5. Getting Started
After having successfully installed Open Rails (see the Installation Manual), to run the game you must double-click on the Open Rails icon on the desktop, or on the OpenRails.exe file.
The OpenRails main window will appear. If you have an MSTS installation in place, this will be displayed as your available installation profile.
If not, then the next Content form is shown where you can download content. This form is described in the next Content chapter.
5.1. Content
Clicking on the Content button makes the Content form popup with the tab Auto Installed open:

Select the route to be installed. This list will be enlarged by the OR team when suitable routes become available. However it is still possible to install routes manually as described in the next chapter.
Install pathandBrowse: Fill in or Browse to the path where the route is to be installed. Each route will be installed in its own subdirectory.Info: Gives more information of the selected route. The default web browser will be started with the information page.Install: Installs the selected route. A popup mentions the directory where the route is to be installed before starting the actual install. Installation profile gets added also.Delete: Delete route with this button. Take care: whole directory including any added and changed files gets deleted.Update: GitHub-based routes can get updated after the install by means of this button. A check for updates is made when clicking this button and updates may be reported at the end of the information webpage. Also GitHub has a watch feature which notifies you of changes by email.
5.2. Installation Profiles
Each profile may be a folder containing one or more routes, or an optional MSTS installation.
In the case where you already have an MSTS installation (see
paragraph Does Open Rails need MSTS to run? for a precise definition of
a MSTS installation) OR should already correctly point to that
installation. To check this, you should initially see under Installation
Profile the string - Default -. Under Route you should see the
name of one of the MSTS routes in your MSTS installation.
You can easily add, remove or move other content profiles and select
among them (e.g. if you have any so-called mini-routes installed.).
For this select the Manually Installed tab on the Content form:

This window allows you to add, remove or modify access to content. Each profile may be a folder containing one or more routes, or an MSTS installation. Profiles located on other drives, or on a USB key, can be added even if they are not always available.
Click on the Add button, and locate the desired installation. ORTS will automatically enter a proposed name in the Route: window that will appear in the Installation set: window on the main menu form. Modify the name if desired, then click OK to add the new path and name to Open Rails.
Please do not store content or any files within the folder containing the Open Rails software. This is because the Updater operates by wiping out the contents of that folder before replacing it with a new updated version. It would be unfriendly for users to lose content that they have stored there, so attempts to add a profile folder stored there are blocked and lead to an error message.
To remove an entry (note that this does not remove the installation itself!) select the entry in the window, and click Delete, then OK to close the window.
To modify an entry, select the route to be changed. Make the necessary changes in the Route and/or Path fields.
The Browse… button can be used to chnage the Path by browsing. Click OK
to close the window and save the changes to OR.
5.3. Updating OR
Four update modes are provided and you can update Open Rails with a single click of a button.
“Stable” is the default and recommended mode.
“Testing” is updated more frequently than the “Stable” mode.
If you follow the Open Rails project on the forums, then you will hear about bug-fixes and new features. These are included in the “Unstable” version for developers and testers to try out. Once they have been checked and approved, they are published (on Fridays) as the latest “Testing” version. Any user can easily update to the current weekly “Testing” version and benefit from these improvements.
New versions are advertised and installed using the Notifications feature.
You can change your current mode using Options > System > Update mode. The fourth mode is “none”, which does not search for a new version.
5.4. Notifications
Notifications are brief messages sent to Open Rails when you launch Open Rails. You can view these by clicking on the notifications icon and stop viewing by toggling the icon again.
Old notifications persist, but when new ones are available, the icon is overlaid with a red indicator showing the number of new notifications. The icons are presented in date order with the latest one first. Step through them by clicking on the arrows:

5.4.1. Static Notifications
A simple notification may be shown in the same way to all users, such as:

Pressing the “Archive” button will launch your default browser to provide extra detail.
5.4.2. Responsive Notifications
Many notifications show differently depending on the user’s installation.
Responsive notifications are used to advise that a new version is available. If a new version is available, then the notification might be shown as:

As before, the button “What’s new” will launch your default browser to provide extra detail. The “Install” button is special and launches a seamless process to download the latest version available and use it to replace the active version.
Once the user has upgraded, the previous message is no longer appropriate and the notification responds to the changes by showing as:

5.4.3. Privacy Note
No information is returned to the Open Rails web server.
5.4.4. Update Mode
There are 4 update modes – Stable, Testing, Unstable and None. More details are available here. Note, however, that previously saved games may not be compatible with newer versions, as described here.
5.4.5. Checking Compatibility
Responsive notifications are also used to check that an update is compatible with your system. For example, you might see useful warnings such as:

5.4.6. Responding to Routes
These notifications can respond to the routes you have installed, so you can be advised of updates to routes you have already installed. For example, you might see:

But this notification would be missing if you don’t already have the route installed.
5.4.7. Responding to Settings
The notifications can also respond to the settings you are using - see Open Rails Options.
In this fictional example, you might see a message encouraging you to try an improved feature:

However, if you have the option turned on already, then the notification is not shown.
5.4.8. Communication Error
If there is a problem with the Internet then the Notifications are replaced by a single prepared notification which gives a reason for the error and a chance to re-try:

5.4.9. Publishing Notifications
The Notifications document explains how to publish notifications and is included in the Documents drop-down.
the release number of the newest release that matches your selected level
of update. Various level of updates called Update Channels are available.
You may choose the desired level in the Options-Update window, described
below.
When you click on the update link OR will download and install the new release. In this way your version of Open Rails is always up to date. Note, however, that previously saved games may not be compatible with newer versions, as described here.
Clicking the link What's new? in the upper centre part of the main menu
window will connect to a website that summarizes the most recent changes
to the OR program.
5.6. Gaming Modes
One of the plus points of Open Rails is the variety of gaming modes you can select.
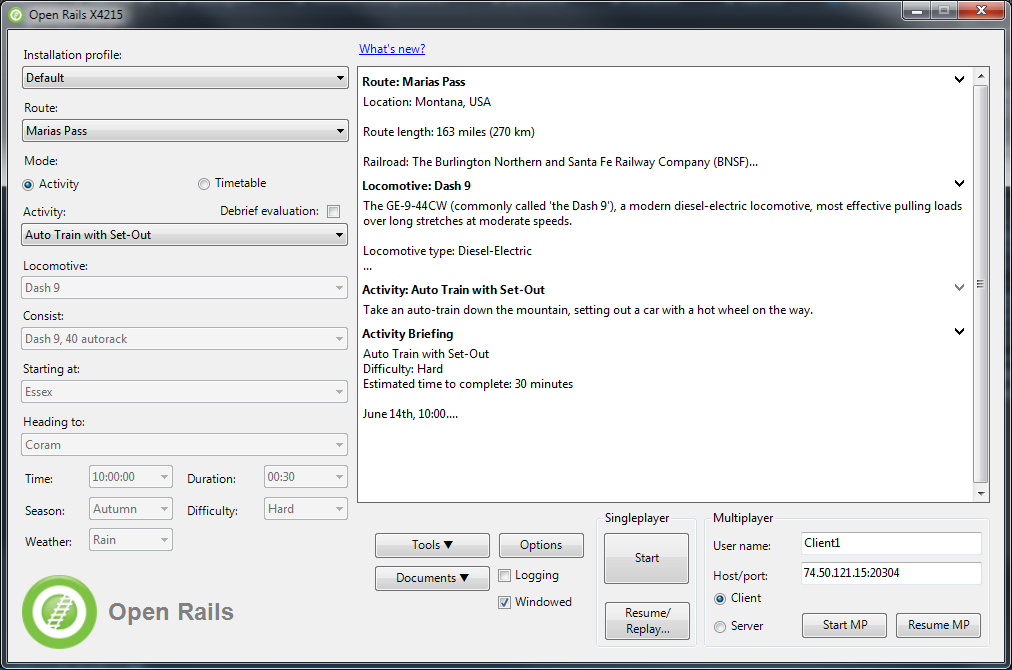
5.6.1. Activity, Explore and Explore with activity modes
As a default you will find the radio button Activity selected in the
start window, as above.
This will allow you to run an activity or run on of two types of explore mode.
If you select - Explore Route - (first entry under Activity:), you will
also have to select the consist, the path, the starting time, the season
and the weather with the relevant buttons.
If you select + Explore in activity mode + (second entry under
Activity:, you will have to select same items as with Explore route, but
in this case the game will automatically generate an activity (with the
player train only) and will execute it. By exploring the route in this mode
you will able to switch to autopilot mode if you like ( see here ) and you will have access to some other activity features
like randomized weather if selected.
To select the consist you have two possibilities: either you click under
Consist:, and the whole list of available consists will appear, or you
first click under Locomotive:, where you can select the desired
locomotive, and then click under Consist:, where only the consists led
by that locomotive will appear.
If you instead select a specific activity, you won’t have to perform any further selections.
5.6.1.1. Activity Evaluation
During the activity session, data about performance is stored and may be viewed as the activity progresses. At the end of the activity a report file is generated which provides a summary of the player’s skills as a train driver.
Activity evaluation is described here.
If you have selected the related Experimental Option, at runtime you can switch Autopilot mode on or off, which allows you to watch OR driving your train, as if you were a trainspotter or a visitor in the cab. Autopilot mode is not available in Explore mode.
5.6.2. Timetable Mode
If you select the radio button Timetable, the main menu window will
change as follows:
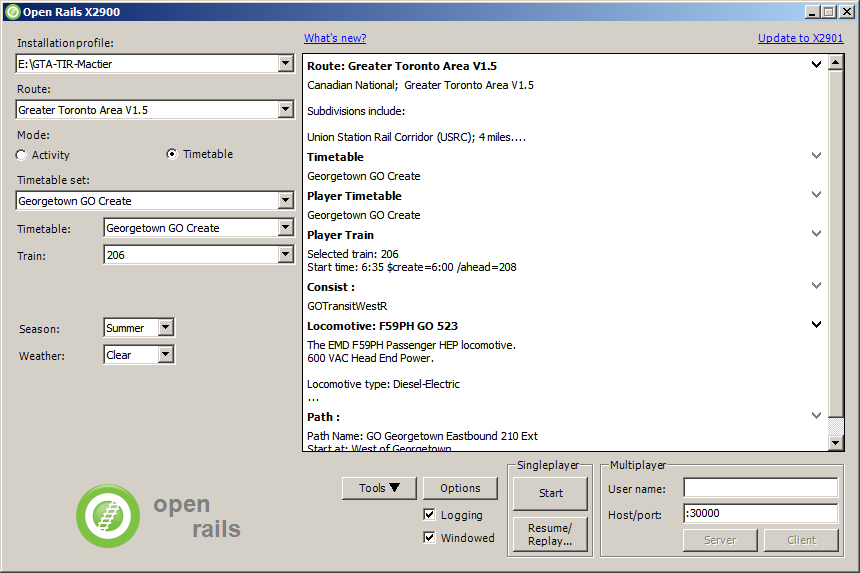
Timetable mode is unique to Open Rails, and is based on a timetable that
is created in a spreadsheet formatted in a predefined way, defining trains
and their timetables, their paths, their consists, some operations to be
done at the end of the train run, and some train synchronization rules.
Timetable mode significantly reduces development time with respect to activities in cases where no specific shunting or train operation is foreseen. The complete description of the timetable mode can be found here.
The spreadsheet has a .csv format, but it must be saved in Unicode format
with the extension .timetable_or in a subdirectory named Openrails
that must be created in the route’s ACTIVITIES directory.
A specific tool (Timetable editor) is available under the “Tools” button to ease generation of timetables.
For the game player, one of the most interesting features of timetable mode is that any one of the trains defined in the timetable can be selected as the player train.
The drop-down window Timetable set: allows you to select a timetable
file from among those found in the route’s Activities/Openrails/ folder.
Now you can select in the drop-down window Train: from all of the trains
of the timetable the train you desire to run as the Player train. Season
and weather can also be selected.
5.6.3. Run
Now, click on Start, and OR will start loading the data needed for your
game. When loading completes you will be within the cab of your
locomotive! You can read further in the chapter Driving a Train.
5.7. Firewall
The game uses a built-in web-server to deliver standard and custom web-pages to any browser - see Web Server.
When the game runs for the first time, the web-server will try to use a port on your PC to serve any browser that you might want to run. The Windows OS will detect this and pop up a prompt to ask permission for this.
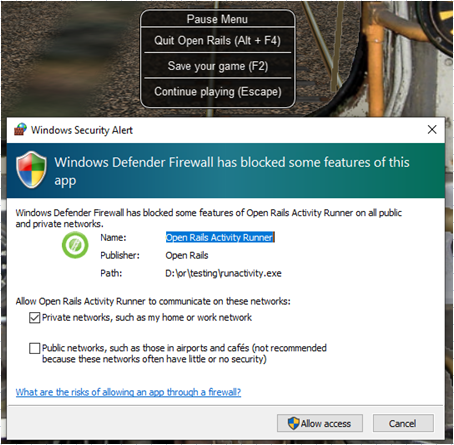
We recommend that you grant permission as a private network even if you don’t plan to use a browser straight away.
5.7.1. Multiplayer Mode
Open Rails also features this exciting game mode: several players, each one on a different computer in a local network or through the Internet, can play together, each driving a train and seeing the trains of the other players, even interacting with them by exchanging wagons, under the supervision of a player that acts as dispatcher. The multiplayer mode is described in detail here.
5.7.2. Replay
This is not a real gaming mode, but it is nevertheless another way to experience OR. After having run a game you can save it and replay it: OR will save all the commands that you gave, and will automatically execute the commands during replay: it’s like you are seeing a video on how you played the game. Replay is described later together with the save and resume functions.