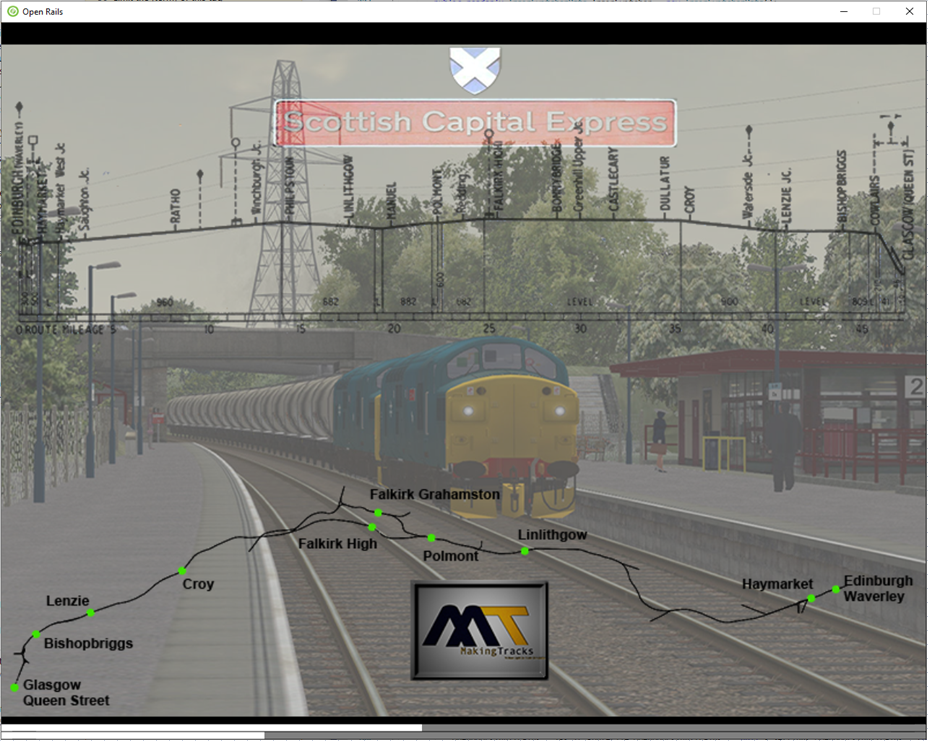
7. Driving a Train
7.1. Game Loading
Once you have pressed Start, Open Rails loads and processes all the
data needed to run the game. During this phase, the route’s splash screen
is shown with an indicator bar at the bottom.
The first time a session is loaded, an animated bar just shows activity. Subsequent loads of that session show the bar growing across the screen to indicate progress.
If a timetable has been selected, then the game also simulates the progress of the timetable from the first train in the timetable up to start time of the player’s train. This is done at high speed, but may still take some time. A second bar appears above the first one to show the progress of this stage.
During loading, if logging
is selected, the log file OpenRailsLog.txt will already begin storing
data.
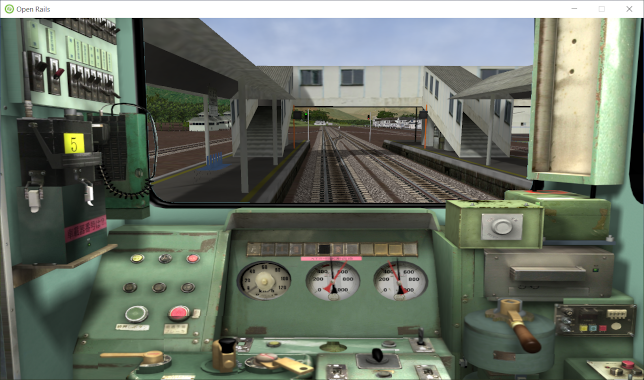
7.2. Entering the Simulation
At the end of the loading phase, you are in the cab of the train you will
drive.(Note: some newer locomotives have 3D cabs - if no cab
interior display appears, then type <Alt+1> to switch between 2D and 3D cabs.)
Depending on the configuration of the activity (in case of activity mode),
your train will be in motion or stopped. To look around in the simulation, you
can select different views using the keyboard, as described in
Changing the View.
7.2.1. Cab Letter-Boxing
OR manages not only cab interiors using 2D images in a MSTS-compatible way, but also supports 3D models. Most 2D cab images follow MSTS practice, being 1024 x 768 pixels to suit monitors with a 4:3 aspect ratio.
So, the problem arises – how to display these 4:3 cabs on a 16:9 or 16:10 monitor?
One possibility is to enlarge these images to fill the width of wider monitors, as shown in the image below.
In doing so, we lose a portion from the top and bottom of the image. You can use the Up and Down Arrow keys to pan and reveal these missing portions.
Instead of enlarging the image, OR can also ‘letterbox’ it by showing the full height and filling the missing space with black bars. You can activate this mode in-game by pressing Ctrl+1.
7.3. Open Rails Driving Controls
Open Rails follows MSTS very closely, providing controls to drive steam, electric and diesel locomotives, both on their own or working together, but also offers additional capabilities.
A very wide range of systems and instruments specified in the ENG and
CVF files is supported.
To control the train, you have at your disposal a set of keyboard commands
that is equivalent to those of MSTS, plus some new ones. You can get a
printable version of the command set as described in paragraph
Keyboard options, or you can press <F1> to
immediately get the scrollable F1 Information Window as shown and
described below.
Alternatively, you can operate the cabview controls by mouse click (buttons) and mouse drag (levers and rotary switches).
7.3.1. Throttle Control
Steam locomotives have a continuous throttle or regulator, but many diesel and electric locomotives have a notched throttle which moves only in steps. To avoid jerks, some of these steps may be smooth, where the power is gradually and automatically adjusted to achieve the setting.
7.3.2. Dynamic Braking
Dynamic braking is the use of the traction motors of a locomotive (electric or diesel-electric) as generators to slow the train. Initially, dynamic braking was applied in mountainous territory where conventional freight-car brakes were prone to overheating on long downgrades. It was also limited to speeds above 10mph. Dynamic braking controls are usually notched.
In OR, the dynamic brake (controlled by the keys <,> and <.>) is
not available unless the throttle is fully closed; similarly the throttle
is not available unless the dynamic brake is fully released (off).
As defined in the CVF file, the tractive and braking forces may be
shown on two different instruments, on one instrument with two needles or
on a single instrument where the braking is shown as a negative value.
7.3.3. Combined Control
Some locomotives are fitted with a combined control where a single lever is used to provide throttle and brake control together, with negative throttle positions used to apply the brake. The brake element may be either dynamic or conventional train brakes.
There may be a delay changing between throttle and brake operation, representing the time required to change the operation of the traction motors from motors to generators.
7.3.4. Blended Dynamic Brake
Some locomotives have blended dynamic brake, which means that the
trainbrake lever also controls the dynamic brake. Currently this is
implemented to be MSTS compatible, the dynamic brake force percentage
follows the train brake pipe pressure (full service/suppression will set
100% dynamic brake). The blending percentage run up/ run down follows the
airbrake application MaxApplicationRate(), and release
rates MaxReleaseRate(), and also respects the dynamic brake delay
setting DynamicBrakesDelayTimeBeforeEngaging() .eng parameters.
Blending can also work if there is no dynamic brake lever configured for
the locomotive. If there is dynamic brake lever defined, then the higher
command will be applied, except if OrtsDynamicBlendingOverride( 1 ) is
added to the Engine() block, which makes the lever override the blending
command, if the dynamic brake lever is not at full release position.
OrtsDynamicBlendingForceMatch( 1 ) parameter can be added to
Engine() block, which makes the dynamic brake system to try to achieve
the same brake force as the airbrake would have (even if the airbrake is
bailed off), in the current train brake lever position. Example: if the
trainbrake has 22 kN brake force at 40% train brake setting, then the
dynamic brake will try to achieve, and maintain 22 kN braking force, instead
of just setting 40% dynamic brake percentage.
For a full list of parameters, see Developing OR Content - Parameters and Tokens
7.3.5. Refill
Diesel and steam locomotives must refill their supplies of fuel
occasionally, perhaps daily, but steam locomotives need water more
frequently and have a range of little more than 100 miles. Use the <T> key
to refill with fuel or water at a fuel or water supply location. Use the
<Y> key to pick up water from a water trough under a moving locomotive.
If the locomotive or tender is alongside the pickup point, e.g. a water tank, then the refilling takes place as the key is held down. If the locomotive is further away, then the distance to the nearest pickup is shown instead.
Note also that the key <Ctrl+T> will provide immediate refill
at any time.
7.3.6. Specific Features to Optimize Locomotive Driving
You are encouraged to read the chapter on Open Rails Physics to optimize your driving capabilities and to achieve a realistic feeling of what happens in a real moving train.
7.3.7. Examples of Driving Controls
For content developers
For continuous throttle, see MSTS model
TRAINS\TRAINSET\ACELA\acela.engFor a notched non-smooth throttle, see
TRAINS\TRAINSET\GP38\gp38.engFor a combined throttle and dynamic brake, see
TRAINS\TRAINSET\DASH9\dash9.engFor a combined throttle and train brake, see
TRAINS\TRAINSET\SERIES7000\series7000.eng
7.4. Driving aids
Open Rails provides a large number of driving aids, which support the player during train operation.
7.4.1. F1 Information Monitor
The F1 key displays the following set of panels in a tabbed format,
selected by clicking with the mouse on the desired heading or
using <Shift+F1> to step through the tabs:
Key Commands: displays the actions of the keyboard keys

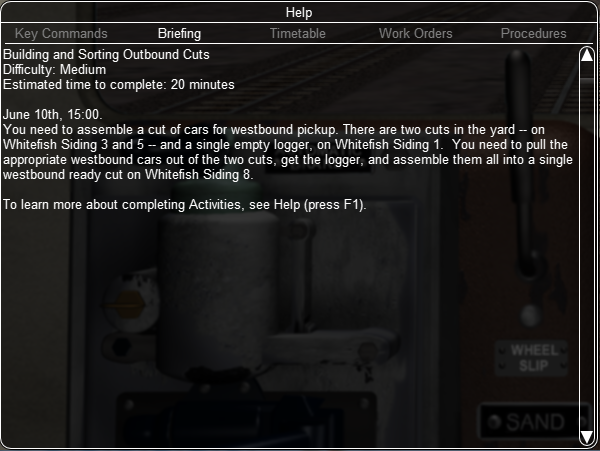
Briefing: displays what the activity or timetable creator has entered as information
to be provided to the player:
Timetable: shows the list of the station stops, if any, with scheduled
and actual times of arrival and departure. During the activity the actual
performance will be shown on the F10 Activity Monitor.
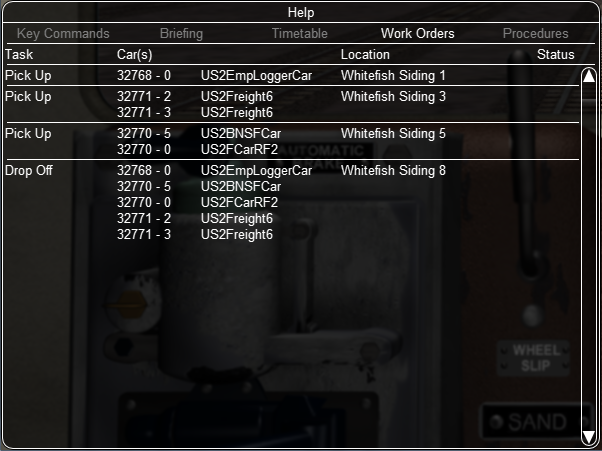
Work Orders: if defined by the activity or timetable creator, lists the coupling and
uncoupling operations to be performed. When an operation has been
completed, the string Done appears in the last column:
Procedures: basic instructions for driving trains in Open Rails.
Train Info: information about the player train.

7.4.2. F3
This key is not currently used.
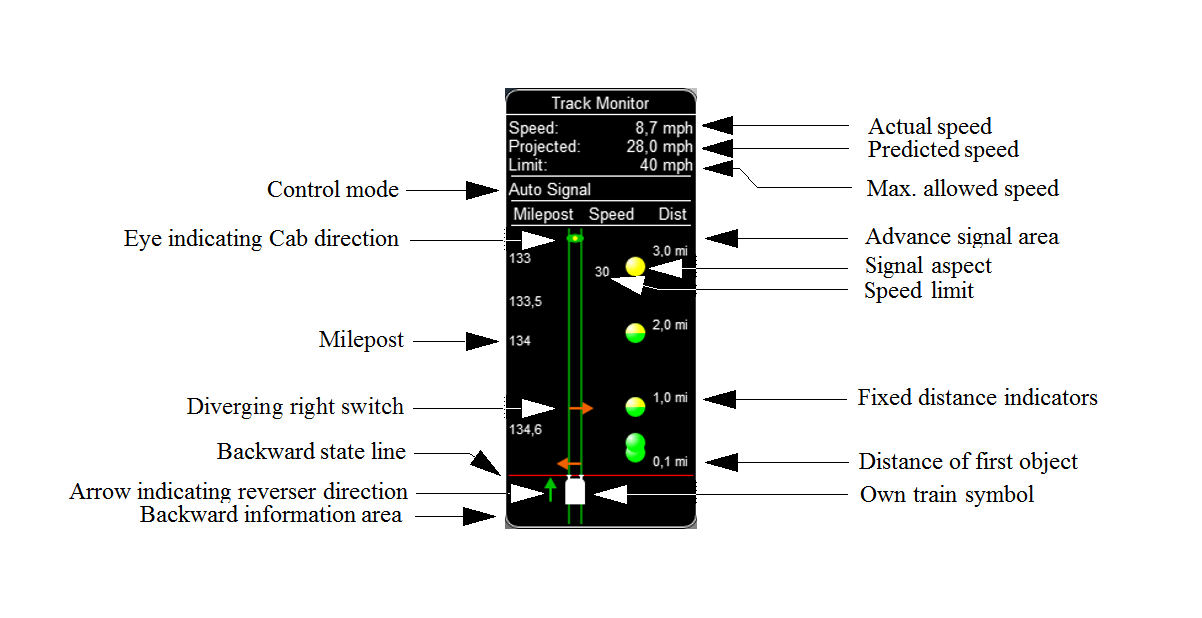
7.4.3. F4 Track Monitor
This window, which is displayed by pressing F4, has two different layouts
according the the train’s control mode:
Auto Signal mode, Manual mode or Explorer mode.
(It is strongly suggested to follow the link and read the related paragraph.)
Auto Signal or Auto mode is the default mode when running
activities or timetables.
There are however two main cases where you must switch to Manual mode
by pressing <Ctrl+M>:
when the activity requires shunting without a predefined path
when the train runs out of control due to SPAD (Signal Passed At Danger or passing a red signal) or exits the predefined path by error. If such situations occur you will usually get an emergency stop. To reset the emergency stop and then move to correct the error, you must first switch to
Manualmode.
To switch to manual mode press <Ctrl+M>. In timetable mode you must
first stop the train to pass to manual mode.
You can return to auto mode by pressing <Ctrl+M> again when the
head of the train is again on the correct path, with no SPAD situation.
In standard situations you can also return to auto mode while the train
is moving. Details are described in the paragraph of the link shown above.
Track Monitor display in Auto Signal mode:
Track Monitor display in Manual mode / Explorer mode:
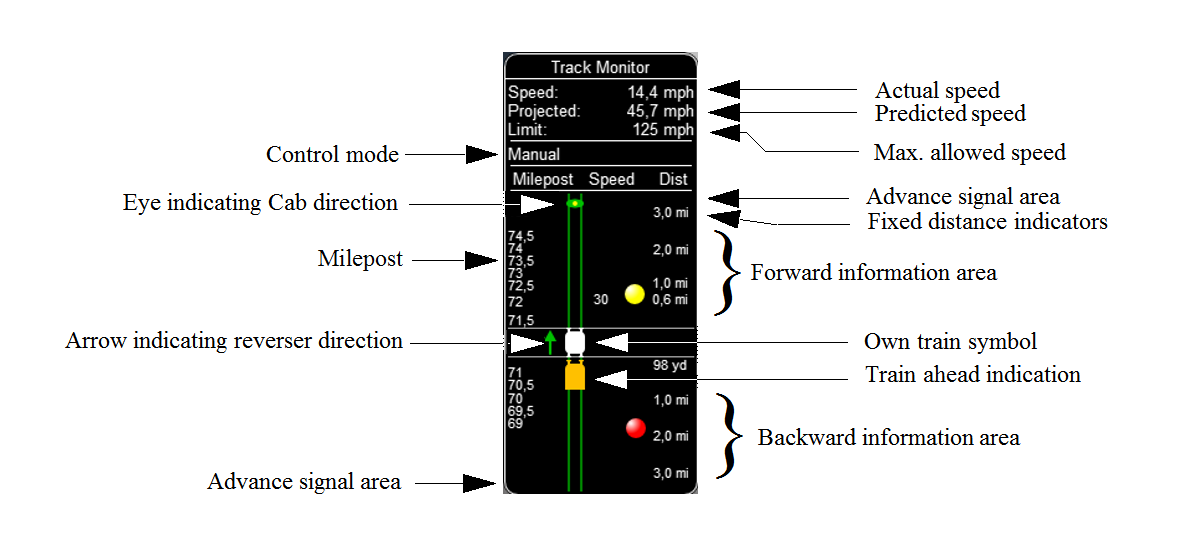
Track Monitor: Displayed Symbols (common for Auto and Manual mode unless indicated otherwise) :

Notes on the Track Monitor:
Distance value is displayed for first object only, and only when within distance of the first fixed marker. Distance is not shown for next station stop.
When no signal is within the normal display distance but a signal is found at a further distance, the signal aspect is displayed in the advance signal area. The distance to this signal is also shown. This only applies to signals, not to speedposts.
For Auto mode:
If the train is moving forward, the line separating the Backward information area is shown in red, and no Backward information is shown.
If the train is moving backward, the separation line is shown in white, and Backward information is shown if available.
For reversal points, see here.
For Manual mode:
If the train is on its defined path (and toggling back to Auto control is possible), the own train symbol is shown in white, otherwise it is shown in red.
The colour of the track-lines is an indication of the train’s speed compared to the maximum allowed speed:
Dark green: low speed, well below allowed maximum
Light green: optimal speed, just below maximum
Orange: slight overspeed but within safety margin
Dark red: serious overspeed, danger of derailment or crashing
Note that the placement of the display objects with respect to the distance offset is indicative only. If multiple objects are placed at short intermediate distances, the offset in the display is increased such that the texts do not overlap. As a result, only the first object is always shown at the correct position, all other objects are as close to their position as allowed by other objects closer to the train.
Pressing <Shift+F4> toggles the Track Monitor’s immersive mode. In this
mode, the window conceals upcoming signal aspects and upcoming signal speed
limits and does not display upcoming diverging switches. However, it retains
the locations of signals, mileposts, permanent speed limits, sidings, and
stations. This level of assistance reflects the route knowledge that a train
driver could be expected to know by memory.
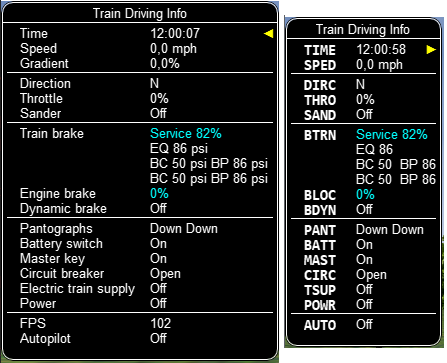
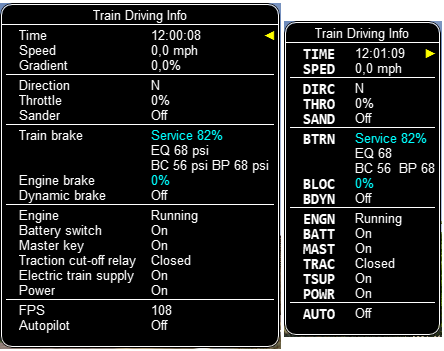
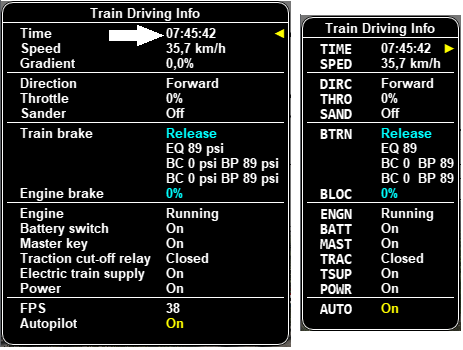
7.4.4. F5 Train Driving Info
By pressing <F5> you get some important data displayed in a dedicated window.
Pressing <Shift+F5> toggles between the full and the abbreviated text mode.
You may also switch mode by clicking on the yellow arrow symbol.
The default mode is full text.
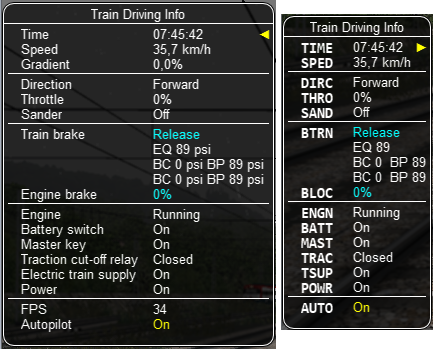
The window displays data appropriate to each type of locomotive as follows.
The Steam locomotive:

The Steam locomotive using manual firing and AI Fireman:
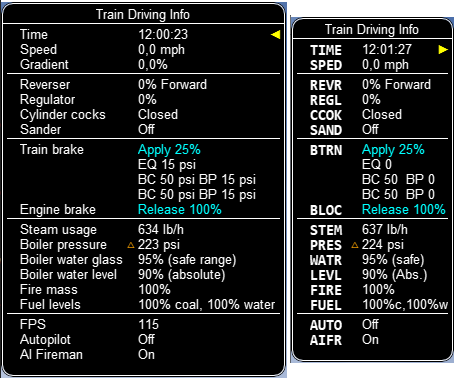
Boiler pressure indicator:

The Electric locomotive:
The Diesel locomotive:
To help the user with ageing eyesight, the Time value is clickable as indicated by the white arrow below. This action toggles between Regular and Bold font styles. The style of font used in this window is also applied to the Multiplayer Info window if it’s open.
Ordered by: |
Locomotive |
Ordered by: |
||
|---|---|---|---|---|
Field names |
Abbreviations |
Type |
Abbreviations |
Field names |
AI Fireman |
AIFR |
Steam |
AIFR |
AI Fireman |
Autopilot |
AUTO |
All |
AUTO |
Autopilot |
Battery switch |
BATT |
Diesel and Electric |
BATT |
Battery switch |
Boiler pressure |
PRES |
Steam |
BDYN |
Dynamic brake |
Boiler water glass |
WATR |
Steam |
BLOC |
Engine brake |
Boiler water level |
LEVL |
Steam |
BTRN |
Train brake |
Circuit breaker |
CIRC |
Electric |
CCOK |
Cylinder cocks |
Cylinder cocks |
CCOK |
Steam |
CIRC |
Circuit breaker |
DerailCoeff |
DRLC |
All |
DIRC |
Direction |
Direction |
DIRC |
All |
DOOR |
Doors open |
Doors open |
DOOR |
All |
DRLC |
DerailCoeff |
Dynamic brake |
BDYN |
Diesel and Electric |
ENGN |
Engine |
Electric train supply |
TSUP |
Diesel and Electric |
FIRE |
Fire mass |
Engine |
ENGN |
Diesel |
FPS |
FPS |
Engine brake |
BLOC |
All |
FUEL |
Fuel levels |
Fire mass |
FIRE |
Steam |
GEAR |
Fixed gear |
Fixed gear |
GEAR |
Steam |
GEAR |
Gear |
FPS |
FPS |
All |
GRAD |
Gradient |
Fuel levels |
FUEL |
Steam |
GRAT |
Grate limit |
Gear |
GEAR |
Diesel |
LEVL |
Boiler water level |
Gradient |
GRAD |
All |
MAST |
Master key |
Grate limit |
GRAT |
Steam |
PANT |
Pantographs |
Master key |
MAST |
Diesel and Electric |
POWR |
Power |
Pantographs |
PANT |
Electric |
PRES |
Boiler pressure |
Power |
POWR |
Electric |
REGL |
Regulator |
Regulator |
REGL |
Steam |
RETN |
Retainers |
Replay |
RPLY |
All |
REVR |
Reverser |
Retainers |
RETN |
If set on all cars |
RPLY |
Replay |
Reverser |
REVR |
Steam |
SAND |
Sander |
Sander |
SAND |
All |
SPED |
Speed |
Speed |
SPED |
All |
STEM |
Steam usage |
Steam usage |
STEM |
Steam |
THRO |
Throttle |
Throttle |
THRO |
Diesel and Electric |
TIME |
Time |
Time |
TIME |
All |
TRAC |
Traction cut-off relay |
Traction cut-off relay |
TRAC |
Diesel |
TSUP |
Electric train supply |
Train brake |
BTRN |
All |
WATR |
Boiler water glass |
Wheel |
WHEL |
All |
WHEL |
Wheel |
7.4.5. F6 Siding and Platform Names
Hit the <F6> key to reveal labels naming the siding and platforms.
Hit it again to hide them.
Items more distant will show more faded and platforms disappear altogether if more than 1km away from the user; sidings disappear if more than 0.5km away.
Use <Shift+F6> to cycle through platforms only (in yellow), sidings only (in orange), and both together.
If the user is in Activity Mode or Timetable Mode, then a 4th step is added to the cycle and this step removes any labels not relevant to the activity or timetable.
7.4.6. F7 Train Names
Hitting the <F7> key displays train service names (player train always
has Player as identification).
Hitting <Shift+F7> displays the rolling stock IDs.
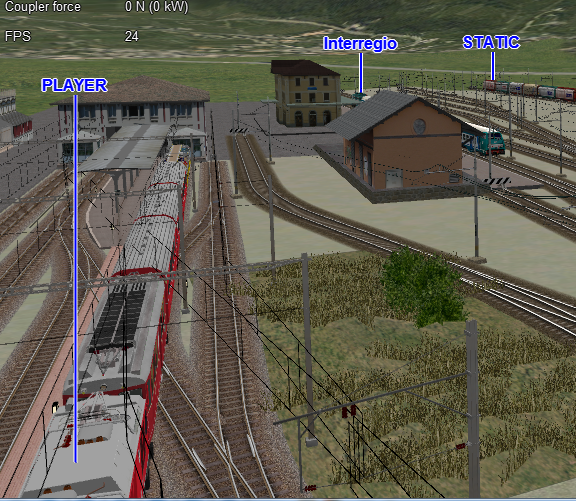
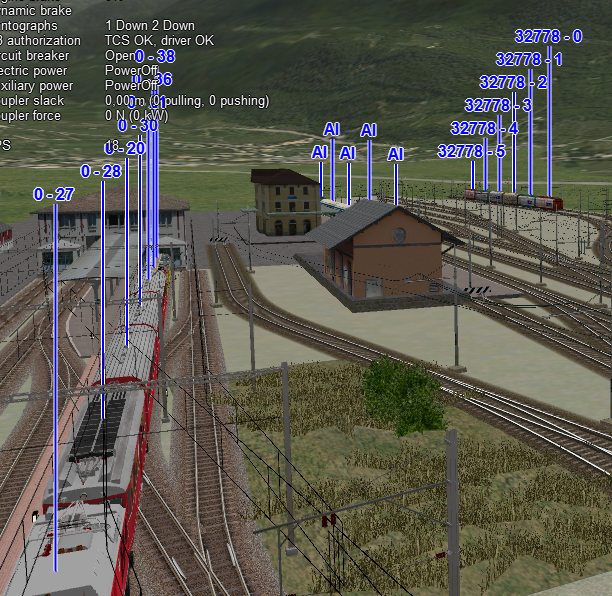
In a multiplayer session, player-controlled trains will have the id specified by the player:
7.4.7. Alt-F7 Train Forces
Pressing <Alt+F7> opens the Train Forces window.
It shows the forces along the player’s train in bar-graph form.
The window is sized to fit the train (graph), with a minimum size for short trains,
and a maximum size for very long trains.
Scrolling may be required to see the end of the train, or the end of the text line.

The train is shown as a white line; locomotives are shown in blue. The front of the train is to the left.
7.4.7.1. Coupler Force
Shows the length-wise pull or push force at each coupling, as a colored bar graph. Up (positive) is pull, down (negative) is push. The scale is determined by the weakest coupler in the train. The steps are non-linear, to provide more sensitivity near the breaking point.
Note: Because the graph is scaled by the weakest car, a red bar may not mean that the coupler will break. When the car has a higher coupler strength, it can tolerate higher forces than the weakest car.
7.4.7.2. Derail Force
Shows the sideway push or pull at the wheels as a colored bar graph. Up (positive) is pull to the inside (stringline), down (negative) is push to the outside (jackknife). The scale is determined by the car with the lowest axle-load (lowest vertical force). The steps are non-linear, to provide more sensitivity near the derailing point. But this is less effective for lateral forces, as the force is proportional to the curve radius, which changes in discrete steps (MSTS legacy).
Note: Because the graph is scaled by the most susceptible car, a red bar may not mean that the car will derail. When the car has a higher vertical force, it can tolerate higher lateral forces than the most susceptible car.
7.4.7.3. Brake Force
Shows the braking force of each car as a bar graph. The scale is determined by the car with the smallest brake force (generally lowest weight). The steps are non-linear, to provide more sensitivity near the small brake applications. As the weight (and thus brake force varies greatly between cars (and especially engines), the graph can be quite jagged, even though all brake cylinders have the same pressure. Locomotives will show a full bar long before the brakes are fully applied.
Dynamic braking is shown in blue (unless there also is a greater force from the air-brakes).
7.4.7.4. Text Line
The text line at the bottom shows the following information.
Max Coupler: The current maximum coupler force within the train, and the car (count from front, including locomotives) where the maximum force is.
Max Derail: The current maximum derail force within the train, and the car (count from front, including locomotives) where the maximum force is.
Low Coupler: The lowest coupler strength within the train.
Low Derail: The lowest derail force within the train. This is an estimate, based on the vertical force. Dynamic factors also affect the force needed to derail.
It may be necessary to scroll to see the rightmost parts of the line.
7.4.8. F8 Switch Monitor
Use the Switch Monitor, enabled by the F8 key, to see the direction of the turnout directly in front and behind the train.

There are 4 ways to change the direction:
Click on the turnout icon in the Switch Monitor;
Press the G key (or, for the turnout behind the train, the
<Shift+G>key);Hold down the Alt key and use the left mouse button to click on the switch in the Main Window;
Use the dispatcher window.
Please note that with the last two methods you can throw any switch, not only the one in front but also the one behind the train.
However, note also that not all switches can be thrown: in some cases the built-in AI dispatcher holds the switch in a state to allow trains (especially AI trains) to follow their predefined path.
The arrow and eye symbols have the same meaning as in the track monitor. The switch is red when it is reserved or occupied by the train, and green when it is free.
A switch shown in green can be operated, a switch shown in red is locked.
7.4.9. Ctrl-Alt-F9 Train Operations Monitor
The Open Rails Train Operations window is similar in function to the F9 window in MSTS, but includes additional features to control the air brake connections of individual cars. For example, it is possible to control the connection of the air brake hoses between individual cars, to uncouple cars without losing the air pressure in the train’s air brake hose, or uncouple cars with their air brakes released so that they will coast.
The unit which the player has selected as the unit from which to control the train, i.e. the lead unit, is shown in red.
Cars are numbered according to their UiD in the Consist file (.con) or UiD in the Activity file (.act). Scrolling is accomplished by clicking on the arrows at the left or right bottom corners of the window.
Clicking on the coupler icon between any two cars uncouples the consist at that point.
You can also uncouple cars from your player train by pressing the
<U> key and clicking with the mouse on the couplers in the main window.
By clicking on any car in the above window, the Car Operation Menu appears. By clicking in this menu it is possible:
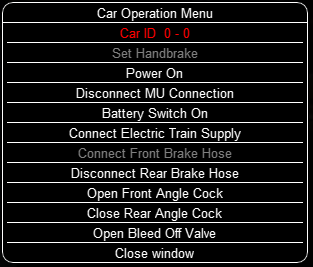
to apply and release the handbrake of the car;
to power on or power off the car (if it is a locomotive). This applies for both electric and diesel locomotives;
to connect or disconnect locomotive operation with that of the player locomotive;
enable or disable the battery switch;
to connect or disconnect the Electric Train Supply;
to connect or disconnect the car’s brake hoses from the rest of the consist;
to open or close the angle cocks on the air hoses at either end of the car;
to open or close the bleed valve on the car to vent the air pressure from the car’s reservoir and release the air brakes to move the car without brakes (e.g. humping, etc.).
Grayed out choices are not applicable for the chosen car.
By toggling the angle cocks on individual cars it is possible to close
selected angle cocks of the air hoses so that when the cars are uncoupled,
the air pressure in the remaining consist (and optionally in the uncoupled
consist) is maintained. The remaining consist will then not go into
Emergency state.
When working with cars in a switch yard, cars can be coupled, moved and
uncoupled without connecting them to the train’s air braking system (see
the Alt+F5 HUD for Braking). Braking must then be
provided by the locomotive’s independent brakes. A car or group of cars
can be uncoupled with air brakes active so that they can be recoupled
after a short time without recharging the entire brake line (Bottling
the Air). To do this, close the angle cocks on both ends of the car or
group before uncoupling. Cars uncoupled while the consist is moving, that
have had their air pressure reduced to zero before uncoupling, will coast
freely.
In Open Rails, opening the bleed valve on a car or group of cars performs
two functions: it vents the air pressure from the brake system of the
selected cars, and also bypasses the air system around the cars if they are
not at the end of the consist so that the rest of the consist remains
connected to the main system. In real systems the bypass action is
performed by a separate valve in each car. In the
Alt+F5 HUD for Braking display, the text Bleed
appears on the car’s display line until the air pressure has fallen to zero.
More information about manipulating the brakes during coupling and uncoupling can also be found here.
7.4.10. F9 Train Car Operations Monitor
This Train Operations window provides a vertical view of the entire train:

This window shows the whole train in vertical mode. Any car can be selected by clicking on the Car ID. Two arrows will then appear pointing to the selected car.
By clicking on the selected Car Id the “Train Operations Viewer” window will be displayed:

From the “Train Operations Viewer” window, we can set all the available systems, as in the “Car Operation Menu”:
FrontBrakeHose
FrontAngleCock
CouplerFront
CouplerRear
RearAngleCock
RearBrakeHose
HandBrake
BleedOffValve
ToggleElectricTrainSupplyCable
ToggleMU
TogglePower
ToggleBatterySwitch
This is where all the symbols are placed:

The red cross on the handbrake symbol (or another), indicates that it is not available.
Any changes made in this window will also appear in the “Train Car Operations” window:

After a change in the braking system that keeps the train stopped, the Car ID changes to a cyan colour. In this way, it is easy for the user, to find out which car is stopping the train.
A click on the right arrow hides all non-system brake symbols, inside the “Train Car Operations” window:

To make the text bold, click the left arrow:

While the “Train Operations Viewer” window is visible, we can modify the “Train Car Operations” window, but if we open the “Train Operations” window <Alt+Shift+F9> and click on any Car ID, the “Car Operation Menu” will appear and it will point to the Car ID which was previously selected in the “Train Operations Viewer” window. The “Car Operations Menu” is updated from the “Train Operations Viewer” window. A click on the Car ID in the “Train Operations Viewer” will close the window.
If the train is very long and not all the cars are displayed in the “Train Car Operations” window, we can scroll by clicking on the white down arrow (vertical scroll bar) at the bottom right. Once the required car has been selected, it will remain visible on the last row:

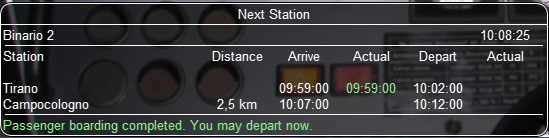
7.4.11. F10 Activity Monitor
The Activity Monitor is similar in function to MSTS. It records the
required Arrival time of your train and the actual arrival time as well
as the required Depart time and the actual departure time.
A text message alerts the engineer as to the proper departure time along with a whistle or other departure sound.
7.4.12. Compass Window
Open Rails software displays a compass that provides a heading based on the camera’s direction together with its latitude and longitude.
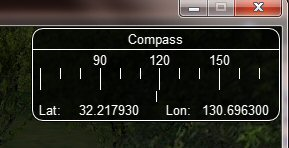
To activate the compass window press the <0> key. To deactivate the
compass window, press the <0> key a second time.
7.4.13. Odometer
The odometer display appears in the centre of the main window, toggled on
or off by the keys <Shift+Z>. The direction of the count is toggled
by the keys <Shift+Ctrl+Z>, and the odometer is reset or
initialized by <Ctrl+Z>.
When set for counting down, it initializes to the total length of the train. As the train moves, the odometer counts down, reaching zero when the train has moved its length. When set for counting up, it resets to zero, and measures the train’s total movement.
For example, if the odometer is set for counting down and you click Ctrl+Z as the front of the train passes a location, then when it reaches zero you will know, without switching views, that the other end of the train has just reached the same point, e.g. the entrance to a siding, etc.
The odometer can be accessed also through cabview controls, if they are defined within the cabview, see here.
7.4.14. Activity Evaluation
7.4.14.1. Description
This feature displays a real-time evaluation of the player’s performance during the activity run and a final report at the end of an activity. The evaluation reports various parameters to provide to the player info in order to improve his train driving ability. While the activity is running, relevant data are stored and displayed. The stored data is used to generate a report at the end of the activity.
7.4.14.2. How It Works
Activity evaluation is enabled only for Activity mode. Checking some checkboxes within the various option tabs of the main menu provides additional parameters for the activity evaluation.
Here an example about the Options/General tab:
and here an example about the Options/Simulation tab:
Checkboxes shown as unchecked in the two above pictures may be checked or unchecked, but don’t have any effect on activity evaluation.
A tab named “Evaluation” is present on the F1 Help Information Monitor. Once the activity is running it displays dynamic information about the player train performance up to that moment.
Clicking Actual status: (↓ ) shows an expanded real-time display.
Clicking Actual status: (↑ ) collapses all items.
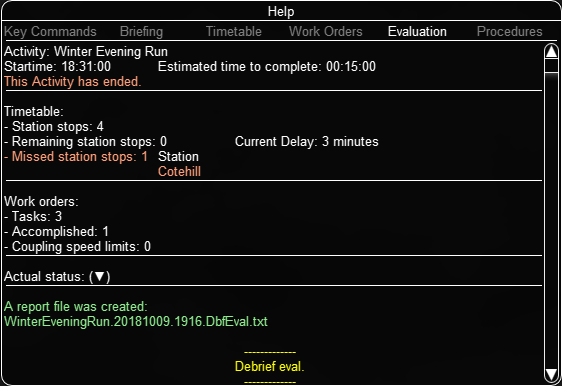
Once the activity has ended, as soon as the player views the Evaluation tab, a report file is created and shown in an editor window as follows.
This report is made up of several sections.
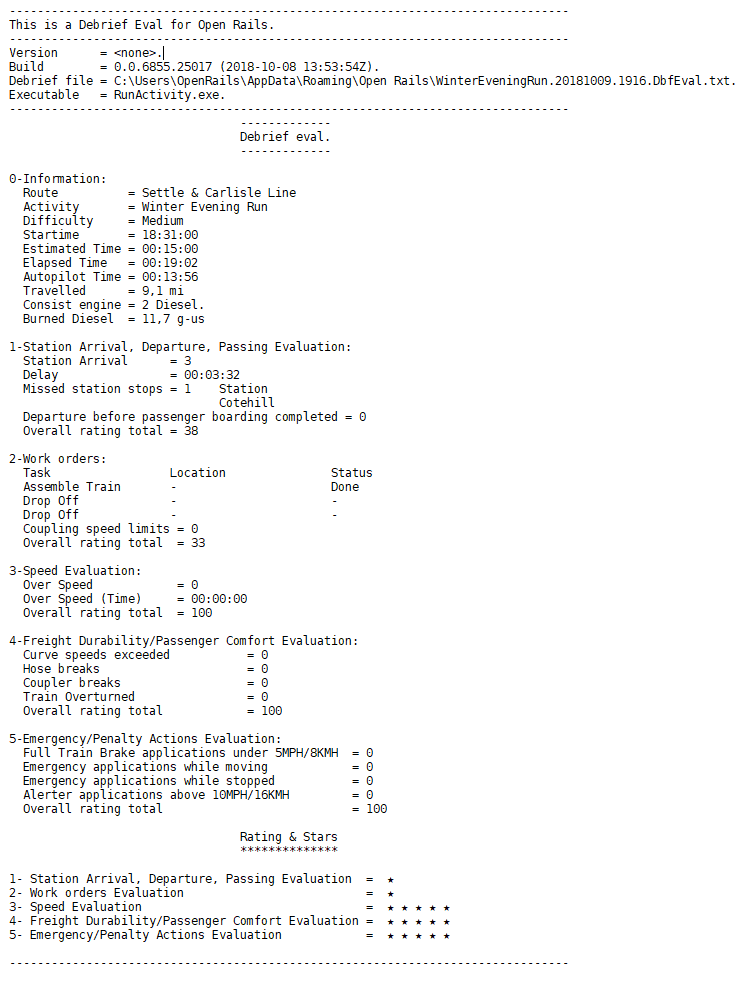
The report file OpenRailsEvaluation.txt is saved alongside the log file OpenRailsLog.txt and the default location for this is the Windows Desktop.
The Save Game (F2) command also copies any evaluation report alongside the save files so it can be kept and reviewed. This copy is deleted when the other files for that save are deleted.
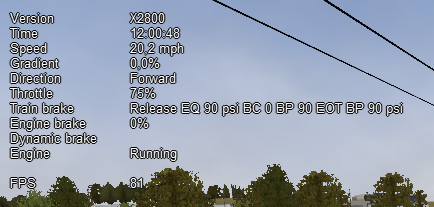
7.4.15. Basic Head Up Display (HUD)
By pressing <Alt+F5> you get some important data displayed at the top left
of the display in the so-called Head Up Display (HUD). If you want the HUD
to disappear, press <Alt+F5> again.
The HUD has 6 different pages. The basic page is shown at game start. To
sequentially switch to the other pages press <Shift+Alt+F5>. After having
cycled through all of the extended HUD pages, the basic page is displayed
again.
The basic page shows fundamental information. The other pages go into more detail, and are used mainly for debugging or to get deeper information on how OR behaves. They are listed in the Analysis tools subchapter.
The following information is displayed in the basic display:
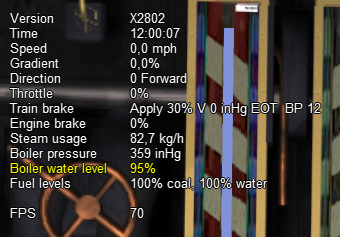
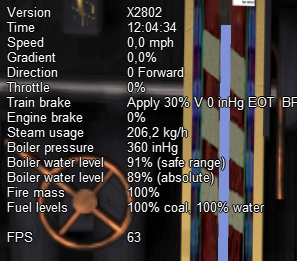
Version = The version of the Open Rails software you are running
Time = Game time of the Activity
Speed = the speed in Miles/Hr. or Kilometers/Hr.
Gradient = Route gradient in % in that point
Direction = Position of the Reverser - Electric, Diesel and Steam.
Throttle = Displays the current position of the throttle, expressed as a percentage of full throttle. Throttle correctly uses Notches and configured % of power for Diesel engines or % of throttle for steam engines.
Train Brake = Shows the current position of the train brake system and the pressure value of the train brakes. Braking correctly reflects the braking system used; hold/release, self-lapping or graduated release. The Train brake HUD line has two Brake Reservoir pressure numbers: the first is the Equalization Reservoir (EQ) and the second is the Brake Cylinder (BC) pressure. The two BP numbers report the brake pressure in the lead engine and in the last car of the train. Additionally, the brake flow is shown, which measures the rate of air flowing into the brake pipe during release and recharge. The unit of measure used for brake pressure is defined by the option Pressure unit.
Engine Brake = percentage of independent engine brake. Not fully releasing the engine brake will affect train brake pressures.
Dynamic brake = if engaged, shows % of dynamic brake
Engine = shows the running status of the engine. In case of a gear-based engine, after the
Engineline aGearline appears displaying the actual gear.Nmeans no gear inserted.FPS = Number of frames rendered per second
When applicable, an additional line indicationg whether Autopilot is active or not will be shown.
An example of the basic HUD for Diesel locomotives:
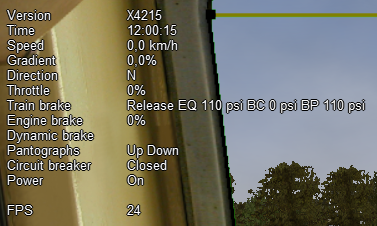
7.4.16. Electric Locomotives – Additional information
For electric locomotives information about the pantograph state is also shown, as well as info about the circuit breaker state and whether the locomotive has power (at least one pantograph raised and circuit breaker closed) or not.
7.4.17. Steam Engine – Additional Information
When using a steam engine the following additional information is displayed in the HUD:
Steam Usage in lbs/h, based on entirely new physics code developed by the Open Rails team. It is calculated by parsing the .eng file for the following parameters: number of cylinders; cylinder stroke; cylinder diameter; boiler volume; maximum boiler pressure; maximum boiler output; exhaust limit; and basic steam usage.
Boiler pressure.
Water level.
Levels of coal and water in %.
An example of the basic HUD for Steam locomotives:
For a full list of parameters, see Developing OR Content - Parameters and Tokens
The default firing setting is automatic fireman.
If manual firing is engaged with <Ctrl+F>, then additional information
is included:
7.4.18. Multiplayer – Additional Information
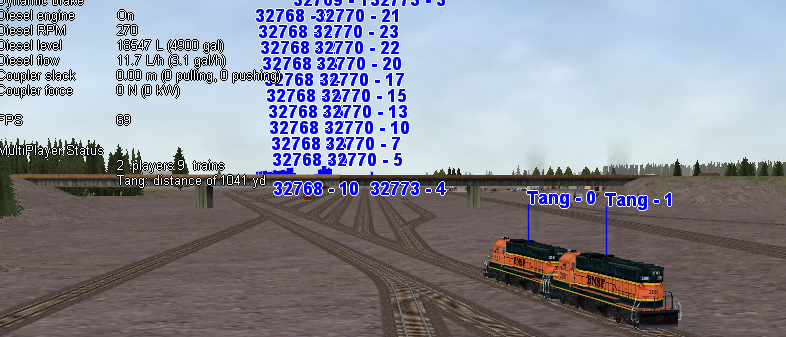
If a multiplayer session is active, the following additional information is shown: the actual status of the player (dispatcher, helper or client), the number of players connected and the list of trains with their distances from the train of the player viewing the computer.
7.5. Map Window
Use the map window to monitor and control train operation.
The map window is opened and closed from the graphics window by pressing <Ctrl+9>.
You can toggle between the graphics window and an opened map window by pressing <Alt+Tab>.
The map window contains 2 tabs: Dispatcher and Timetable. Both provide maps of the route with each train following its own path.
The map window is resizable and can also be maximized, e.g. on a second display.
To pan, use the left mouse button to drag the map around.
To zoom, use left and right mouse buttons together and drag vertically or use the mouse wheel.
To zoom in centred on a location, press Shift and click the left mouse button at that location.
To zoom out from a location, press Alt and click the left mouse button.
To zoom out fully, press Ctrl and click the left mouse button.
7.5.1. Dispatcher Tab
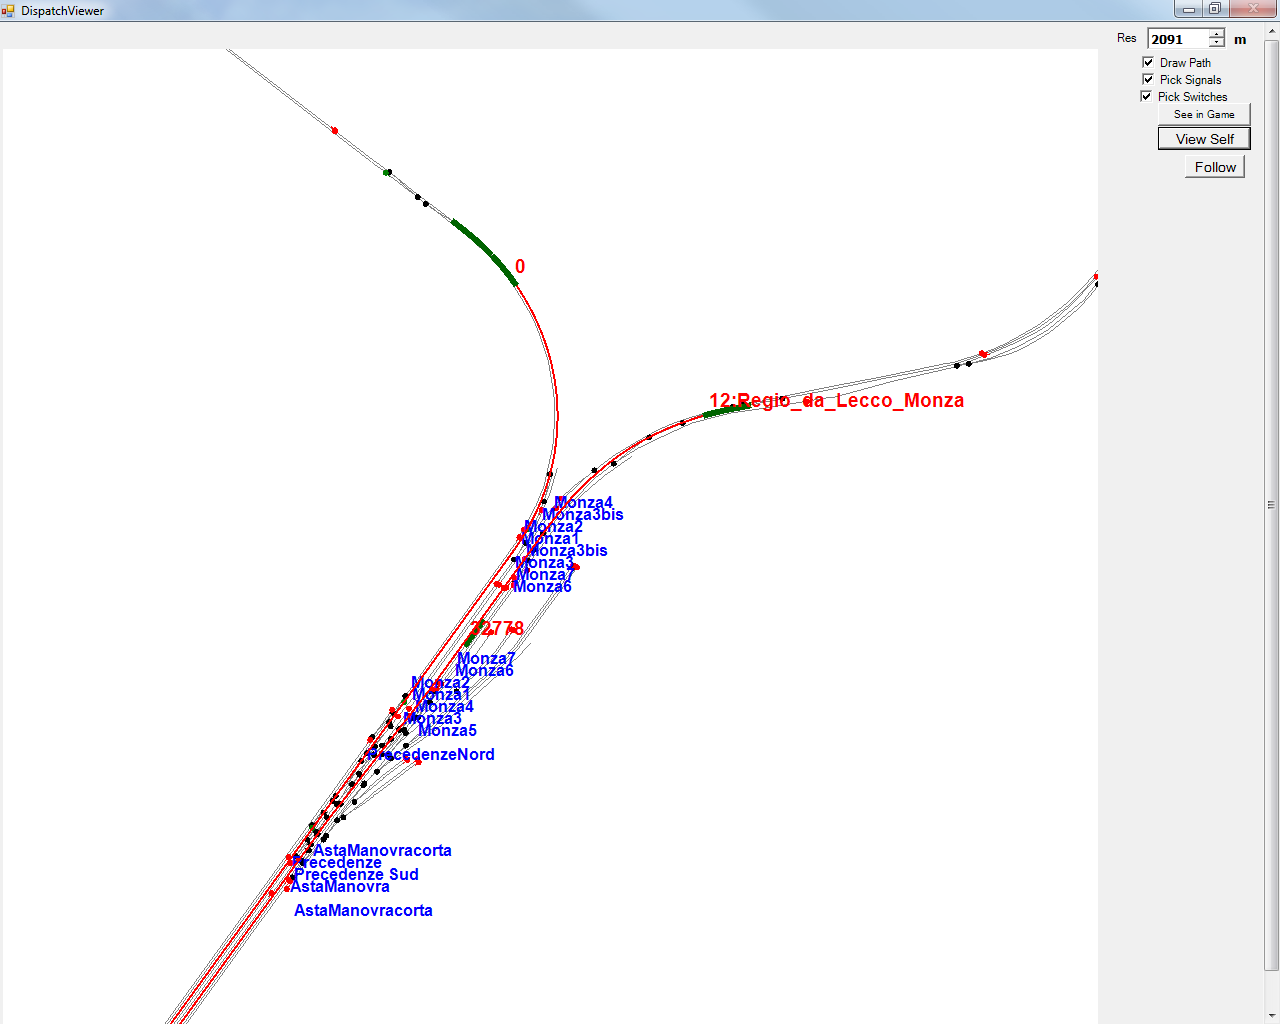
The dispatcher window shows the route layout, monitors the movement of
all trains and allows you to change switches and signals.
While the player train is identified by the 0 label,
AI trains are identified by an Id number (as shown in the Extended HUD for Dispatcher
Information), followed by the service name.
Static consists are identified as in MSTS.
The state of the signals is shown (only three states are drawn), that is
Stop– drawn in redClear_2– drawn in greenwhile all signals with restricting aspect are drawn in yellow.
The state of the switches is also shown. A switch shown with a black dot indicates the main route, while a grey dot indicates a side route.
When the Draw path is checked, the first part of the path that the
train will follow is drawn in red. If a trailing switch in the path is not
in the correct position for the path, a red X is shown on it.
When left- or right-clicking on a signal, a pop-up menu appears:
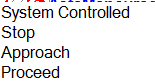
Using the mouse, you can force the signal to Stop, Approach or Proceed. Later you can return it to System Controlled mode.
For signals using the TrainHasCallOn functions as described
here, an additional option labeled
Enable CallOn will appear in the pop-up menu. The use of this
function allows a train to enter into an occupied platform if the
dispatcher allows so.
By left- or right-clicking on a switch, a small pop-up menu with the two
selections Main route and Side route appears. By clicking on them
you can throw the switch, provided the OR AI dispatcher allows it.
Using the dispatcher window for AI trains is described here below.
The two checkboxes Pick Signals and Pick Switches are checked as
default. You can uncheck one of them when a signal and a switch are
superimposed in a way that it is difficult to select the desired item.
You can click a switch (or signal) in the dispatcher window and press
<Ctrl+Alt+G> to jump to that switch with the free-roam (8-key)
camera.
If you click on View Self the dispatcher window will center on the
player train. However, if the train moves, centering will be lost.
You can select a train by left-clicking with the mouse its green
reproduction in the dispatcher window, approximately half way between the
train’s head and its name string. The train body becomes red. Then if you
click on the button See in game the main Open Rails window will show
this train in the views for the 2, 3, 4 or 6 keys, (and the 5-key view if
available for this train). Display of the new train may require some time
for OR to compute the new image if the train is far away from the previous
camera view.
Take into account that continuous switching from train to train, especially if the trains are far away, can lead to memory overflows.
If after a train selection you click on Follow the dispatcher window
will remain centered on that train.
7.5.1.1. Using dispatcher tab for AI trains
What is described here is valid only for activity mode and explore in activity mode.
There are cases where it would be advisable to re-route an AI train to manage standoffs, train passings, train priorities. In this case, using the dispatcher window it is possible to re-route an AI train (e.g. on a siding) and then to get it back on the original route. The feature anyhow also allows to re-route it without getting it back on the original route.
It is suggested to look at this video which explains some practical case https://youtu.be/-f0XVg7bSgU before continuing reading.
To perform this correctly and in a way closer to reality, some rules have to be followed. The concept is that switches must be manually thrown only if they aren’t reserved by a train. To be sure of this it is necessary to force to stop the last signal(s) between train(s) and switch, in case such signal is not already at stop. Once the switch is manually thrown, the signal in front of the train that has to be re-routed must be set to the “System controlled” state if it had been forced to stop before. At that point OR breaks down the old train’s route and re-computes a new one, taking into account the moved switch. More switches may be forced on the route (e.g. both the switches to enter the siding and the ones to re-enter the main line).
Signals must never be forced to clear or approach.
If an AI train is re-routed on a route which isn’t at the moment re-entering the original route, its path information in the dispatcher info HUD is displayed in yellow.
Station platform stops are re-assigned to adjacent platforms, if available. Events and waiting points in the abandoned part of route will be lost.
The re-routed train may be also the player train (be it autopiloted or not).
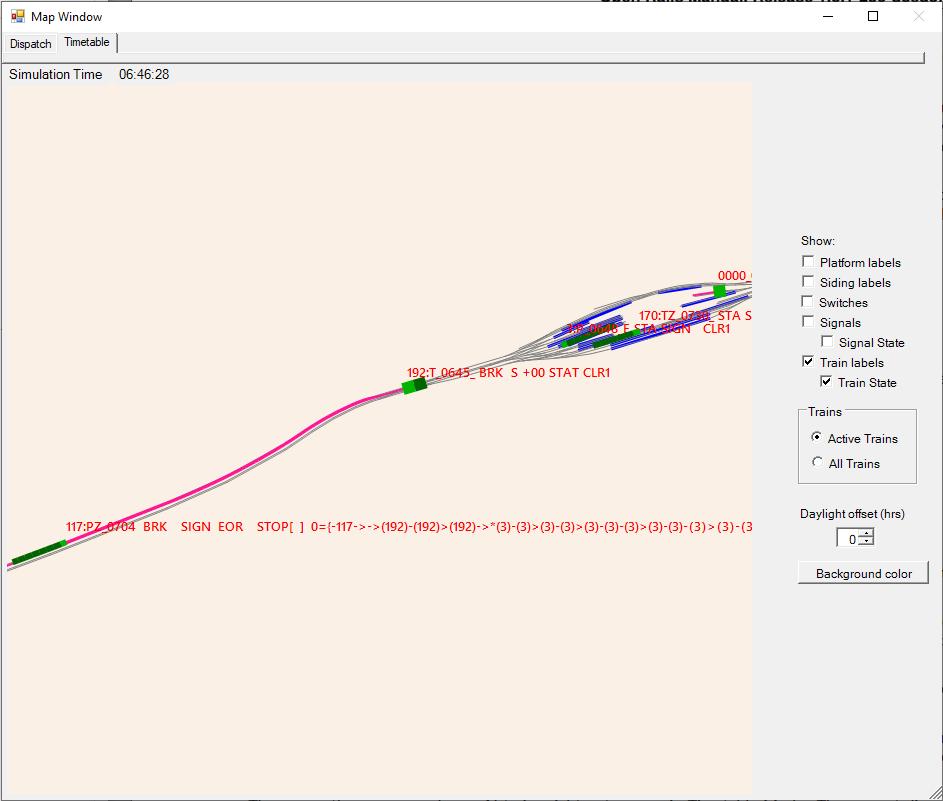
7.5.2. Timetable Tab
This tab shows the same route and trains as the dispatch tab but, with its focus on a timetable of trains, is provided to assist timetable builders.
In this tab, for clarity, you can use the checkboxes to hide or reveal the labels for platforms, sidings, switches, signals and trains. The simulation time is also on view.
As shown below, the basic red train label identifies the train.
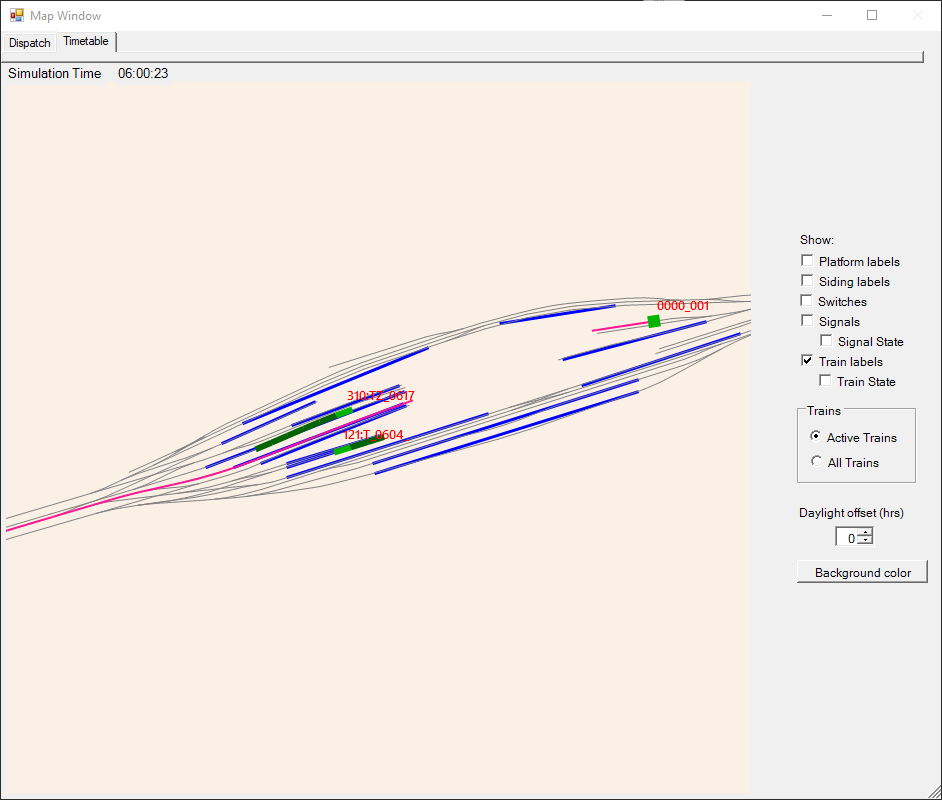
Trains are drawn in green except that locos are drawn in brown. To indicate direction, the leading vehicle is draw in a lighter shade.
The “Active trains” selection shows trains that are currently delivering a service. The “All trains” selection also shows inactive and static trains with labels in dark red.
Inactive trains are not part of a current service - i.e. their start time has not been reached or they have arrived at their destination and not yet been re-formed for another service - see #dispose commands.
Static trains do not move and are shown in gray. They created with the $static command.
When you select the “Train state” checkbox, the train labels extend to provide key information matching that from the HUD as shown below:
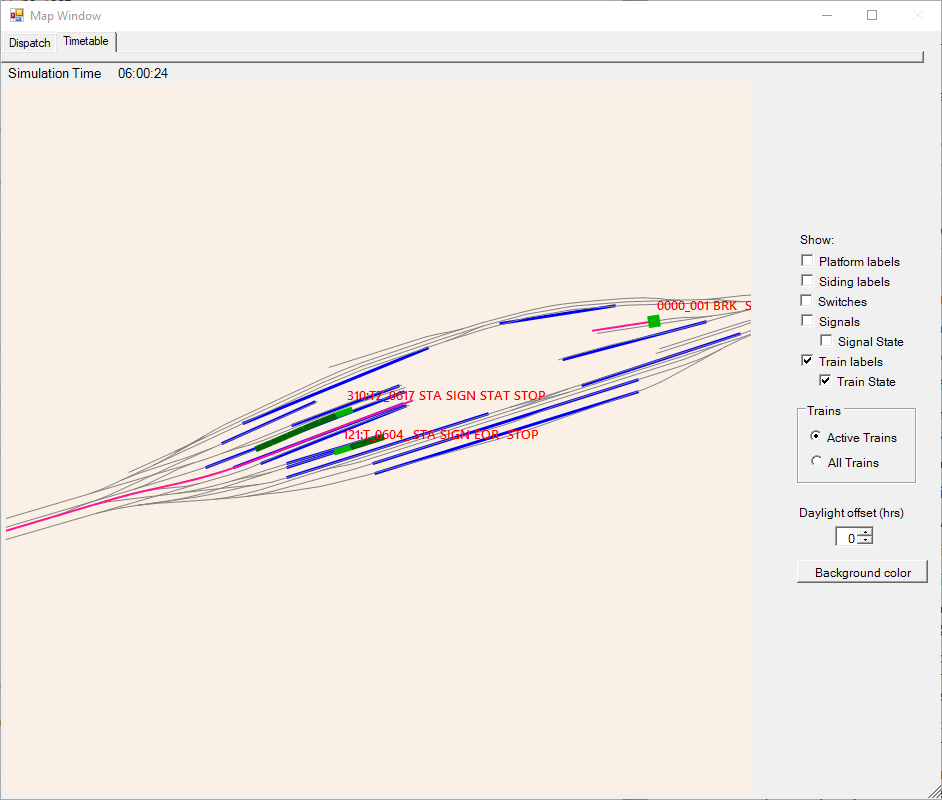
The path element of the train state can be very lengthy, so this is only shown where the path contains the characters # & * ^ ~ which indicate a track section that is in contention.
In the image below, train 192 crosses the path of train 117.
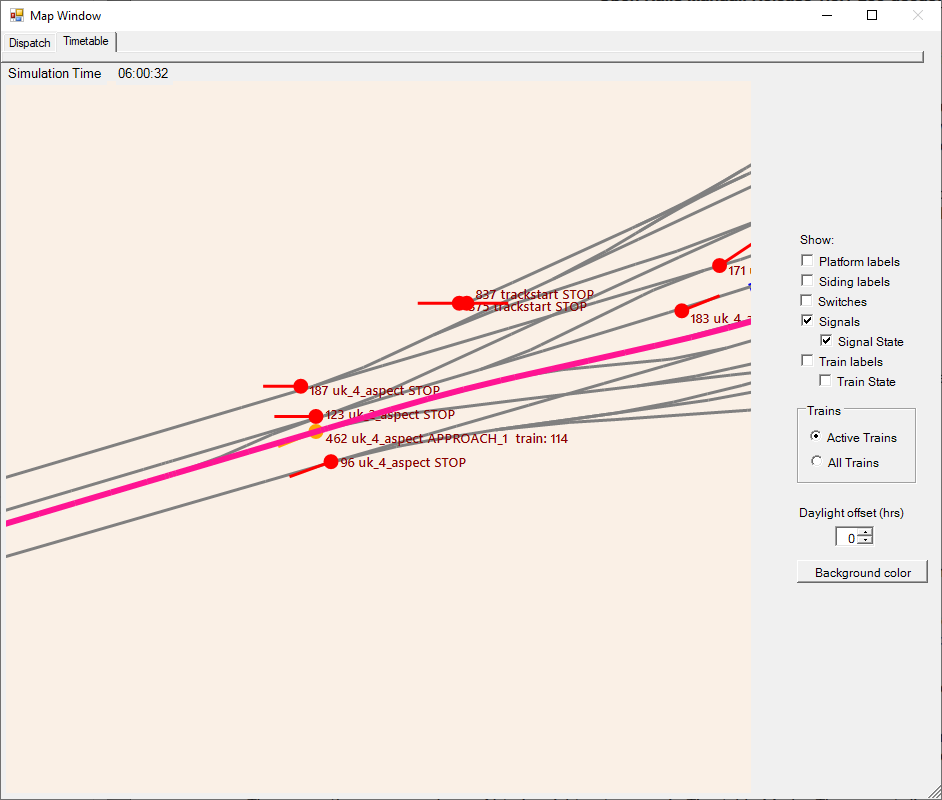
The “Signal state” checkbox reveals the aspect of each signals and also indicates the id number of the train that is approaching. In this image, signal 462 is showing an APPROACH_1 aspect for train 114.
An adjustment for “Daylight offset (hrs)” is provided for convenience to advance the sun as it moves
across the sky so that night time trains can be more easily observed in daylight.
Use <Alt+Shift+=> to increase the offset and <Alt+Shift+-> to decrease it.
7.6. Additional Train Operation Commands
OR supports an interesting range of additional train operation commands. Some significant ones are described here.
7.6.1. Diesel Power On/Off
With the key <Shift+Y> the player diesel engine is alternately
powered on or off. At game start the engine is powered on.
With the key <Ctrl+Y> the helper diesel locomotives are alternately
powered on or off. At game start the engines are powered on.
Note that by using the Car Operation Menu you can also power on or off the helper locomotives individually.
7.6.2. Initialize Brakes
Entering this command fully releases the train brakes. Usually the train must be fully stopped for this to be allowed. This action is usually not prototypical. Check the keyboard assignment for the keys to be pressed. The command can be useful in three cases:
A good number of locomotives do not have correct values for some brake parameters in the .eng file; MSTS ignores these; however OR uses all these parameters, and it may not allow the brakes to release fully. Of course, it would be more advisable to correct these parameters.
It may happen that the player does not want to wait for the time needed to recharge the brakes; however the use of the command in this case is not prototypical of course.
The player may wish to immediately connect brake lines and recharge brakes after a coupling operation; again, the use of the command is not prototypical.
Note that this command does not work if the Emergency Brake button has been pressed – the button must be pressed again to cancel the emergency brake condition.
For a full list of parameters, see Developing OR Content - Parameters and Tokens
7.6.3. Connect/Disconnect Brake Hoses
This command should be used after coupling or decoupling. As the code used depends on keyboard layout, check the keys to be pressed as described in keyboard options or by pressing F1 at runtime. More information on connecting brakes and manipulating the brake hose connections can be found here and here.
7.6.4. Doors, Mirror and Windows Commands
Note that these commands are active only if the trainset is equipped with the related animations.
Command |
Function |
|---|---|
|
Door left open/close |
|
Door right open/close |
|
Mirror rotate clock/counterclockwise |
|
Window left open/close |
|
Window right open/close |
Note that the standard keys for doors and mirror in OR are different from those of MSTS.
7.6.5. Wheelslip Reset
With the keys <Ctrl+X> you get an immediate wheelslip reset.
7.6.6. Toggle Advanced Adhesion
Advanced adhesion can be enabled or disabled by pressing <Ctrl+Alt+X>.
7.6.7. Request to Clear Signal
When the player train has a red signal in front or behind it, it is
sometimes necessary to ask for authorization to pass the signal. This can
be done by pressing <Tab> for a signal in front and <Shift+Tab>
for a signal behind. You will receive a voice message reporting if you
received authorization or not. On the Track monitor window the signal
colours will change from red to red/white if permission is granted.
7.6.8. Change Cab
All locomotives and some passenger cars have a forward-facing cab which is
configured through an entry in the ENG file. For example, the MSTS Dash9
file TRAINSET\DASH9\dash9.eng contains the entry:
CabView ( dash9.cvf )
Where a vehicle has a cab at both ends, the ENG file may also contain an entry for a reversed cab:
CabView ( dash9_rv.cvf )
OR will recognise the suffix _rv as a rear-facing cab and make it
available as follows.
When double-heading, banking or driving multiple passenger units (DMUs and EMUs), your train will contain more than one cab and OR allows you to move between cabs to drive the train from a different position. If you change to a rear-facing cab, then you will be driving the train in the opposite direction.
If there are many cabs in your train, pressing <Ctrl+E> moves you
through all forward and rear-facing cabs in order up to the last cab in
the train. If you end up in a rear-facing cab, your new forward direction
will be your old backward direction. So you will now drive the train
in the opposite direction.
A safety interlock prevents you from changing cabs unless the train is stationary and the direction lever is in neutral with the throttle closed.
7.6.9. Train Oscillation
You can have train cars oscillating (swaying) by hitting <Ctrl+V>; if
you want more oscillation, click <Ctrl+V> again. Four levels,
including the no-oscillation level, are available by repeating <Ctrl+V>.
7.6.10. Manual emergency braking release
In some cases where the emergency braking is triggered by the simulator, it is possible to release
the emergency braking by pressing <Shift+Backspace>.
The cases where the reset is allowed are:
Signal passed at danger
Trailed misaligned switch
7.7. Engaging a turntable or a transfertable
Turntable and transfertable operation is possible in explore mode, activity mode and timetable mode.
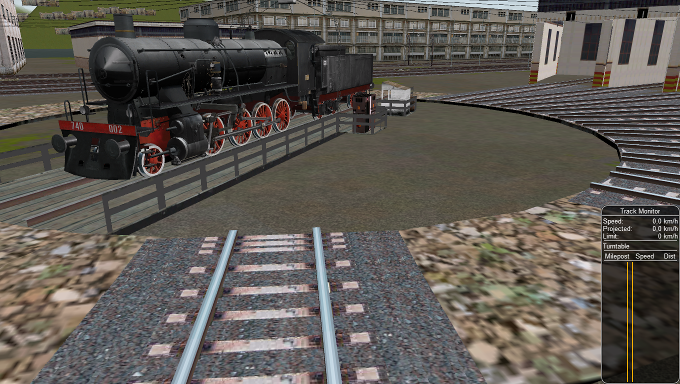
A turntable or transfertable can be moved by the player only if it is viewed by him on the screen.
If more than one turntable or transfertable is on view, the nearest one can be moved.
The trainset (or trainsets) to be rotated or translated must be completely on the turntable
or transfertable to start
rotation. Messages of type “Train front on turntable” and “train rear on turntable”
help stating that the train is fully on the rotating or transferring bridge.
Before starting rotating or translating the train must be fully stopped, with reverser in neutral
position and zeroed throttle. Moreover, if in activity or timetable mode, the player
must first pass to manual mode pressing <Ctrl+M>.
At this point you can rotate the turntable clockwise (or move the trasfertable to the right of
its origin) with keys <Alt+C>, and counterclockwise (or move the trasfertable to the
left of
its origin) with keys <Ctrl+C>. You must keep the keys pressed to continue
rotation or translation . When the first of the two rails of the rotating or translating
bridge is between the two
rails where you want to stop, release the keys. Rotation or translation will continue up to
perfect
alignment. If necessary exit from manual mode (if you are again on a path in activity
mode) and move the loco out of the turntable or transfertable.
During rotation the train is in Turntable state (this can be seen in the
Track Monitor).
It is also possible to rotate or translate standalone wagons. They have to be pushed or pulled to the turntable or transfertable, the locomotive must exit the turntable or transfertable and the wagon can be rotated or translated. It is suggested to read also this paragraph to better understand what is possible with turntables and transfertables.
7.8. Loading and Unloading Containers
Provided that the wagons and the container cranes in the route fulfill the rules indicated here, containers can be unloaded and loaded on wagons at locations where a container crane is present.
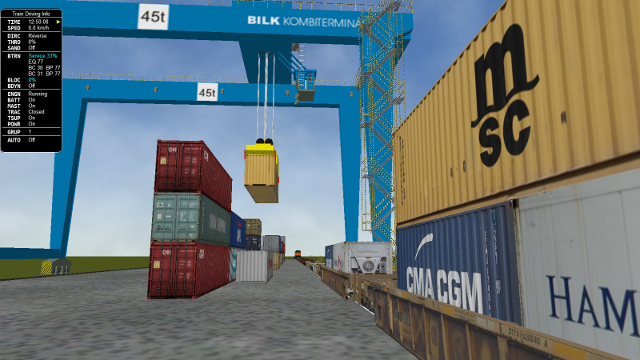
The loading and unloading operations are started by the player, by pressing the key <T>
for loading, and the key <Shift-T> . The operation is performed on the first wagon
(starting from the locomotive) which is within the container crane displacement range and which
fulfills the required conditions (e.g. loading space available for loading, container present
for unloading). So, if a train has only empty wagons and the locomotive is within the container
crane displacement range, the first wagon is loaded first, then the second and so on up to the
last wagon within the crane displacement range. At that point, if there are further
wagons to be loaded, the train must be moved forward so that a new group of wagons is within
the crane displacement range, and Load operations can be resumed.
Every keypress loads or unloads a single wagon.
In some cases it can occur that during a load operation the crane stops motion and the following
message appears on the display: "Wagon out of range: move wagon towards crane by {0} metres";
this occurs when the wagon is at the boundary of the crane displacement range; the player must
move the wagon towards the inside of the crane displacement range and stop the train. The crane
will then continue its loading mission up to the end.
Saves (key <F2>) are rejected and a message appears on the display when a loading
or unloading operation is ongoing.
7.9. Autopilot Mode
Through this feature it is possible to stay in the cab of the player train, but to let Open Rails move the train, respecting path, signals, speeds and station stops.
It is possible to switch the player train between autopilot mode and player driven mode at run time.
Autopilot mode is not a simulation of a train running with cruise control; instead, it is primarily a way to test activities more easily and quickly; but it can also be used to run an activity (or part of it, as it is possible to turn autopilot mode on or off at runtime) as a trainspotter or a visitor within the cab.
Autopilot mode is available in activity, timetable and explore in activity mode (i.e. not in explorer mode).
When starting the game with any activity, you are in player driving mode. If you press Alt+A, you enter the autopilot mode: you are in the loco’s cabview with the train moving autonomously accordingly to path and station stops and of course respecting speed limits and signals. You still have control over the horn, bell, lights, doors, and some other controls that do not affect train movement. The main levers are controlled by the autopilot mode, and indications are correct.
You can at any moment switch back to player driven mode by pressing
<Alt+A>, and can again switch to autopilot mode by again pressing
<Alt+A>.
When in player driven mode you can also change cab or direction. However, if you return to autopilot mode, you must be on the train’s path; other cases are not managed. When in player driven mode you can also switch to manual, but before returning to autopilot mode you must first return to auto mode.
Station stops, waiting points and reverse points are synchronized as far as possible in the two modes.
In activity mode cars can also be uncoupled in autopilot mode (but check that the train will stop in enough time, otherwise it is better to change to player driven mode). A static consist can also be coupled in autopilot mode.
The Request to Clear signal (<Tab> key) works in the sense that the
signal opens. However in autopilot mode at the moment that the train stops
you must switch to player driven mode to pass the signal and then you can
return to autopilot mode.
Note that if you run with Advanced Adhesion enabled, you may have wheelslip when switching from autopilot mode to player driven mode.
The jerky movements of the levers in autopilot mode are the result of the way that OR pilots the train.
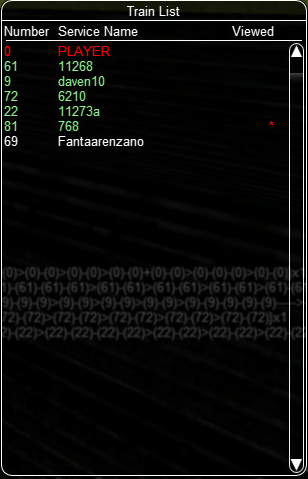
7.10. Changing the Train Driven by the Player
7.10.1. General
This function works in activity mode as well as in timetable mode, and allows the player to select another (existing) train from a list and to start driving it.
This function can be called more than once. A new information window has
been created to support this function: the Train List window (opened
with Alt+F9). It contains a list of all of the AI trains and of the static
trains equipped with a locomotive with cab, plus the player train.
Here an example of an initial situation:
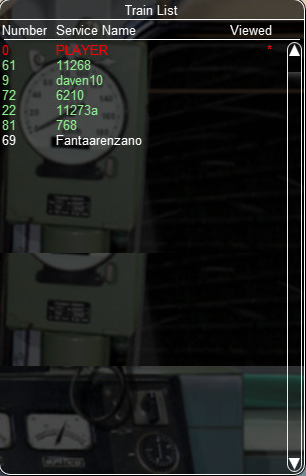
The current player train is shown in red. The star at the end of the line indicates that the cameras (cab camera is managed differently) are currently linked to that train.
AI trains whose loco(s) have at least a cab are shown in green. They are eligible for player train switching.
Static trains with loco and cab are shown in yellow.
Other AI trains are shown in white.
By left-clicking in the list for the first time on an AI train, the cameras
become linked to that train. A red star appears at the end of the line.
This is partially equivalent to clicking on <Alt+9>, but in this
method the desired train is immediately selected and may become the player
train.
Here is the intermediate situation:
By left-clicking a second time on the AI train (usually when it has completely appeared on the screen - if it is far away from the player train this can require several seconds to load the world around the train) the switch of control occurs.
The AI train string now becomes red and is moved to the first position. In timetable mode the new player train is automatically set to autopilot mode, while this does not apply to activity mode. However in both timetable and activity mode the player can switch forth and back to autopilot mode. The former player train becomes an AI train.
Here is the final situation:
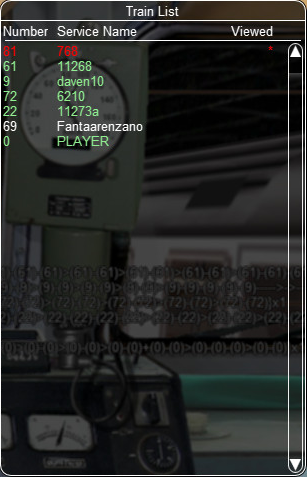
In activity mode only, if the second left-click was performed with the Shift key down, the former player train still becomes an AI train, but it is put in a suspended mode (only if its speed is 0). It won’t move until it becomes a player train again. A suspended train is shown in orange color on the Train List window.
The new player train can can be switched to manual mode, can also request to
pass signals at danger with the <Tab> command, and can be moved outside
of its original path. However before switching control to still another train,
the new player train must be returned to the original path or put in suspend
mode (last is possible only in activity mode); or else it will disappear,
as occurs for AI trains running outside their
path.
The sequence may be restarted to switch to a new train or to switch back to the initial player train.
Train switching also works in activity mode together with multiplayer mode, in the sense that the dispatcher player can switch its played train, and the related information is sent to the client players.
7.10.2. Switching to a static train (only activity mode)
In the Train List window the drivable static consists (that is the ones that have at least an engine provided with a cab) are also listed (in yellow color).
To ease recognition static consists are named STATIC plus the ID number as present in the .act file (e.g. STATIC - 32768).
The procedure to select a static consist in order to drive it is similar to that used to drive another non-static train train: with the first click on the static consist line in the Train List window the camera (if there wasn’t the Cab camera active) moves to the static consist. With the second click the game enters into the cab of the static consist. If the second click occurs with the Shift key pressed, the old player train goes into a suspended state (else it enters autopilot mode, autonomously moving itself along its path).
The static consist becomes a standard train without a path - a pathless train. It runs in manual mode, and so it can be managed with all the thrills and frills available for manual mode. Signals can be cleared in the dispatcher window or alternatively requests for permission can be issued, switches can be moved, direction can be changed, cars can be coupled and uncoupled. If the train goes out of control (e.g. because of SPAD), CTRL+M has to be pressed first to exit emergency braking.
With stopped pathless train, if a new player train is selected in the Train List window, the pathless train returns to being a STATIC consist.
The pathless train can also couple to another train (e.g. an AI train or the initial player train). The coupled train becomes incorporated into the pathless train, but now more possibilities are available:
The pathless train incorporating the AI train continues to be driven as a pathless train; later on the run it could uncouple the incorporated train, which would continue autonomously if it is still on its path.
By clicking once on the incorporated AI train line in the Train List window it is the pathless train that becomes absorbed into the AI train, which now can operate on its path in autopilot mode or in player driven mode.
Once the pathless train has coupled to the AI train, an uncouple operation can be performed with the F9 window (between any couple of cars). The pathless train can be driven further (with modified composition) and also the AI train can run further, provided both retain at least one locomotive.
7.10.3. Waiting point considerations
A waiting point icon showing a hand has been added for the Track Monitor, that is shown when WPs (waiting points) for new player trains are met in the path. This because the player should know that his train (when run as AI train) would stop at a point for a certain time. The WP is red when approaching it. When the train stops at it, it becomes yellow, and disappears when the time to depart is reached. When the new player train is run in autopilot mode, the train automatically stops for the required time at the WP.
If the activity foresees that the new player train has to execute an Extended AI Shunting function, OR allows this function to be executed. When the train runs in autopilot mode such functions are executed automatically; when it runs in player driven mode, the player must act to uncouple cars; in this case pop-up messages based on the activity events window appear to help the player.
Care has been taken when the player is driving a train that was foreseen to disappear due to an Extended AI Shunting function, as e.g. when it merges into another train or when it is part of a join-and-split function and is incorporated within another train. In these cases, when the coupling occurs, the player is automatically moved to the train that remains alive.
7.11. Changing the View
Open Rails provides all of the MSTS views plus additional view options:
A 3D interior cabview option (where a 3D cabview file is available);
Control of the view direction using the mouse (with the right-hand button pressed);
The exterior views (keys 2,3,4,6) and the interior view (key 5) can be attached to any train in the simulation by the Alt+9 key as described below;
The
<Alt+F9>key shows the Train List window, which not only allows attaching the exterior views to any train, but also, in Activity mode, to move to the Cab and drive any train in the simulation;when in passenger view (key 5) it is possible to toggle the viewpoint from one side to the other of the wagon, and to jump to other viewpoints if defined, as described below;
a “special viewpoint” trackside view camera is available, as described below.
All of the required key presses are shown by the F1 Help key in the game.
Note that some of the key combinations are different in Open Rails than in
MSTS. For instance, in Open Rails the cab Headout views from the cab view
are selected by the Home and End keys, and the view direction is
manipulated by the four arrow keys, or the mouse with the right-hand button
depressed.
The commands for each of the views are described below.
Key
<1>opens the driver’s view from the interior of the controlling cab of the player locomotive.In case the 2D view is selected, the 2D view can be cycled between the fixed left, front, and right views with the
<Left>and<Right>arrow keys. The cab itself can be hidden with the<Shift+1>key. (The 2D view is constructed from three 2D images, so the actual camera position can only be modified by editing the contents of the .cvf file.) If there is a mismatch between the aspect ratio of the cab and the aspect ratio of the monitor, OR will clip the cab and show only the portion that fits within the display. This clip can be panned around to reveal the rest of the cab with the<Up>,<Down>,<Alt+Left>, and<Alt+Right>keys. Alternatively, if placed into letterboxing mode, by using the<Ctrl+1>key, OR will render the full cab without a clip and cover the remaining space with black bars.In case the 3D view is selected, the camera position and view direction are fully player controllable.
Key
<Alt+1>switches between 2D and 3D cabs if both are available.The entire cab view can be moved to other cabs (if available) in the player train by successive presses of
<Ctrl+E>; the train must be stopped and the direction switch in Neutral.The headout views (if available) are selected by
<Home>(right hand side, looking forward) or<End>(left hand side, looking back) and the headout view direction is controlled by the mouse with the right button depressed. If there are multiple locomotives,<Alt+PgUp>and<Alt+PgDn>move the headout views.
Rotation of the camera view in any direction is controlled by the mouse
with the right-hand button depressed (or alternatively by the four arrow
keys). The camera’s position is moved forward or backward along the train
axis with the PageUp and PageDown keys, and moved left or right or up or
down with <Alt> + the four arrow keys. The headout views (if available)
are selected by <Home> (right hand side, looking forward) or <End>
(left hand side, looking back) and the outside view direction is
controlled by the mouse with the right button depressed.
Keys
<2>and<3>open exterior views that move with the active train; these views are centered on a particular target car in the train. The target car or locomotive can be changed by pressing<Alt+PgUp>to select a target closer to the head of the train and<Alt+PgDn>to select a target toward the rear. The 2-View selects the train’s head end as the initial target, the 3-View the last car. Alt+Home resets the target to the front,<Alt+End>to the rear of the train. With commands<Shift+Alt+7(Numpad)>and<Shift+Alt+1(Numpad)>cameras 2 or 3 move gently forward or backward along a stopped or moving train. By pressing a second time the key sequence the motion stops.
The camera’s position with respect to the target car is manipulated by the
four arrow keys – left or right arrows rotate the camera’s position left or
right, up or down arrows rotate the camera’s position up or down while
remaining at a constant distance from the target. The distance from the
camera to the target is changed by zooming with the <PgUp> and
<PgDn> keys. Rotation of the camera view direction about the camera’s
position is controlled by holding down the <Alt> key while using the
arrow buttons, or by moving the mouse with the right mouse button
depressed. The scroll wheel on the mouse zooms the screen image; the field
of view is shown briefly. <Ctrl+8> resets the view angles to their
default position relative to the current target car.
Key
<4>is a trackside view from a fixed camera position with limited player control - the height of the camera can be adjusted with the up and down arrow keys. Repeated pressing of the 4-key may change the position along the track.Key
<Shift+4>is a special viewpoint trackside view: the camera locates itself at platforms, or looks at the train following a spawned road car along the road, or at a level crossing, when such special viewpoints are near to the train; else it behaves like the standard trackside view camera. When the camera follows a spawned road car, speed of the road car can be increased and decreased within certain limits with keys<9(NumKey)>and<3(NumKey)>to adjust the speed of the camera with that of the train. By pressing key<Shift+4>when the camera is on a special viewpoint, another one, if available, is selected.Key
<5>is an interior view that is active if the active train has a passenger view declaration in any of its cars (or in the caboose). The view direction can be rotated by the arrow keys or the mouse with right button pressed. The camera position is moved forward or backward along the train axis with the PageUp and PageDown keys, and moved left or right or up or down with<Alt>+ the four arrow keys. Successive presses of the<5>key will move the view to successive views (if they exist) within the active train. Note that the active train may be an AI train selected by<Ctrl+9>. By pressing<Shift+5>the viewpoint can be toggled to the other side of the wagon (if it was right side, it moves to left side and vice-versa). If more viewpoints are defined for such wagon as explained here, pressing<Shift+5>moves through the various viewpoints.Key
<6>is the brakeman’s view – the camera is assumed to be at either end of the train, selected by<Alt+Home>and<Alt+End>. Rotation is controlled by the arrow keys or mouse with right button depressed. There is no brakeman’s view for a single locomotive.Key
<8>is the free camera view; the camera starts from the current Key-2 or Key-3 view position, and moves forward (<PgUp>key) or back (<PgDn>key) along the view direction. The direction is controlled by the arrow keys or the mouse with right button depressed. The speed of motion is controlled by the<Shift>(increase) or<Ctrl>(decrease) keys. Open Rails saves the position of previous Key 8 views and can recall them by repeatedly pressing<Shift+8>.<Alt+9>is an ORTS feature: it controls the target train for the Key 2, 3, 4, 5 and 6 views during activities or timetable operations. If there is more than one active train or there are consists declared in the activity for pickup, pressing this key combination will set the view to display each train or consist in turn. To return to the player train, press the<9>key. There may be a delay for each change of view as Open Rails calculates the new image. The cab view and data values in the F4 window always remain with the Player train. To directly select which train is to be shown either use the Dispatcher Window or the<Alt+F9>option described below. In the Dispatcher Window, locate the train that you wish to view, and click the mouse on it until the block representing it turns red; then click on the buttonShow in gamein the Dispatcher Window and then return to the Open Rails window.<Alt+F9>is an enhancement of the<Alt+9>feature that displays the Train List window showing the names of all of the currently active trains. Click on the name of the desired train to move the exterior views to the selected train. In Activity mode, double-clicking on a train’s name in this window transfers the Cabview and control of the selected train to the player. In Timetable mode, only the exterior views are selected.Key
<9>resets the target train for the Key 2,3,4,5 and 6 views to the Player train.
Holding the <Shift> key with any motion command speeds up the
movement, while holding the <Ctrl> key slows it.
Note that view direction control using the mouse with right button pressed
differs slightly from using <Alt> + the arrow keys – the view direction
can pass through the zenith or nadir, and the direction of vertical motion
is then reversed. Passing back through the zenith or nadir restores normal
behavior.
Whenever frame rates fall to unacceptable levels players are advised to adjust camera positions to cull some models from being in view and to adjust the camera again to include more models when frame rates are high.
Some camera views (among them 2Dcabview, 3Dcabview and passenger view) feature
the <Ctrl+8> command, that resets the view position to the default one.
7.12. Toggling Between Windowed Mode and Full-screen
You can toggle at any time between windowed mode and full-screen by
pressing <Alt+Enter>.
7.13. Modifying the Game Environment
7.13.1. Time of Day
In activity mode Open Rails software reads the StartTime from the MSTS .act file to determine what the game time is for the activity. In combination with the longitude and latitude of the route and the season, Open Rails computes the actual sun position in the sky. This provides an extremely realistic representation of the time of day selected for the activity. For example, 12 noon in the winter will have a lower sun position in the northern hemisphere than 12 noon in the summer. Open Rails game environment will accurately represent these differences.
Once the activity is started, Open Rails software allows the player to
advance or reverse the environment time of day independently of the
movement of trains. Thus, the player train may sit stationary while the
time of day is moved ahead or backward. The keys to command this depend
from the national settings of the keyboard, and can be derived from the
key assignment list shown by pressing <F1>.
In addition, Open Rails offers functionality similar to the time acceleration switch for MSTS.
Use <Ctrl+Alt+PgUp(Numkey)> or <Ctrl+Alt+PgDn(Numkey)> keys to increase or decrease the
speed of the game clock. <Ctrl+Alt+Home(Numkey)> resets the speed.
In a multiplayer session, all clients’ time, weather and season selections are overridden by those set by the server.
7.13.2. Weather
When in activity mode Open Rails software determines the type of weather to display from the Weather parameter in the MSTS Activity file. In the other modes the weather can be selected in the start menu. A Weather Change Activity Event can be included in an activity that will modify the weather during the activity.
For a full list of parameters, see Developing OR Content - Parameters and Tokens
7.13.3. Modifying Weather at Runtime
The following commands are available at runtime (keys not shown here can be found in the key assignment list obtained pressing F1):
Overcast increase/decrease: increases and decreases the amount of clouds
fog increase/decrease
precipitation increase/decrease
Precipitation “liquidity” (that is selection between rain and snow with intermediate states) increase/decrease.
These commands are active starting from any initial weather state (clear, rain, snow).
By selecting the desired precipitation liquidity before increasing precipitation, it is possible to decide whether to pass from clear to rain or from clear to snow weather.
Moreover, pressing <Alt+P> can abruptly change the weather from clear to raining to
snowing and back to clear.
7.13.4. Randomized Weather in activities
By activating the related experimental option as described here the player may experience an initial weather that varies every time the activity is executed, and that varies in a random way during activity execution.
7.13.5. Season
In activity mode Open Rails software determines the season, and its related alternative textures to display from the Season parameter in the MSTS Activity file. In other modes the player can select the season in the start menu.
For a full list of parameters, see Developing OR Content - Parameters and Tokens
7.14. Activity randomization
By activating the related experimental option as described here the player may experience slightly or significantly different activity behaviours in every different activity run. It must be stated that it is not guaranteed that every randomization leads to a realistic and/or manageable activity. However it must be considered that using features like player train switching and manually setting switches and signals many situations can be solved. This even contributes to generate a pleasant activity run.
Following activity features are randomized:
diesel locomotive compressor blowdown: when this occurs a message is displayed, output power and force go to zero, and the smoke gets white (to have a diesel smoke colour change dieselsmoke.ace must be replaced with a better one; there is some freely available from the website of some payware trainset providers. Moreover the parameter of the third parameter line in the Exhaust1 block within the .eng file of the diesel loco should have at least the value of 0.3, which by the way improves in general the lookout of the smoke). Wheh this event occurs, the train should be stopped as soon as possible, the defect loco should be put out of the MU chain and then switched off (these two operations can be done with the Car operations window). The defect loco is evidenced in red in the train operations window.
diesel or electric locomotive bogie unpowered; when this occurs a message is displayed, and output power and force are halved. The defect loco is again evidenced in red in the train operations window. The total traction time is accumulated. In the first 30, 15, 10 traction minutes (for randomization levels 1, 2, 3) no locomotive failures occur. After that for each loco and at every simulator update (which has the same frequency as the FPS) a random number between 0 and 199999 is generated. If it is higher than 199998, 199992, 199899 for the three randomization levels the failure is generated. The failure may also occur on the player loco. No more than a faulty loco is possible on a train.
freight car with brakes stuck: in this case the total braking time and the total countinuous braking time are accumulated. In this case the time with surely no failures varies from 20 to about 7 minutes for the total braking time and from 10 to about 3.5 minutes for the total continuous braking time. After such time for each car a random number between 0 and 199999 is generated at every simulator update. If the number is higher than 199996, 199992, and 199969 for the three randomization levels the failure is generated. The car will brake continuously, will be shown in red in the train operations window and will squeal if an .sms file named BrakesStuck.sms is present in the
<Train Simulator\Sound>directory. Here an example of such file. Of course when this event occurs it is advisable to uncouple the wagon as soon as possible from the train. No more than a car will fail.
All these train failures occur only on the player train.
AI train efficiency: the initial AI train efficiency (which determines max accelerations and decelerations and in some cases also max speed) is randomized, that is it may be increased or decreased around its preset value for a maximum of 20%, only in respectively 70% , 60% and 50% of cases when randomization level is 3, 2 or 1, and the increase and decrease is computed with a pseudonormal distribution curve, that is smaller changes are more likely than bigger changes. The same AI train efficiency randomization occurs after every station stop.
station depart time: in the same 70% , 60% and 50% of cases the number of passengers boarding at a station are increased or decreased of a random amount that depends also from randomization level. Departure time therefore may be anticipated or, more often, delayed.
waiting point delay: in the same 70% , 60% and 50% of cases a waiting point delay is introduced, that can have a maximum value of 25 seconds for the standard WPs and 5 minutes for the absolute WPs. Such maximum values depend also from randomization level.
For a full list of parameters, see Developing OR Content - Parameters and Tokens
7.15. Screenshot - Print Screen
Press the keyboard <PrintScreen> key to capture an image of the game
window. This will be saved by default in the file
C:\Users\<username>\Pictures\Open Rails\Open Rails <date and time>.png
Although the image is taken immediately, there may be a short pause before the confirmation appears. If you hold down the Print Screen key, then OR takes multiple images as fast as it can.
The key to capture the current window – <Alt+PrintScreen> – is not
intercepted by OR.
7.16. Suspending or Exiting the Game
You can suspend or exit the game by pressing the ESC key at any time. The window shown at the right will appear.
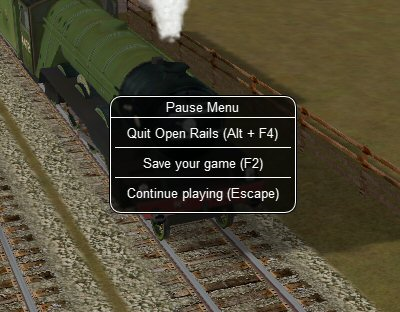
The window is self-explanatory.
If you are running OR in a Window, you can also exit OR by simply clicking on the x on the right top of the OR window.
7.17. Save and Resume
Open Rails provides Save and Resume facilities and keeps every save until you choose to delete it.
During the game you can save your session at any time by pressing <F2>.
You can view the saved sessions by choosing an activity and then pressing
the Resume/Replay... button.
This will display the list of any Saves you made for this activity:
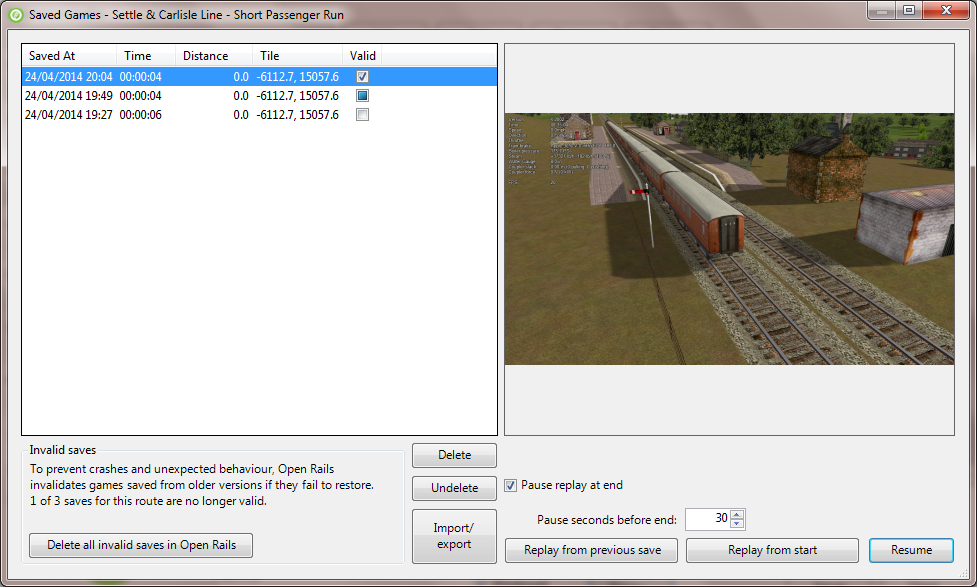
To help you identify a Save, the list provides a screenshot and date and also distance travelled in meters and the time and position of the player’s train. This window can be widened to show the full width of the strings in the left panel.
7.17.1. Saves from Previous OR Versions
You should be aware that these Saves will only be useful in the short term as each new version of Open Rails will mark Saves from previous versions as potentially invalid (e.g. the second entry in the list below).
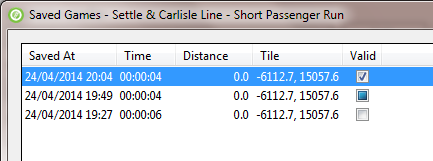
When you resume from such a Save, there will be a warning prompt.
The Save will be tested during the loading process. If a problem is detected, then you will be notified.
This Save and any Saves of the same age or older will be of no further value and will be marked as invalid automatically (e.g. the 3rd entry in the list). The button in the bottom left corner of the menu deletes all the invalid Saves for all activities in Open Rails.
7.18. Save and Replay
As well as resuming from a Save, you can also replay it just like a video. All the adjustments you made to the controls (e.g. opening the throttle) are repeated at the right moment to re-create the activity. As well as train controls, changes to the cameras are also repeated.
Just like a black box flight recorder, Open Rails is permanently in
recording mode, so you can save a recording at any time just by pressing
<F2> Save.
Normally, you would choose the replay option by Menu > Resume >
Replay from start.
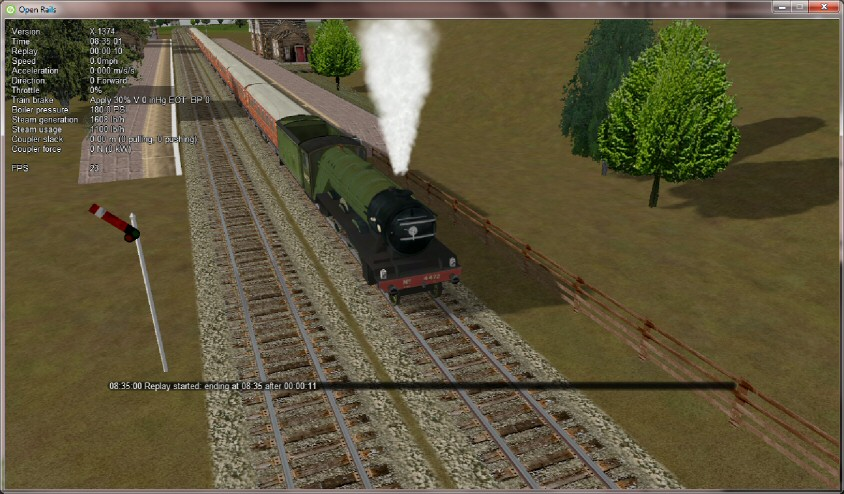
A second option Menu > Resume > Replay from previous save lets
you play back a shortened recording. It resumes from the most recent Save
it can find and replays from that point onwards. You might use it to play
back a 5 minute segment which starts an hour into an activity.
A warning is given when the replay starts and a replay countdown appears in the Alt+F5 Head Up Display.
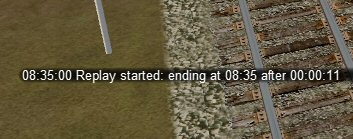
Warning
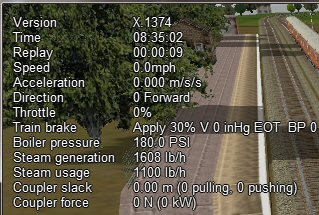
Countdown
By default, the simulation pauses when the replay is exhausted. Use Pause replay at end on the Saved Games window to change this.
Little can usefully be achieved by adjusting the train controls during replay, but the camera controls can be freely adjusted. If changes are made (e.g. switching to a different camera view or zooming out), then replay of the camera controls is suspended while replay of the train controls continues. The result is a bit like editing a video. To resume the replay of the camera controls, just press Esc to open the Pause Menu and then choose Continue playing.
A possible future development may be to edit the replay file to adjust times or to add messages to provide a commentary. This would allow you to build demonstrations and tutorials.
Replay is a feature which is unique to Open Rails. You can use it to make your own recordings and Open Rails provides a way to exchange them with other players.
7.18.1. Exporting and Importing Save Files
To export a Save file, use the command: Menu > Options >
Resume > Import/export saves > Export to Save Pack
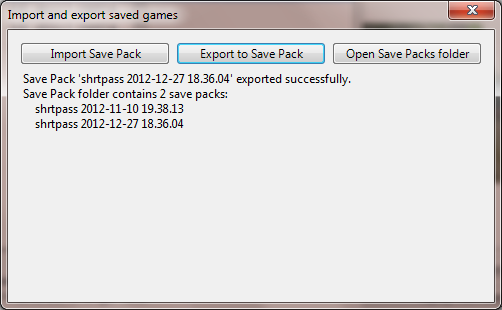
OR will pack the necessary files into a single archive file with the
extension ORSavePack and place it in the folder Open Rails\Save Packs.
This ORSavePack file is a zip archive which contains the replay commands,
a screenshot at the moment of saving, a Save file (so that Open Rails can
offer its Resume option) and a log file. This arrangement means that the
ORSavePack archive is ideal for attaching to a bug report.
You can use the Import Save Pack button on the same window to import
and unpack a set of files from an ORSavePack archive. They will then
appear in your Saved Games window.
7.19. Analysis Tools
The extended HUDs provide a rich amount of information for analysis, evaluation and to assist in troubleshooting.
You can move through the sequence of HUD displays by repeatedly pressing
<Shift+Alt+F5>.
In the extended HUDs the trainsets (locos and cars) are identified by the trainset UiD as defined in the consist file, preceded by a train identification.
7.19.1. Extended HUD for Consist Information
This page shows in the first line data about the whole train. Under
Player you will find the player locomotive UiD followed by an
F if the forward cab is selected, and an R if the rear cab is
selected.
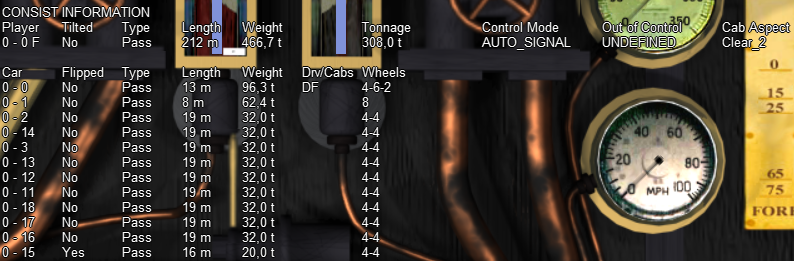
Tilted is set at YES in case the consist name ends with tilted (e.g.
ETR460_tilted.con), in which case it means that it is a tilting train.
Control mode shows the actual control mode. Read more about this here.
Cab aspect shows the aspect of next signal.
In the other lines data about the train cars are shown. Data are mostly
self-explanatory. Under Drv/Cabs a D appears if the car is
drivable, and an F and/or a R appear if the car has a front
and/or a rear cab.
7.19.2. Extended HUD for Locomotive Information
The next extended HUD display shows locomotive information.
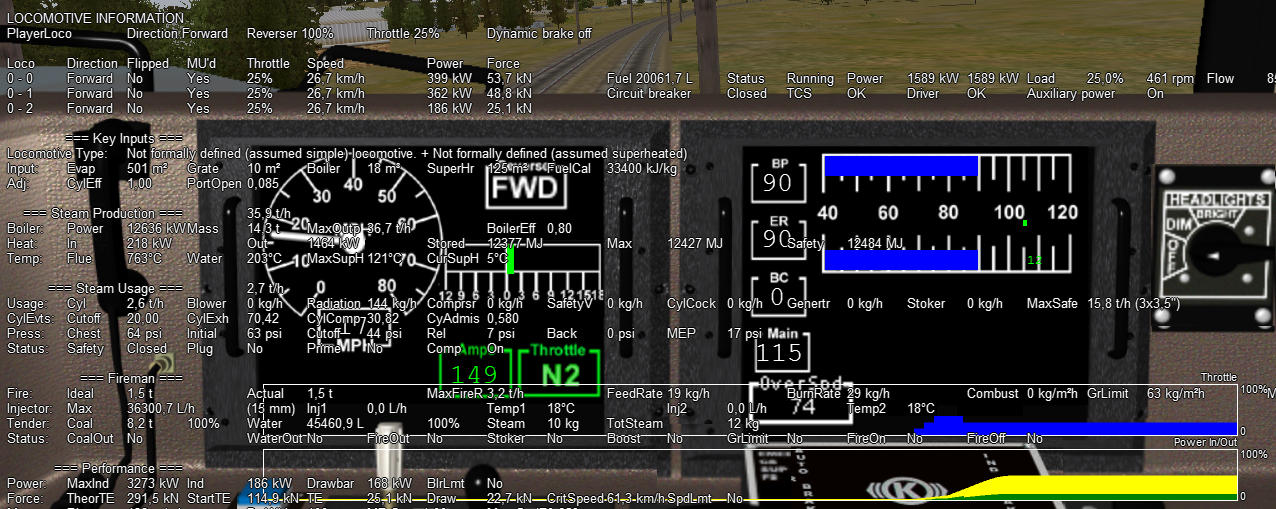
As can be seen from this screenshot related to a fictitious train with a diesel, an electric and a steam loco, information about diesel and electric locomotives is contained on a single line, while information about steam locomotives includes a large set of parameters, which shows the sophistication of OR’s steam physics.
In the bottom part of this HUD two moving graphs show the evolution in time of the throttle value and of the power of the player locomotive (the one where the active cab resides).
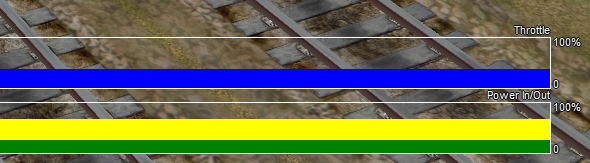
7.19.3. Extended HUD for Brake Information

This extended HUD display includes all the information of the basic HUD
plus Brake status information. In the first part specific information for
locomotives is shown, while in the second one general information is shown for
all cars. After the car UiD the following alphanumeric string shows the brake
system (1P: single-pipe system, V: vacuum etc.) and the current
state of the air brakes on the unit. More information on this display
can be found in Open Rails Braking and
F9 Train Operations Monitor.
7.19.4. Extended HUD for Train Force Information
In the top part of this display some information related to the player locomotive is shown. The information format differs if advanced adhesion has been selected or not in the Simulation Options.
The middle line of information shown (provided that Wind Dependent Resistance is selected in the Options Menu) shows the wind speed and direction, the train direction, and the resulting train/wind vectors for speed and direction.
The table part below the above information, shows the relevant forces acting upon the locos/cars in the train.
The columns are as follows:
Car - the UiD of the car as defined in the car consist file.
Total - the total force acting on the car. This is the sum of the other forces after the signs are properly adjusted.
- Motive - the motive force which should only be non-zero for locomotives,
and that becomes negative during dynamic braking.
Brake - the brake force.
Friction - the friction (or resistance) force calculated from the Davis equation. This is in STILL air only.
Gravity - the force due to gravity.
Curve - the resistance forces due to the car being on a curve.
Tunnel - the resistance forces due to the car being in a tunnel.
Wind - the resistance forces due to the car being impacted by wind.
Coupler - the coupler force between this car and the next (negative is pull and positive is push). The F or R symbols indicate whether the coupler is a flexible or rigid coupler respectively.
Slack - indicates the amount of slack (distance due to coupler movement between the cars).
Mass - car mass in kg.
Gradient - gradient of the track underneath the car.
Curve - the radius of the curve.
Brk Frict - friction of the brakes on the car.
Brk Slide - indicates whether the car is skidding due to excessive brake application.
All of the force values will be in Newtons, or the UoM selected by the player.
Many of these values are relative to the orientation of the car, but some are relative to the
train. If applicable, two further fields appear: the first is “True” if
the car is flipped with respect to the train or False otherwise, while
the second field signals coupler overload.
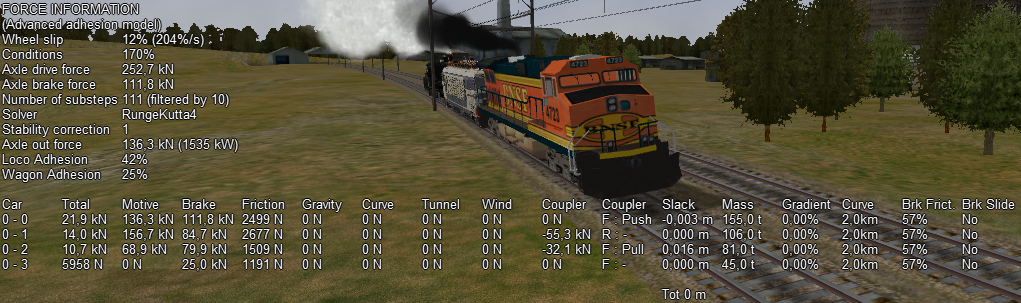
At the bottom of the picture two moving graphs are displayed.
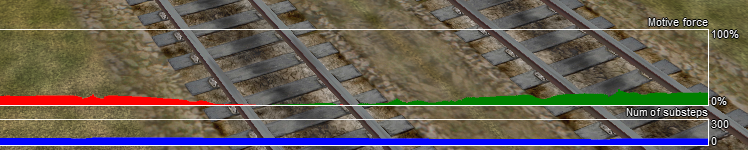
The upper graph displays the motive force in % of the player locomotive. Green colour means tractive force, red colour means dynamic brake force.
The lower graph refers – roughly speaking - to the level of refinement used to compute axle force.
7.19.5. Extended HUD for Dispatcher Information
The next extended HUD displays Dispatcher Information. It is very useful to troubleshoot activities or timetables. The player train and any AI trains will show in the Dispatcher Information, a line for each train.

A detailed explanation of the various columns follows:
Train: Internal train number, with P=Passenger and F=Freight.
Travelled: distance travelled. Gives an indication if all is well. If a train started an hour ago and ‘travelled’ is still 0.0, something’s clearly wrong.
Speed: present speed.
Max: maximum allowed speed.
AI Mode: gives an indication of what the AI train is ‘doing’. Possible states:
INI: train is initializing. Normally you would not see this.
STP: train is stopped other than in a station. The reason for the stop is shown in
Authority.BRK: train is preparing to stop. Does not mean it is actually braking, but it ‘knows’ it has to stop, or at least reduce speed, soon. Reason and distance to the related position, are shown in
AuthorityandDistance.ACC: train is accelerating, either away from a stop or because of a raise in allowed speed.
RUN: train is running at allowed speed.
FOL: train is following another train in the same signal section. Its speed is now derived from the speed of the train ahead.
STA: train is stopped in station.
WTP: train is stopped at waiting point.
EOP: train is approaching end of path.
STC: train is Static train, or train is in Inactive mode if waiting for next action.
AI data : shows throttle (first three digits) and brake (last three digits) positions when AI train is running, but shows departure time (booked) when train is stopped at station or waiting point, or shows activation time when train is in inactive mode (state STC).
Mode:
SIGN (signal)
NODE
MAN: train is in manual mode (only player train, see here)
OOC: train is out of control
EXPL: train is in explorer mode (only player train) When relevant, this field also shows delay (in minutes), e.g. S+05 mean Signal mode, 5 minutes delay.
Auth: End of “authorization” info - that is, the reason why the train is preparing to stop or slow down. Possible reasons are :
SPDL: speed limit imposed by speed sign.
SIGL: speed limit imposed by signal.
STOP: signal set at state “STOP”.
REST: signal set at state “RESTRICTED” (train is to reduce speed at approaching this signal).
EOA: end of authority - generally only occurs in non-signaled routes or area, where authority is based on NODE mode and not SIGNAL mode.
STAT: station.
TRAH: train ahead.
EOR: end of train’s route, or subroute in case the train approaches a reversal point.
AUX: all other authorization types, including auxiliary action authorizations (e.g. waiting points).
When the control mode is
NODEthe columnAuthcan show following strings:EOT: end of track
EOP: end of path
RSW: switch reserved by another train
LP: train is in loop
TAH: train ahead
MXD: free run for at least 5000 meters
NOP: no path reserved.
When the control mode is
OOCthe columnAuthcan show following strings:SPAD: passed signal at danger
RSPD: passed signal at danger running backwards
OOAU: passed authority limit
OOPA: out of path
SLPP: slipped into path
SLPT: slipped to end of track
OOTR: out of track
MASW: misaligned switch.
Distance: distance to the authority location.
Signal: aspect of next signal (if any).
Distance: distance to this signal. Note that if signal state is STOP, and it is the next authority limit, there is a difference of about 30m between authority and signal distance. This is the ‘safety margin’ that AI trains keep to avoid accidentally passing a signal at danger.
Consist: the first part of the train’s service name. Only for the player, always the
PLAYERstring is displayed.Path: the state of the train’s path. The figure left of the “=” sign is the train’s present subpath counter : a train’s path is split into subpaths when its path contains reversal points. The details between { and } are the actual subpath. Following the final } can be x<N>, this indicates that at the end of this subpath the train will move on to the subpath number N. Path details :
The path shows all track circuit sections which build this train’s path. Track circuit sections are bounded by nodes, signals or cross-overs, or end-of-track. Each section is indicated by its type:
-is plain train section.>is switch (no distinction is made for facing or trailing switch).+is crossover.[is end-of-track.
Following each section is the section state. Numbers in this state refer to the train numbers as shown at the start of each row. Below, <n> indicates such a number.
<n> section is occupied by train <n>.
(<n>) section is reserved for train <n>.
# (either with <n> or on its own) section is claimed by a train which is waiting for a signal.
& (always in combination with <n>) section is occupied by more than one train.
- deadlock info (always linked to a switch node):
*possible deadlock location - start of a single track section shared with a train running in opposite direction.
^active deadlock - train from opposite direction is occupying or has reserved at least part of the common single track section. Train will be stopped at this location – generally at the last signal ahead of this node.
~active deadlock at that location for other train - can be significant as this other train can block this train’s path.
The dispatcher works by reserving track vector nodes for each train. An AI train will be allowed to move (or start) only if all of the nodes up to the next potential passing location are not reserved for another train. If this condition cannot be met, in Timetable Mode the AI train will not spawn.
There are other reasons why an AI train might not appear in Timetable Mode. The current dispatcher assumes that all routes are unsignaled. The dispatcher issues a track authority (which is similar to a track warrant) to all trains. For an AI train to start, the tracks it needs must not be already reserved for another train. The dispatcher compares the paths of the trains to identify possible passing points and then reserves tracks for a train up until a passing point. When a train gets near the next passing point the reservation is extended to the next one. The end result is that in Timetable Mode an AI train cannot be placed on a track if that section of track is already occupied by or reserved for another train. A section of track is any track bounded by either a switch or a signal.
Also, a train is not created if it would be partly or fully superimposed on an already existing train, or if its path is not long enough for it. This applies to both Timetable Mode and Activity Mode.
7.19.6. Extended HUD for Debug Information
The last extended HUD display shows Debug information containing:
Logging enabled: logging status
Build: date and time Open Rails was compiled
CPU: processor utilization by Open Rails
GPU: frame rate, frame time percentiles and graphics feature level
Memory: number of core memory objects loaded (textures, materials, shapes, and tiles) plus garbage collection statistics
CPU Memory:
Private: virtual memory allocated just for Open Rails (not shared with other applications)
Working set: physical memory in use by Open Rails (including any shared with other applications)
Private working set: physical memory in use just for Open Rails
Managed: virtual memory allocated by the .NET runtime (CLR)
Virtual: virtual memory allocated for any purpose (private + shared + others)
GPU Memory:
Committed: all graphics memory allocated for Open Rails
Dedicated: physical graphics card memory in use by Open Rails
Shared: system memory shared with the graphics card in use by Open Rails
Adapter: name and dedicated physical memory of graphics card
Shadow maps: distance and size of each shadow map level (and texture size)
Shadow primitives: total primitives (rendered items) and breakdown by shadow map level
Render primitives: total primitives (rendered items) and breakdown by rendering sequence (
RenderPrimitiveSequencein the code)Render/Updater/Loader/Sound process: percentage of time each process is active and waiting
Camera: tile X, tile Z, X, Y, Z, altitude, LOD bias, effective viewing distance, effective distant mountain viewing distance
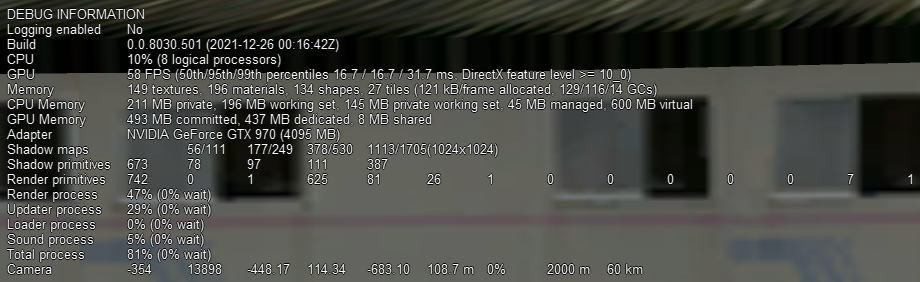
The primary measurements for comparing and analysing performance are the first column of values (some lines are skipped), so for the image above we have:
CPU: 10% - very low (warning at 75%)
GPU: 58 FPS - good (warning at <55 FPS with 60 Hz vertical sync)
CPU Memory: 211 MB private - very low (~3% of 8 GB)
GPU Memory: 493 MB committed - low (~24% of 2 GB)
Highest process (Render): 47% - moderate (warning at 75%)
Also shown are the following graphs of:
Memory: working set
GCs: garbage collections
Frame time: how long each frame takes to render
Render/Updater/Loader/Sound process: same as textual display above
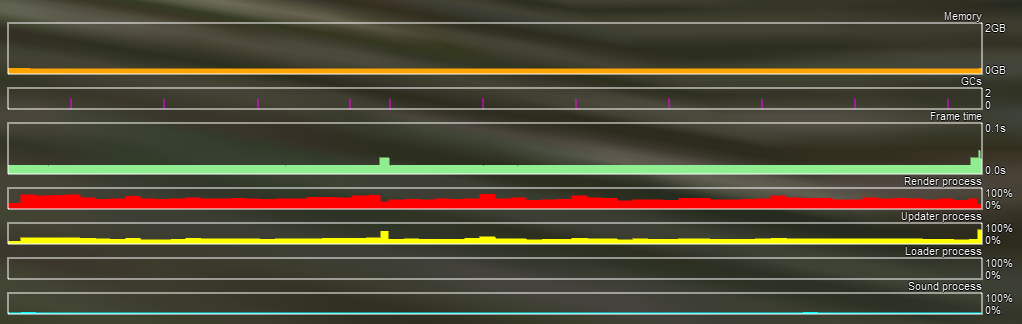
7.19.7. Viewing Interactive Track Items
By pressing <Ctrl+Alt+F6> at runtime you get a picture like this
one that allows you to take note of the interactive IDs for debugging
purposes.
7.19.8. Viewing Signal State and Switches
By pressing <Ctrl+Alt+F11> you get a picture like the following
that shows the state of the signals and switches on the path.
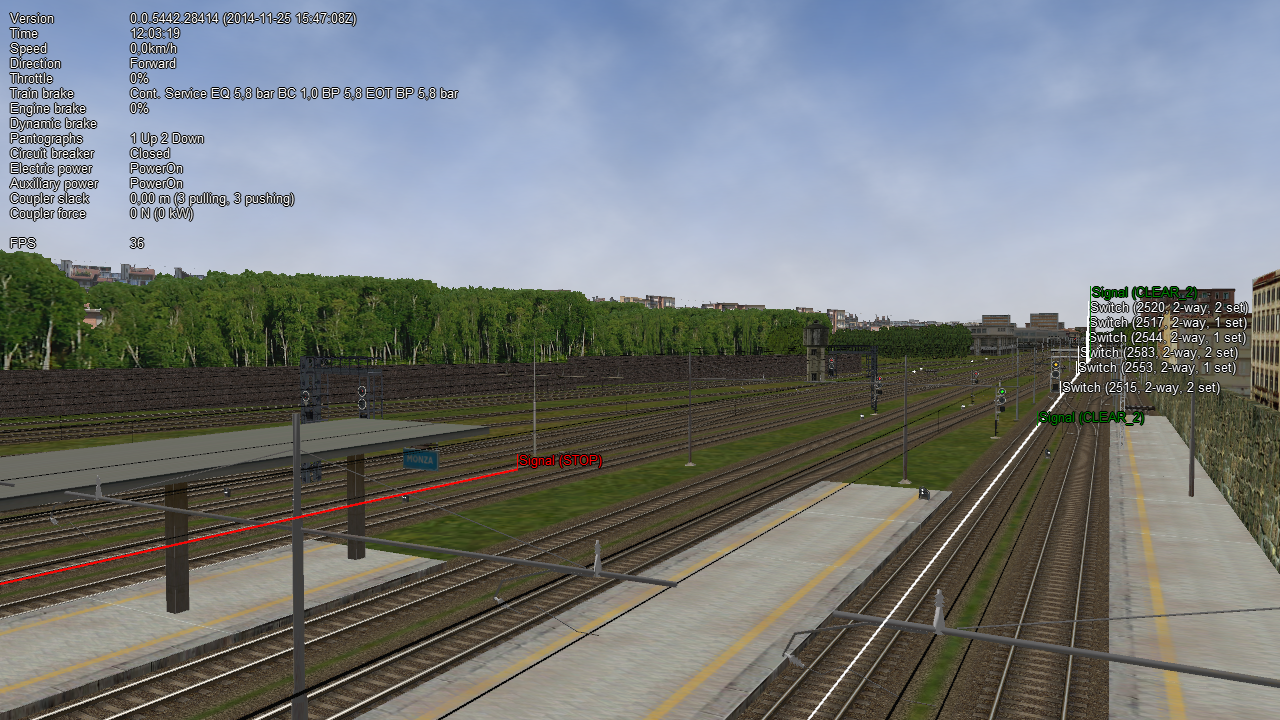
7.19.9. Sound Debug Window
By pressing <Alt+S> this window opens:
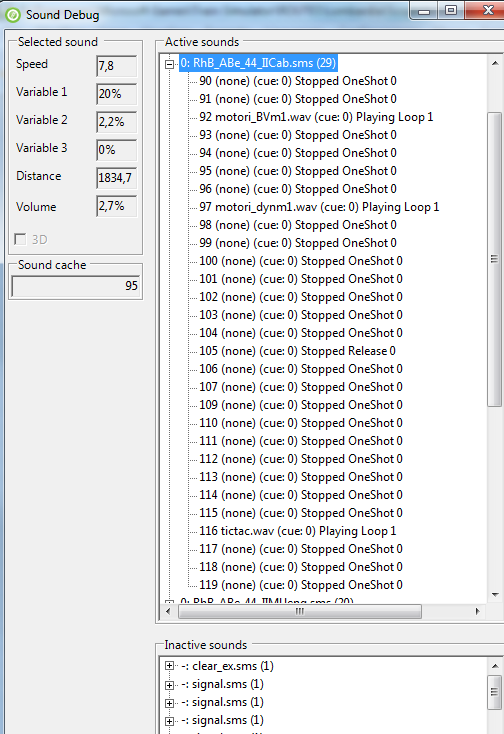
It shows in the upper part the list of all active .sms files (track sound apart); by expanding the detail of a specific .sms file, the list of all sound streams is displayed, as well as their state. On the left the value of the analog sound variables is displayed for the selected .sms file. The volume refers to the first stream of the selected sound file.
Active and inactive sounds toggle passing from internal to external views and vice-versa.
7.20. OpenRailsLog.txt Log file
When the Logging option in the main window is checked, a log file
named OpenRailsLog.txt file is generated. This file contains rich
information about the execution of the game session, allowing
identification of critical problems. This file should always be attached
to requests of support in case of problems.
The contents of the file are often self-explanatory, and therefore can be evaluated by the same contents developer. It includes reports of various errors in the MSTS files which are ignored by OR, including missing sound files, unrecognized terms in some files, etc. Selecting the Experimental Option Show shape warnings allows OR to report errors found in shape files in the log file. It includes also reports about malfunctions in the gaming session, such as trains passing red signals, as well as OR malfunctions.
7.21. Code-embedded Logging Options
OR source code is freely downloadable; check the http://www.OpenRails.org website for this. Within the code there are some debug options that, when activated, generate specific extended log files, e.g. for analysis of signal and of AI train behavior. Short specific info on this can be provided to people with programming skills.
7.22. Testing in Autopilot Mode
Autopilot mode is a powerful tool to help in testing activities.