6. Open Rails Options
Clicking on the Options button opens a multi-panel window. The Menu > Options panels contain the settings which remain in effect during your simulation. Most of the options are self-explanatory; you may set them according to your preference and system configuration. For example, you can turn off dynamic shadowing if your system has low FPS (frames-per-second) capability. The options configuration that you select is saved when you click OK. When you restart OR, it will use the last options configuration that you selected.
There are 10 option panels, described below.
6.1. General Options

6.1.1. Alerter in cab
As in real life, when this option is selected, the player driving the train
is required to perform specific actions to demonstrate that he is alive,
i.e. press the Alerter Button (or press the Key <Z>). As the player may
sometimes use a view other than the cabview to follow the train, and
therefore will not see the alerter warning, selecting the related option
Also in external views enables the alerter in those views as well.
6.1.2. Graduated release air brakes
Selecting this option allows a partial release of the brakes. Generally speaking, operating with the option checked is equivalent to passenger standard and unchecked is equivalent to freight standard. A complete description of this option can be found here.
6.1.3. Retainer valve on all cars
The player can change the braking capability of all of the cars in the simulation to include Brake Retainers. These cause the brake cylinder on a car to retain some fixed pressure when the train brakes are released; this causes the car to produce a constant braking force. If this option is not checked, then brake retainers are only found on cars that have an appropriate entry, as described here, in their .wag files.
6.1.4. Brake pipe charging rate
The Brake Pipe Charging Rate (psi/s) value controls the charging rate of the main air brake pipe. Increasing the value will reduce the time required to recharge the train (i.e. when releasing the brakes after a brake application), while decreasing the value will slow the charging rate. See also the paragraphs on the ORTS implementation of the braking system.
If this parameter is set at 1000, a simplified, MSTS-like braking model is implemented, providing for faster brake release and being less influenced by incoherent braking parameters within .eng file.
6.1.5. Pressure unit
The player can select the unit of measure of brake pressure in the HUD display.
When set to automatic the unit of measure is the same as that used in the cabview of the locomotive.
6.1.6. Other units of measure
This selects the units displayed for length, mass, pressure, etc. in the F5 Train Driving Info Window and also the Alt+F5 HUD of the simulation.
These windows use the abbreviations t-us for short tons (2000 lb), t-uk for long tons (2240 lb) and t for metric tons (1000 kg).
The option Route sets the units based on the data in the route files. The route’s TRK file may contain MilepostUnitsMiles () or
MilepostUnitsKilometers () to specify the units of distance for this route.
The option Player’s Location sets the units according to the Windows Language and Region settings on the player’s computer.
The other choices for units of measure are straightforward.
Note: The units displayed by the F4 Track Monitor (e.g. velocity and distance) are always based on data read from the route files.
6.1.7. Use TCS scripts
This option uses the train control system scripts for locomotives where these have been implemented.
6.1.8. Auto Save
This option will make saves automatically at regular intervals just as though you had pressed <F2>
for a manual save. This option is off by default,
When Auto Save is on, you can still make manual saves and doing so resets the automatic timer.
6.1.9. Overspeed Monitor
If a Train Control Script (TCS) is specified for the loco and not disabled, then that takes priority. Otherwise, if the loco has an Overspeed Monitor specified in its ENG file, then that monitor will detect excessive speed and respond as it was specified, e.g. by applying emergency braking.
This monitor is enabled by checking the option.
6.1.10. Telemetry

These options let you choose which (if any) anonymous data collection types you would like to enable, preview the data that will be collected, and visit the telemetry server and source code.
Each anonymous data collection type can be set to:
Undecided (off) - (default) no data is collected or sent, but we may ask if you want to participate via Notifications
Off - no data is collected or sent
On - data is collected and sent automatically
There is no option to allow you to check through the collected data before it is sent.
6.1.10.1. Application, runtime, operating system, and hardware properties
This anonymous data collection type can be previewed to see what will be sent; for example:
Application = Open Rails U2025.01.31-1152 (X64)
Runtime     = .NET Framework 4.8.9290.0
System      = Microsoft Windows 11 Home 10.0.26100 (X64; en-GB; en-GB,en-US,ja-JP)
Memory      = 32,592 MB
CPU         = 12th Gen Intel(R) Core(TM) i7-1255U (GenuineIntel; 12 threads; 2,600 MHz)
GPU         = Intel(R) Iris(R) Xe Graphics (Intel Corporation; 128 MB)
Direct3D    = 12_1,12_0,11_1,11_0,10_1,10_0,9_3,9_2,9_1
This is also included at the start of every log file.
6.2. Audio Options
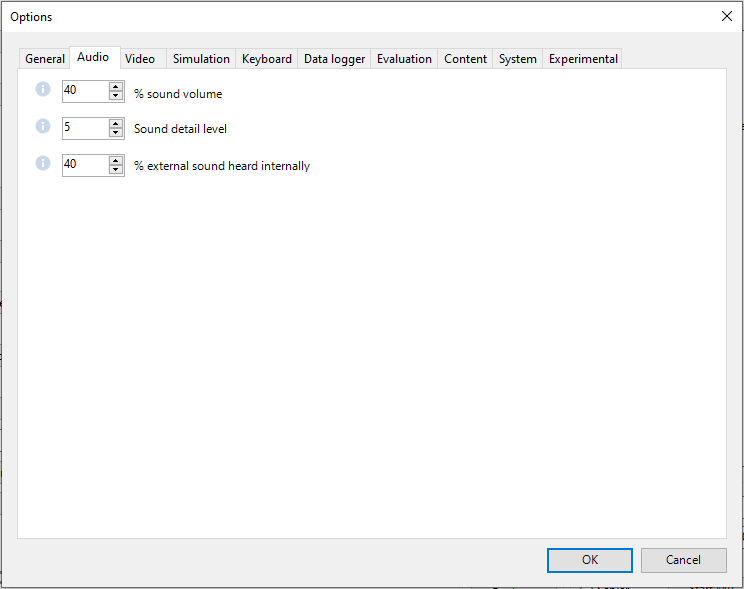
6.2.1. Sound Volume
The % sound volume scroll button allows adjustment of the volume of OR sound.
Default is 40.
6.2.2. Sound Detail Level
Except for very slow computers, it is suggested that you set the Sound detail level to 5.
6.2.3. External Sound
The % external sound heard internally scroll button defines the percentage of the original volume of external sounds heard in cab and passenger views. This percentage may be overridden trainset by trainset as defined here.
6.3. Video Options

6.3.1. Viewing distance
This option defines the maximum distance at which terrain and objects are displayed. Where the content provides “Distant Mountains”, these are displayed independently (see below).
Note: When the option to tune settings automatically is applied, then this value will be overridden and dynamically changed to maintain a target frame rate.
Note: Some routes are optimized for a viewing distance of 2km as this is the maximum provided by MSTS.
The default distance is 2km.
6.3.2. Distant mountains
This option defines the maximum distance at which “Distant Mountains” are displayed.
Note: “Distant Mountains” are present in the route if it has a folder called LO_TILE.
The default setting is checked.
The default distance is 40km.
6.3.3. Extend object maximum viewing distance to horizon
With this option selected, all objects viewable up to the viewing distance (as defined above) are displayed, even if they have a level of detail (LOD) that is less distant.
Without this option, ORTS only displays objects up to their peak distance set by their level of detail (LOD) or the viewing distance, whichever is less.
Selecting this option shows all the objects that should be in view but it may reduce the frame rate. MSTS limits the viewing distance to just 2km and the peak LOD distances are usually 2km, so this option is especially useful for viewing routes created for MSTS at distances above 2km.
However, for routes that make good use of LOD settings, showing the objects that should be in view can be achieved at higher frame rates by unchecking this option. For example, if the viewing distance is 10km and the content has been created with some large objects having peak distance LODs set at 5km and smaller objects having LODs which are much shorter, then this strategy will show all the objects that should be in view without reducing the frame rate.
The default setting is checked.
6.3.4. Dynamic shadows
This option causes movable objects such as trains to cast shadows. Unchecking the option will increase the frame rate.
The default setting is checked.
6.3.5. Shadow for all shapes
Check this option to cast shadows from static objects.
The default setting is unchecked.
Note: This may reduce the frame rate.
Note: Static objects provided with shadows (in the World files) will cast shadows anyway. This option adds shadows for other static objects.
6.3.6. Overhead wire
This option will enable or disable display of the overhead wire.
6.3.7. Double overhead wires
MSTS uses a single wire for electrified routes; you may check this box so that ORTS will show the two overhead wires that are more common.
6.3.8. Signal light glow
When this option is set, a glowing effect is added to signal semaphores when seen at distance, so that they are visible at a greater distance. There are routes where this effect has already been natively introduced; for these, this option is not recommended.
6.3.9. Ambient daylight brightness
With this slider you can set the daylight brightness.
Note: The controls on the right side of the tab are more subtle and the changes they make may be less easy to detect.
6.3.10. Model instancing
When the option is checked, in cases where multiple instances of the same object have to be drawn, only a single draw call is sent to the GPU. Uncheck this option to avoid the graphical glitches which appear on some hardware, but this may reduce the frame rate.
The default setting is checked.
6.3.11. Vertical sync
Vertical Sync (VSync) attempts to lock Open Rails’ output frame rate to your monitor’s refresh rate for the smoothest image and to resist image “tearing”.
VSync may help keep the frame rate more stable on complex routes, reducing sudden frame rate drops and apparent control lag in some cases. If Open Rails’ frame rate drops below your monitor’s frame rate, you may see stuttering or image “tearing”. To prevent this, either uncheck the VSync option or reduce the values for video options such as view distance, anti-aliasing, or world object density.
The default setting is checked.
6.3.12. Anti-aliasing
Controls the anti-aliasing method used by Open Rails. Anti-aliasing is a computer graphics technique that smooths any harsh edges, otherwise known as “jaggies,” present in the video image. Currently, Open Rails only supports the multisample anti-aliasing (MSAA) method. Higher applications of anti-aliasing will require exponentially more graphics computing power.
The default setting is MSAA with 2x sampling.
6.3.13. World object density
This value can be set from 0 to 99 and the default value is 49. When 49 is selected, all content defined in the route files and intended for the player to see is visible. Lower values will hide some categories of objects which tends to increase frame rates.
In legacy routes, all the content was assigned to categories 0-10. In more modern routes, content may be assigned to categories between 0 and 49. Content builders are advised to reserve values 50 to 99 for objects used in building the route.
6.3.14. Level of detail bias
Many visual objects are modelled at more than one level of detail (LOD) so, when they are seen at a distance, Open Rails can switch to the lesser level of detail without compromising the view. This use of multiple LODs reduces the processing load and so may increase frame rates.
Lowering the LOD Bias setting below 0 reduces the distance at which a lower level of detail comes into view, and so boosts frame rates but there may be some loss of sharpness.
Raising the LOD Bias setting above 0 increases the distance at which a lower level of detail comes into view. This may be useful to sharpen distant content that was created for a smaller screen or a wider field of view than you are currently using.
The default setting is 0.
Note: If your content does not use multiple LODs, then this option will have no effect.
6.3.15. Viewing vertical FOV
This value defines the vertical angle of the world that is shown. Higher values correspond roughly to a zoom out effect. The default is 45 degrees.
6.4. Simulation Options
The majority of these options define train physics behavior.
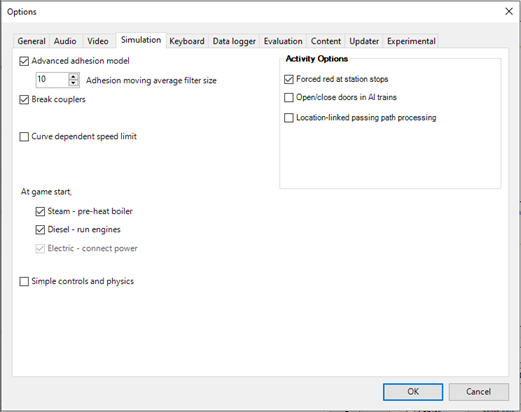
6.4.1. Advanced adhesion model
OR supports two adhesion models: the basic one is similar to the one used by MSTS, while the advanced one is based on a model more similar to reality.
For more information read the section on Adhesion Models later in this manual.
6.4.2. Break couplers
When this option is selected, if the force on a coupler is higher than the threshold set in the .eng file, the coupler breaks and the train is divided into two parts. ORTS will display a message to report this.
6.4.3. Curve dependent speed limit
When this option is selected, ORTS computes whether the train is running too fast on curves, and if so, a warning message is logged and displayed on the monitor. Excessive speed may lead to overturn of cars, this is also displayed as a message. This option is described in detail here (theory) and also here (OR application). OR does not display the damage.
6.4.4. At game start, Steam - pre-heat boiler
With this option selected, the temperature and pressure of steam in the boiler is ready to pull the train. Uncheck this option for a more detailed behaviour in which the player has to raise the boiler pressure.
If not, the boiler pressure will be at 2/3 of maximum, which is only adequate for light work. If your schedule gives you time to raise the pressure close to maximum, then switch from AI Firing to Manual Firing (Ctrl+F) and increase the Blower (N) to 100% to raise a draught. Replenish the coal using R and Shift+R to keep the fire mass close to 100%. Full pressure may be reached in 5 minutes or so.
The default setting is checked.
6.4.5. At game start, Diesel - run engines
When this option is checked, stationary diesel locos start the simulation with their engines running. Uncheck this option for a more detailed behaviour in which the player has to start the loco’s engine.
The default setting is checked.
6.4.6. At game start, Electric - power connected
When this option is checked, stationary electric locos start the simulation with power available. Uncheck this option for a more detailed behaviour in which the player has to switch on electrical equipment.
The default setting is checked.
In timetable mode, power status is not affected by these options.
6.4.7. Forced red at station stops
In case a signal is present beyond a station platform and in the same track section (no switches in between), ORTS will set the signal to red until the train has stopped and then hold it as red from that time up to two minutes before starting time. This is useful in organizing train meets and takeovers, however it does not always correspond to reality nor to MSTS operation. So with this option the player can decide which behavior the start signal will have.
This option is checked by default.
Note: Unchecking the option has no effect when in Timetable mode.
6.4.8. Open/close doors on AI trains
This option enables door open/close at station stops on AI trains having passenger trainsets with door animation. Doors are opened 4 seconds after train stop and closed 10 seconds before train start. Due to the fact that not all routes have been built with correct indication of the platform side with respect to the track, this option can be individually disabled or enabled on a per-route basis, as explained here. With option enabled, doors open and close automatically also when a player train is in autopilot mode. The option is active only in activity mode.
6.4.9. Location-linked passing path processing
When this option is NOT selected, ORTS acts similarly to MSTS. That is, if two trains meet whose paths share some track section in a station, but are both provided with passing paths as defined with the MSTS Activity Editor, one of them will run through the passing path, therefore allowing the meet. Passing paths in this case are only available to the trains whose path has passing paths.
When this option is selected, ORTS makes available to all trains the main and the passing path of the player train. Moreover, it takes into account the train length in selecting which path to assign to a train in case of a meet.
For content developers
A more detailed description of this feature can be found under Location-Linked Passing Path Processing in the chapter Open Rails Train Operation.
6.4.10. Simple control and physics
This is an option which players can set to simplify either the train controls or physics. This feature is intended for players who want to focus on “running” trains and don’t want to be bothered by complex controls or prototypical physics which may require some additional expertise to operate.
Initially this option affects only trains that use vacuum braking but other controls may be added in future versions.
With vacuum braking, it is sometimes necessary to operate two different controls to apply and release the brakes. With “Simple control and physics” checked, the player is able to operate the brakes just with the brake valve and doesn’t need to consider the steam ejector separately.
6.5. Keyboard Options
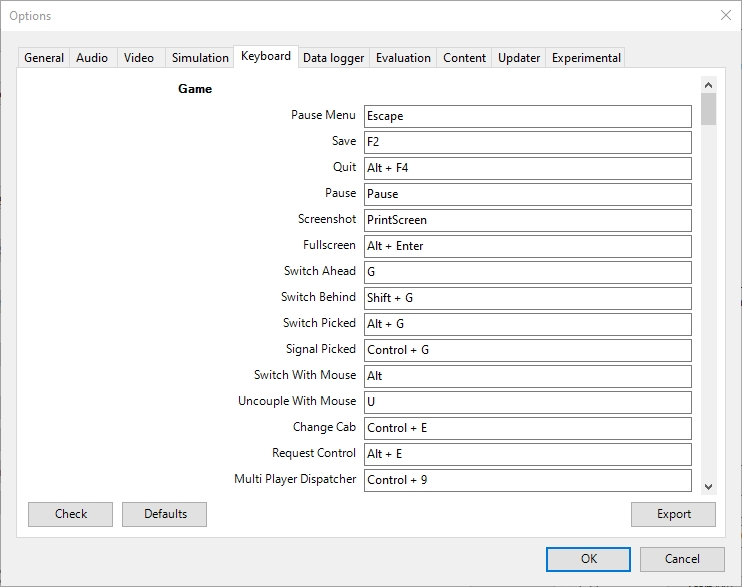
In this panel you will find listed the keyboard keys that are associated with all ORTS commands.
You can modify them by clicking on a field and pressing the new desired key. Three symbols will appear at the right of the field: with the first one you validate the change, with the second one you cancel it, with the third one you return to the default value.
By clicking on Check ORTS verifies that the changes made are compatible, that is, that there is no key that is used for more than one command.
By clicking on Defaults all changes that were made are reset, and the default values are reloaded.
By clicking on Export a printable text file Open Rails
Keyboard.txt is generated on the desktop, showing all links between
commands and keys.
6.6. RailDriver Options
Open Rails has built-in support for the RailDriver controller from P.I.Engineering so you do not need any extra software for the RailDriver to work with Open Rails.
If your RailDriver is connected, you should see a RailDriver tab in the options menu:
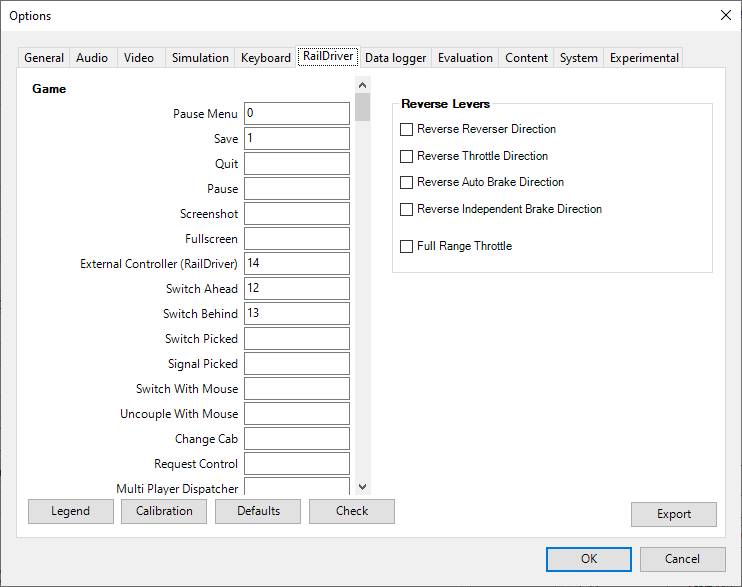
Use this tab to calibrate the 6 analog controls and assign operations to the 44 switches on your RailDriver device.
6.6.1. Calibrating RailDriver Levers
RailDriver uses analog inputs that appear to vary from unit to unit. In theory the range of each lever is 0-255 but, in practice, the actual range can be much narrower. For this reason Open Rails uses a calibration routine to adjust to the actual range of each lever.
You will need to calibrate the RailDriver, even if you’ve previously calibrated your RailDriver in other software. However, you will only need to perform a full calibration once as Open Rails will use that calibration from then on.
Click the Callibration button and follow the prompts:

Note the image on screen will also visually guide you to the control being calibrated as in this example:

You will be prompted in sequence to calibrate all 6 of the RailDriver analog controls:
Reverser
Throttle
Automatic Brake
Independent Brake
Light/wiper switches
If you make a mistake during calibration, simply restart the process again.
6.6.2. Assigning RailDriver Switches
You can modify the assignments by clicking on a field (e.g. “Pause”) and pressing the RailDriver button you want for that operation. Three symbols will appear at the right of the field: use them to validate the change, cancel it or restore the default value.

6.6.3. Other controls on this tab
Click on Check to verify that the changes made are compatible; that is, that no button is used for more than one command.
Click on Defaults to reset all the assignments.
Click on Export to generate a report file Open Rails
RailDriver.txt on the desktop, listing all links between
commands and switches.
6.6.4. Using your RailDriver from within Open Rails
To engage the RailDriver, use the Open Rails function named “Game External Controller (Raildriver)”. By default this is assigned to the backtick key (` )
You can look up this function’s keybinding in-game by using the F1 help screen.
6.7. Data Logger Options
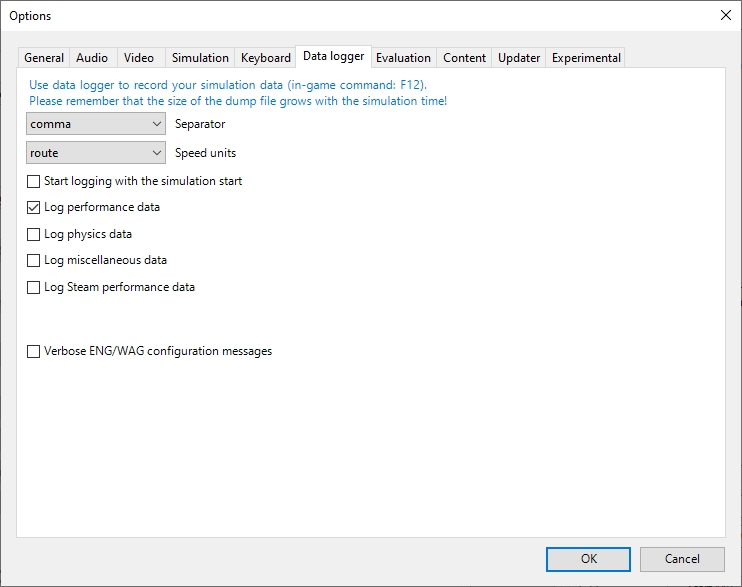
By selecting the option Start logging with the simulation start or by
pressing <F12> a file with the name dump.csv is generated in the
configured Open Rails logging folder (placed on the Desktop by default).
This file can be used for later analysis.
A Logging interval of 0 (zero) dumps data for each frame (i.e. logs at the frame rate). This is intended for analyzing system and graphics performance. Larger intervals are better for looking at train performance.
6.8. System Options
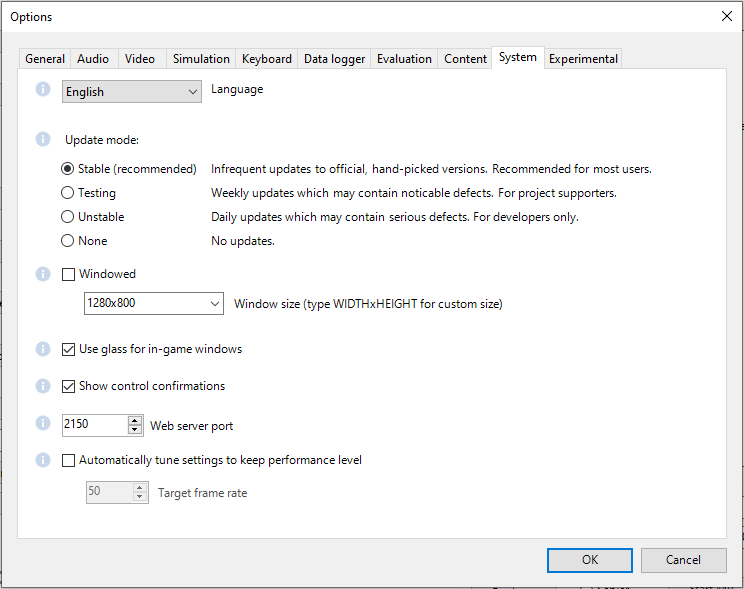
6.8.1. Language
ORTS is an internationalized package. It supports many languages, and others
can be added by following the instructions contained in the Localization
Manual which can be found in the Open Rails Documentation
folder.
When System is selected, ORTS automatically selects the language of the hosting OS, if that language is available.
6.8.2. Update mode
These options set which channel is active to update the ORTS version. More details are given here.
6.8.3. Windowed
If the Windowed checkbox is checked, Open Rails will run in a window
instead of full screen.
Once the game has started, you can toggle between windowed mode and full screen by
pressing Alt+Enter.
The default setting is unchecked.
6.8.4. Window size
This pair of values defines the size of the ORTS window. There are some pre-configured pairs of values and you can also enter a specific width and height to be used.
The format is <width>x<height>, for example 1024x768.
6.8.5. Glass on in-game windows
When this option is checked, the in-game windows are shown semi-transparently.
The default setting is checked.
6.8.6. Control confirmations
Whenever you make adjustments to the train controls (e.g. open the throttle) Open Rails briefly shows a message near the bottom of the screen.
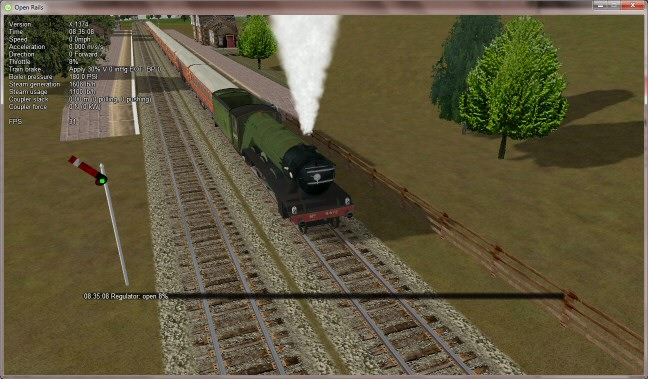
This is helpful for operations that don’t have visible feedback and also allows you to control the train without being in the cab.
Informational, Warning and Error messages are displayed here also.
The default setting of this option is to show all messages. Dropdown list gives the following choices:
None: no messages suppressed (default)
Information: informational messages and control confirmations suppressed
Warning: warning messages and the ones mentioned above suppressed
Error: error messages and the ones mentioned above suppressed
OR uses the same message scheme for system messages such as “Game saved” or “Replay ended” but you cannot suppress these system messages.
Once the game has started, you can cycle through the above settings
by pressing Ctrl+Alt+F10.
6.8.7. Web server port
The web server can be accessed from a browser on the local machine at
http://localhost:<port>, where <port> is the specified port number.
Change the default value of 2150 if it conflicts with other services.
If you open
the web server port (just granting RunActivity.exe an exemption is not
sufficient) in Windows Firewall, the server can also be accessed from a device
on the local network, such as a smartphone, tablet or another PC, using your
system’s IP address.
E.g.: If your Open Rails PC is at IP address 192.168.0.99, browse to
http://192.168.0.99:2150, where 2150 is the specified port number.
Sample web pages are included in the Open Rails installation and the browser will show a menu of sample pages.
As well as a web browser, data from the web server can also be fetched by any program which can make a web request, such as C# or Python, using the Application Programming Interface (API).
6.8.8. Automatically tune settings to keep performance level
When this option is selected ORTS attempts to maintain the selected Target frame rate FPS ( Frames per second). To do this it decreases or increases the viewing distance of the standard terrain. If the option is selected, also select the desired FPS in the Target frame rate field.
The default setting is unchecked.
6.9. Experimental Options
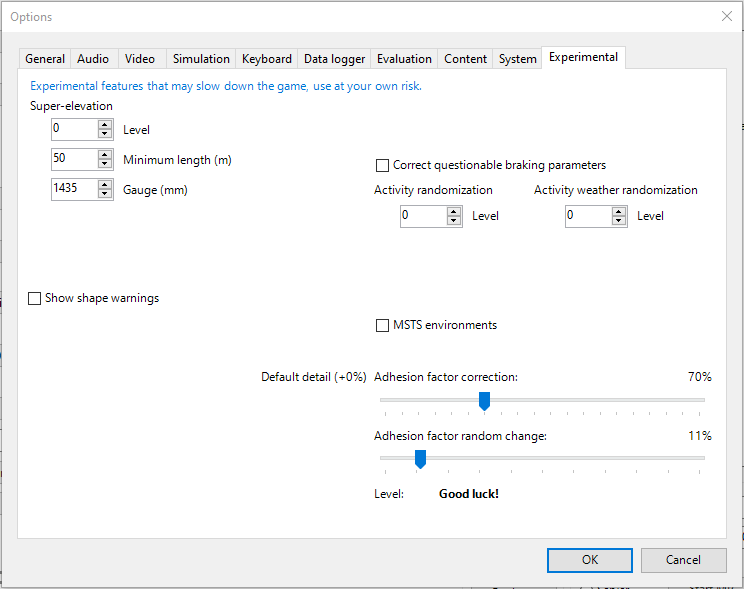
Some experimental features being introduced in Open Rails may be turned on and off through the Experimental tab of the Options window, as described below.
6.9.1. Superelevation
ORTS implements graphical superelevation (tilting) of tracks using Dynamic Tracks.
For superelevation to appear, the route must have one (or more) <route folder>/TrackProfiles/
TrProfile.stf files. A document describing the creation of track profiles, How to
Provide Track Profiles for Open Rails Dynamic Track.pdf, can be found in the
Menu > Documents drop-down or the Open Rails /Source/Documentation/ folder. Forum
discussions about track profiles can also be found on Elvas Tower.
However, superelevation will also appear if the route has a superelevation standard
ORTSSuperElevation defined within the route’s .trk file
regardless of the use of track profiles. It is recommended to combine both track profiles
and ``ORTSSuperElevation`` for best results, as dynamic track (ie: superelevation) is rendered
as Kuju track without any track profiles installed, which may not appear correct.
Note
This behavior can be overwritten if ORTSForceSuperElevation ( 0/1 ) is present in the .trk file.
A setting of 0 will always disable superelevation graphics, while 1 always enables it, regardless
of the criteria described here.
To support routes without Track Profiles and without ORTSSuperElevation, the
“Legacy Superelevation” option can be enabled. This will activate superelevation visuals
on routes regardless of missing data, which may be appropriate for original MSTS routes but
will not be aesthetically pleasing for routes using more modern track shapes. Experimentation
may be required to determine the correct setting, and editing of routes (to add data to the
.trk file and/or to add track profiles) will be required for best results.
Note
The configuration described here only affects the visual depiction of superelevation. Superelevation is still considered by train physics regardless of the state of the visual system.
When visual superelevation is enabled (either through correct configuration of a route, or enabled with the “Legacy Superelevation” option), two viewing effects occur at runtime:
If an external camera view is selected, the tracks and the running train will be shown inclined towards the inside of the curve.
When the cab view is selected, the external world will be shown as inclined towards the outside of the curve.
Note that superelevation usually won’t be this distinct. The amount of superelevation depends on the track speed limit and curve radius, where higher speeds and tighter curves lead to more intense superelevation.
Additionally, the superelevation physics system requires knoweldge of the gauge of track used on
the route. Normally, this should be defined with TrackGauge
in the .trk file, but many routes have the gauge value
set to 0, which is not useful. In such a case, the program must use the gauge (in millimeters)
specified by the “Default Gauge” option. Note this assumes the entire route has the same gauge of track.
Multi-gauge routes are not fully supported at the moment.
6.9.2. Show shape warnings
When this option is selected, ORTS will:
when loading the shape (.s) files, report errors in syntax and structure (even if these don’t cause runtime errors) in the Log file
OpenRailsLog.txton the desktop;use high-visible magenta for missing textures (instead of grey).
6.9.3. Correct questionable braking parameters
When this option is selected, Open Rails corrects some braking parameters if they are out of a reasonable range or if they are incoherent. This is due to the fact that many existing .eng files have such issues, that are not a problem for MSTS, which has a much simpler braking model, but that are a problem for OR, which has a more sophisticated braking model. The problem usually is that the train brakes require a long time to release, and in some times do not release at all.
The following checks and corrections are performed if the option is checked:
if the compressor restart pressure is smaller or very near to the max system pressure, the compressor restart pressure and if necessary the max main reservoir pressure are increased (single pipe air brakes only)
if the main reservoir volume is smaller than 0.3 m3 and the engine mass is higher than 20 tons, the reservoir volume is raised to 0.78 m3
the maximum brake cylinder pressure will be reduced to the maximum pressure possible from a full service train brake application if it was set above this amount
any brake pipe leakage specified by
TrainPipeLeakRateis limited to 2.5 psi/minutethe dynamic brake delay on electric locomotives is reduced to 2 seconds if it was defined to be above 4 seconds
dynamic brake force left at the default value of 20kN will be increased to half the locomotive’s continuous force, or 150kN, whichever is lower
For a full list of parameters, see Developing ORTS Content - Parameters and Tokens
6.9.4. Activity randomization
The related Level box may be set to integer values from zero to three.
When a level of zero is selected, no randomization is inserted.
When a level greater than zero is selected, some activity parameters are randomly
changed, therefore causing different behaviors of the activity at every run.
Level 1 generates a moderate randomization, level 2 a significant randomization
and level 3 a high randomization, that may be unrealistic in some cases.
This feature is described in greater detail here.
6.9.5. Activity weather randomization
The Level box works as the one for activity randomization, and has the
same range. When a level greater than zero is selected, the initial weather is
randomized, and moreover it changes during activity execution.
The randomization is not performed if at activity start the train is within a
lat/lon rectangle corresponding to the arid zone of North America (lat from
105 to 120 degrees west and lon from 30 to 45 degrees north).
The randomization is not performed either if the activity contains weather
change events.
6.9.6. MSTS Environments
By default ORTS uses its own environment files and algorithms, e.g. for night sky and for clouds.
With this option selected, ORTS applies the MSTS environment files. This includes support of Kosmos environments, even if the final effect may be different from the current MSTS one.
6.9.7. Adhesion proportional to rain/snow/fog
Adhesion is dependent on the intensity of rain and snow and the density of fog. Intensities and density can be modified at runtime by the player.
6.9.8. Adhesion factor correction
The adhesion is multiplied by this percentage factor. Therefore lower values of the slider reduce adhesion and cause more frequent wheel slips and therefore a more difficult, but more challenging driving experience.
6.9.9. Adhesion factor random change
This factor randomizes the adhesion factor corrector by the entered percentage. The higher the value, the higher the adhesion variations.