16. OR-Specific Route Features
As a general rule and as already stated, Open Rails provides all route functionalities that were already available for MSTS, plus some opportunities such as also accepting textures in .dds format.
16.1. Modifications to .trk Files
Many of the features described in this chapter require additional parameters to be
added in the route’s .trk file. The additional parameters can be directly added at
the end (just above the last parenthesis) of
the route’s .trk file residing in the route’s root folder. Don’t add such parameters
in other positions of the file, because this would create problems if you want to use
the MSTS editors with the related route. However, to avoid
modifying the original file, the Include method described
here is also applicable to the .trk file, creating a
new .trk file inserted into an OpenRails folder in the root folder of the route.
As an example, in case of the parameter needed to avoid forest trees on tracks ( see
here), this additional .trk file will contain:
include ( ../Surfliner2.trk )
    ORTSUserPreferenceForestClearDistance ( 2 )
Only OR will look in the Openrails folder.
For a full list of parameters, see Developing OR Content - Parameters and Tokens
16.2. Repetition of Snow Terrain Textures
OR provides a simple way to add snow terrain textures: the following default
snow texture names are recognized: ORTSDefaultSnow.ace and
ORTSDefaultDMSnow.ace, to be positioned within folder TERRTEX\SNOW of
the concerned route. For the snow textures that are missing in the SNOW
subfolder, and only for them, ORTS uses such files to display snow, if they
are present.
To have a minimum working snow texture set, the file microtex.ace must
also be present in the SNOW subfolder.
16.3. Snow Textures with Night Textures
MSTS did not allow snow textures to be used with night textures.
This meant having dark buildings when running an activity at night
when the weather is set to snow. It turns out that OR is able to run
with snow textures and night textures. To do this, you have to create
the Night\ folder in the Textures\Snow\ directory and copy the needed textures
into the Night\ folder. Doing this will allow night textures to be visible when operating
in snow at night. Keep in mind that the current night textures such as buildings do not
include snow so new textures will have to be created.
One warning, if you decide to do this, there is a possiblility of experiencing resource issues.
16.4. Operating Turntables and Transfertables
A cool feature available in OR is the one of operating turntables and transfertables. In MSTS they are static, and can’t rotate and transfer trainsets. Turntables and transfertables are managed in a similar way by OR, and share also a significant portion of code. Therefore here reference to turntables will be made, and then only the differences for transfertables will be described.
Caution
Turntables and transfertables can’t be directly connected to a leading switch. A track section of at least 1 meter must be laid in between.
16.4.1. Turntables
The best way to get a turntable to be operational is to refer to an example.
So here are the instructions and the files to test this function, both for route
Catania-Messina (SICILIA 1) and for other routes using a1t27mturntable.s.
Route Catania-Messina can be downloaded from
here .
A .ws file within the World subdirectory must be replaced with file
w-005631+014158.zip
available in the Open Rails pack in the Documentation\SampleFiles\Manual subfolder.
(this has nothing to do with turntables, it’s a file that contains incoherent data that
can cause a crash).
Pls. note that also the other sample files cited in this paragraph are available in such subfolder.
Two test paths, included in file Turntable_PATHS.zip, one for each turntable in the route, which can be used either
in explore mode or within activities are available in the Open Rails pack.
Within the route’s folder an OpenRails subfolder must be created, that must contain
2 files. The first one is following file turntables.dat, which contains the data needed
to OR to locate and specify the turntable.
turntables.dat:
2
Turntable(
WFile ( "w-005625+014198.w" )
UiD ( 1280 )
XOffset ( 0 )
ZOffset ( 13.4 )
TrackShapeIndex ( 253 )
Animation ( "TRACKPIECE" )
Diameter ( 27 )
)
Turntable(
WFile ( "w-005631+014158.w" )
UiD ( 638 )
XOffset ( 0 )
ZOffset ( 13.4 )
TrackShapeIndex ( 253 )
Animation ( "TRACKPIECE" )
Diameter ( 27 )
)
To generate this file for other routes following has to be taken into account:
the first line must be blank
the number in the second line (2 in the above file) is the number of operating turntables within the route
WFile is the name of the .w file where the turntable is present
The number in the UiD line is the UiD number of the TrackObj () block within the .w file related to the turntable
XOffset, YOffset and ZOffset are the offsets of the center of rotation of the turntable with respect to the zero of the turntable shape
TrackShapeIndex is the index of the TrackShape () block within tsection.dat that refers to the turntable; please note that if a new TrackShape () block for the turntable is needed, it is not necessary to modify tsection.dat; it is possible to proceed as described here
The Animation parameter is the name of the Matrix of the rotating part within the .s file
the Diameter value is the diameter of the turntable in meters.
The above file refers to turntables using the a1t27mturntable.s shape.
The second file to be inserted within the route’s Openrails subfolder is a small
integration .trk file that indicates the name of the .sms sound file to be associated to the turntable. For
the route SICILIA 1 such file is therefore named SICILIA 1.trk, like its parent file.
Here is the file content.
SICILIA 1.trk:
include ( "../Sicilia 1.trk" )
                      ORTSDefaultTurntableSMS ( turntable.sms )
The first line must be empty.
File a1t27mturntable.s must be modified to add the animation data, as MSTS has provided
it as a static file. To do this, uncompress it with Route Riter or Shapefilemanager and insert just above
the last parenthesis the contents of file a1t27mturntable_animations.zip.
If other .s files have to be used for turntables, or new ones have to be developed, it must be considered that
the rotation animation should be as follows:
animation ( 3599 30
        anim_nodes ( ..
                ..
                ..
                ..
                anim_node TRACKPIECE (
                        controllers ( ..
                                tcb_rot ( 5
                                        tcb_key ( 0 0 0 0 1 0 0 0 0 0 )
                                        tcb_key ( 900 0 0.7071068 0 0.7071067 0 0 0 0 0 )
                                        tcb_key ( 1800 0 1 0 0.0 0 0 0 0 0 )
                                        tcb_key ( 2700 0 -0.7071068 0 0.7071067 0 0 0 0 0 )
                                        tcb_key ( 3600 0 0 0 -1 0 0 0 0 0 )
                                )
or as follows:
animation ( 3599 30
        anim_nodes ( ..
                ..
                ..
                ..
anim_node WHEEL1 (
    controllers ( 1
       tcb_rot ( 5
          slerp_rot ( 0 0 0 0 1 )
          slerp_rot ( 900 0 0.7071068 0 0.7071067 )
          slerp_rot ( 1800 0 1 0 -1.629207E-07 )
          slerp_rot ( 2700 0 -0.7071066 0 0.7071069 )
          slerp_rot ( 3600 0 0 0 1 )
        )
     )
 )
The above names of the anim_nodes are of course free choice. The animation rotation direction as defined above must be counterclockwise.
Within the base Sound folder (not the one of the route) the .sms file
turntablesSOUND.zip has to be added to provide sound when the turntable rotates. It uses the two default
MSTS .wav files for the sound. They have a bit a low volume. It is open to everyone to improve such files.
Discrete trigger 1 is triggered when the turntable starts turning empty, discrete trigger 2 is triggered when
the turntable starts turning with train on board, and discrete trigger 3 is triggered when rotation stops.
To help generating the tsection.dat entries for new turntable types a rough .xls
spreadsheet (turntable_sectionidxs.xls) can be found in Documentation\SampleFiles\Manual.
It computes the X, Z and degree parameters to be inserted in the SectionIdx lines of the
TrackShape block within the tsection.dat file. You only have to insert the diameter of
the turntable and the degree step. Of course you have to take only the lines up to the
one preceding the one with degrees = 180.
Also turntables which may rotate less than 360 degrees can be implemented, like the one in the picture here below:
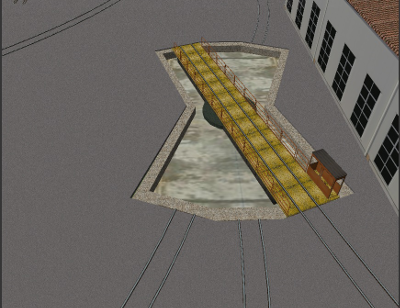
In this case following line has to be added at the end of the Turntable() block
in file turntables.dat for a turntable that can rotate only between 0 and 40 degrees:
MaxAngle ( 40 )
Angles increase clockwise.
Already many existing turntables have been successfully animated and many new other have been created. More can be read in this forum thread .
16.4.2. Transfertables
Info for transfertables is stored in file turntables.dat too. This file may contain
info for transfertables and turntables together. Here is an example of such file for
a turntable and a transfertable:
2
Turntable(
WFile ( "w-005625+014198.w" )
UiD ( 1280 )
XOffset ( 0 )
ZOffset ( 13.4 )
TrackShapeIndex ( 253 )
Animation ( "TRACKPIECE" )
Diameter ( 27 )
)
Transfertable(
WFile ( "w-005578+014976.w" )
UiD ( 72 )
XOffset ( 0 )
ZOffset ( 15.0)
TrackShapeIndex ( 37300 )
Animation ( "TRACKPIECE" )
Length ( 29.4 )
)
Parameters have the same meaning as for turntables. “Length” is the length of the transfer bridge (therefore the length of the track above it or a bit less, depending from the dimensions of the basin of the transfertable).
The integration .trk file format described in preceding paragraph can be used also for transfertables, using the same sound.
In the standard tsection.dat there are no usable transfertables defined. Therefore
at least a new TrackShape block has to be created. Also in this case it is suggested
to define the additional block in the route’s specific tsection.dat.
Here below is an example for a route’s specific tsection.dat containing a
TrackShape for a transfertable:
include ( "../../../Global/tsection.dat" )
_INFO ( Track section and shape addition for transfer table derived from turntable 27m )
TrackSections ( 40000
_SKIP ( No change here )
)
TrackShapes ( 40000
_INFO(TrackShape for for 30 m transfer table derived from turntable 27m)
TrackShape ( 37300
FileName (  A1t30mTransfertable.s )
NumPaths ( 9 )
SectionIdx ( 1 0 -0.18 -1.1 0 339 )
SectionIdx ( 1 4.985 -0.18 -1.1 0 339 )
SectionIdx ( 1 9.97 -0.18 -1.1 0 339 )
SectionIdx ( 1 14.955 -0.18 -1.1 0 339 )
SectionIdx ( 1 19.94 -0.18 -1.1 0 339 )
SectionIdx ( 1 24.925 -0.18 -1.1 0 339 )
SectionIdx ( 1 29.91 -0.18 -1.1 0 339 )
SectionIdx ( 1 34.895 -0.18 -1.1 0 339 )
SectionIdx ( 1 39.88 -0.18 -1.1 0 339 )
)
)
The first line must be empty.
The animation block for the above transfertable is as follows:
animations ( 1
        animation ( 3600 30
                anim_nodes ( 2
                        anim_node BASIN (
                                controllers ( 0 )
                        )
                        anim_node TRACKPIECE (
                                controllers ( 1
                                        linear_pos ( 2
      linear_key (      0       0       -1.92177        0        )
      linear_key (      3600    39.88   -1.92177        0        )
                                )
                                )
                        )
                )
        )
)
3600 is not a mandatory value, however to have a reasonable transfer speed a number of animation keys equal to 60 - 90 every meter should be selected.
16.4.3. Locomotive and wagon elevators
The elevator is managed by ORTS as a vertically moving transfertable. So files needed are the same as used for a transfertable, with content modified where needed.
Info to identify an elevator in a route is stored in file turntables.dat, as it is for turntables and transfertables. The same file can store info for moving tables of different types. Here a turntables.dat file that contains info for an elevator:
1
Transfertable(
WFile ( "w-005578+014976.w" )
UiD ( 75 )
XOffset ( 0 )
YOffset ( -0.18 )
ZOffset ( 13.405)
VerticalTransfer ( 1 )
TrackShapeIndex ( 37301 )
Animation ( "TRACKPIECE" )
Length ( 26.81 )
)
What identifies this as an elevator is the presence of the VerticalTransfer parameter with value 1. The other difference to a transfertable is the presence of the YOffset parameter, which is the vertical offset of the zero position of the elevator with respect to the shape file zero.
An example of the animation block in the elevator shape file is shown here below:
animations ( 1
        animation ( 1800 30
                anim_nodes ( 2
                        anim_node BASIN (
                                controllers ( 0 )
                        )
                        anim_node TRACKPIECE (
                                controllers ( 1
                                        linear_pos ( 2
      linear_key (      0       0       -1.92177        0        )
      linear_key (      1800    0       6.07823 0        )
                                        )
                                )
                        )
                )
        )
)
wich generates a vertical movement with a span of 8 meters which is covered in 60 seconds. Of course the 1800 value may be modified to get the desired motion speed.
The elevator must also be defined as a TrackShape in tsection.dat. It is suggested
to define it in a route specific tsection.dat extension file, which, for the
sample elevator, is as follows:
include ( "../../../Global/tsection.dat" )
_INFO ( Track section and shape addition for transfer table derived from turntable 27m )

TrackSections ( 40000

_SKIP ( No change here )

)


TrackShapes ( 40000

_INFO(TrackShape for for vertical transfer table derived from turntable 27m)

TrackShape ( 37301
 FileName ( A1t27mVerticalTransfertable.s )
  NumPaths ( 2 )
  SectionIdx ( 1 0 -0.18 0.0000 0 338 )
  SectionIdx ( 1 0 7.82 0.0000 0 338 )
 )
)
To insert the elevator in a route using TSRE5 it must be reminded that the latter doesn’t look at the tsection.dat file within the Openrails subfolder. So, for the sole time of the editing of the route, the TrackShape() block must be inserted in the global tsection.dat. After route editing is terminated, the block may be removed. Tsection.dat build 38 or higher is required within the main Global folder.
At runtime the elevator is moved with the keys used for transfertables and turntables. Alt-C moves the elevator upwards, while Ctrl-C moves the elevator downwards.
16.4.4. Path laying and operation considerations
By building up a path that enters the turntable or transfertable, exits it from the opposite side and has a reversal point few meters after the end of the turntable or transfertable, it is possible to use the turntable or transfertable in activity mode. The player will drive the consist into the turntable or transfertable and stop it. At that point the reversal point will have effect and will logically lay the consist in the return subpath. The player will put the consist in manual mode, rotate the turntable (in case he is using a turntable) by 180 degrees and return to auto mode. At this point the consist will be again on the activity path.
If instead the player wants the consist to exit to other tracks, he must drive the consist in manual mode out of the turntable or transfertable. If he later wants to drive back the consist into the turntable or transfertable and rotate or translate the train so that it exits the turntable or transfertable on the track where it initially entered it, he can pass back the train to auto mode after rotation, provided the path is built as defined above.
By using the feature to change player train it is possible also to move in and out any locomotive on any track of e.g. a roundhouse or use a shunter to shunt a wagon in and out of a trasfertable.
16.5. .w File modifiers
An Openrails subfolder can be created within the route’s World folder.
Within this subfolder .w file chunks can be positioned. ORTS will first read the base
.w files, and then will correct such files with the file chunks of the Openrails
subfolder.
This can be used both to modify parameters or to add OR-specific parameters.
Here an example of a w. file chunk for USA1 .w file w-011008+014318.w:
SIMISA@@@@@@@@@@JINX0w0t______

Tr_Worldfile (
              CarSpawner (
                      UiD ( 532 )
                      ORTSListName ( "List2" )
              )
              CarSpawner (
                      UiD ( 533 )
                      ORTSListName ( "List3" )
              )
              Static (
                      UiD ( 296 )
                      FileName ( hut3.s )
        )
)
With the two CarSpawner block chunks OR interprets the CarSpawners with same UiD present in the base .w file as extended ones (see here). With the Static block OR replaces the shape defined in the Static block with same UiD within the base .w file with the one defined in the file chunk. WAny Pickup, Transfer, Forest, Signal, Speedpost, LevelCrossing, Hazard, CarSpawner, Static, Gantry may have parameters modified or added by the “modifying” .w file.
Caution
If the route is edited with a route editor, UiDs could change and so the .w file chunks could be out of date and should be modified.
Caution
Entering wrong data in the .w file chunks may lead to program malfunctions.
16.6. Multiple car spawner lists
With this OR-specific feature it is possible to associate any car spawner to one of additional car lists, therefore allowing e.g. to have different vehicles appearing in a highway and in a small country road.
The additional car lists have to be defined within a file named carspawn.dat to be inserted in an Openrails subfolder within the Route’s root folder.
Such file must have the structure as in following example:
SIMISA@@@@@@@@@@JINX0v1t______

3
CarSpawnerList(
ListName ( "List1" )
2
CarSpawnerItem( "car1.s" 4 )
CarSpawnerItem( "postbus.s" 4 )
)
CarSpawnerList(
ListName ( "List2" )
3
CarSpawnerItem( "policePHIL.S" 6 )
CarSpawnerItem( "truck1.s" 13 )
CarSpawnerItem( "postbus.s" 6 )
)
CarSpawnerList(
ListName ( "List3" )
2
CarSpawnerItem( "US2Pickup.s" 6 )
CarSpawnerItem( "postbus.s" 13 )
)
The first 3 defines the number of the additional car spawner lists.
To associate a CarSpawner block to one of these lists, a line like this one:
ORTSListName ( "List2" )
has to be inserted in the CarSpawn block, in any position after the UiD line.
If the CarSpawner block does not contain such additional line, it will be associated with the base carspawn.dat file present in the route’s root directory.
Caution
If the route is edited with the MSTS route editor modifying the .w files referring to the additional car spawners, the above line will be deleted.
To avoid this problem, two other possibilities are available to insert the additional line. One is described here. The other one is to use the OR specific TSRE route editor, that natively manages this feature. Also in the latter case, however, if the route is later edited with the MSTS route editor, the above line will be deleted.
16.7. Car spawners used for walking people
The OR specific TSRE route editor is able to generate car spawner paths also outside roads. This has many applications, one of which is to generate paths for walking people. Walking people have the peculiarity that on an inclined path they don’t incline like a vehicle does, instead they remain vertical. To enable OR to handle these car (or better person) spawners specifically, the parameter IgnoreXRotation () has to be inserted in the car spawner list, just after the number of the car spawner items.
Here is an example of a car spawner file specific for walking people to be inserted in the route’s Openrails subfolder ( see here ):
SIMISA@@@@@@@@@@JINX0v1t______

1
CarSpawnerList(
ListName ( "People1" )
3
IgnoreXRotation ()
CarSpawnerItem( "walkingperson1.s" 3 )
CarSpawnerItem( "walkingperson2.s" 1 )
CarSpawnerItem( "walkingperson3.s" 1 )
)
16.8. Route specific TrackSections and TrackShapes
It quite often occurs that for special routes also special TrackSections and TrackShapes
are needed. Being file tsection.dat unique for every installation, for such routes a
so-called mini-route installation was needed.
The present feature overcomes this problem. The route still uses the common tsection.dat,but it can add to it route-specific TrackSections and TrackShapes, and can modify common ones. This occurs by putting in an OpenRails subfolder within the route’s root
folder a route-specific chunk of tsection.dat, which includes the TrackSections and
TrackShapes to be added or modified. Here a fictitious example for route USA1 (first
line must be blank):
include ( "../../../Global/tsection.dat" )
_INFO ( Track sections and shapes specific for USA1   )
_Skip (
Further comments here
)
TrackSections ( 40000
_Skip (
Comment here
)
_SKIP ( Bernina )
  TrackSection ( 33080
          SectionSize ( 0.9 1.5825815 )
  )
  TrackSection ( 19950
          SectionSize ( 0.9 12 )
  )
)
TrackShapes ( 40000
_Skip (
Comment here
)
-INFO(Bernina Pass narrow gauge sections / wood tie texture)
_INFO(by Massimo Calvi)
_INFO(straight sections)
  TrackShape ( 30000
          FileName ( track1_6m_wt.s )
          NumPaths ( 1 )
          SectionIdx ( 1 0 0 0 0 33080 )
  )
  TrackShape ( 19858
          FileName ( track12m_wt.s )
          NumPaths ( 1 )
          SectionIdx ( 1 0 0 0 0 19950 )
  )
)
In this fictitious example the first TrackSection and TrackShape is present also in the Global tsection.dat, so the effect is that the original TrackSection and TrackShape are modified; the second ones are not present, and so they are added to the lists.
Note
To be able to use these modified items with the actual MSTS RE and AE it is necessary that these modified items are present also in the original tsection.dat file. However, when the work with the RE is terminated and route is distributed, it is sufficient to distribute the above route’s specific tsection.dat.
16.9. Overhead wire extensions
16.9.1. Double wire
OR provides an experimental function that enables the upper wire for
electrified routes. The optional parameter ortsdoublewireenabled in the .trk file of the route can
force the activation or deactivation of the option overriding the user setting in the options panel.
In this example the upper wire is enabled overriding the user setting:
OrtsDoubleWireEnabled ( On )
while in this one the upper wire is forced to be disabled:
OrtsDoubleWireEnabled ( Off )
Another parameter (ortsdoublewireheight) specifies the height of the upper wire relative to the contact wire;
if not specified the default is 1 meter.
In this example the upper wire is 130cm above the main wire (as in most Italian routes):
include ( "../tures.trk" )
  OrtsTriphaseEnabled ( Off )
  OrtsDoubleWireEnabled ( On )
  OrtsDoubleWireHeight ( 130cm )
Of course you can use any distance unit of measure supported by OR.
16.9.2. Triphase lines
The modern electric locos are powered by DC or monophase AC, but some years ago there were triphase AC powered locos. A triphase circuit needs three wires (one for each phase, no wire is needed for neutral); in rail systems two wires are overhead and the third is made by the rails.
OR can enable the second overhead wire with the parameter ortstriphaseenabled this way:
OrtsTriphaseEnabled ( On )
If the parameter is missing or its value is Off the usual single wire is displayed.
Another parameter (ortstriphasewidth) specifies the space between the two wires with a default (if the parameter
is not declared) of 1 meter.
16.10. Loading screen
In the .trk file of the route the parameter loadingscreen can be used as in this example:
LoadingScreen ( Load.ace )
A DDS extension takes precedence over ACE so, if
in the main directory of the route there is a file with the same name but with extension .dds,
the latter is displayed instead of that with .ace extension.
If the filename parameter is omitted then the file load.ace is loaded (as in MSTS) or load.dds if present.
The loading screen image can have any resolution and aspect ratio; it will be displayed letter-boxed on the screen keeping the aspect ratio.
Another optional parameter ortsloadingscreenwide, can specify the image to show when the user
loads the route on a wide (16:9) screen. This parameter is ignored when a traditional 4:3 display is used.
16.11. MSTS-Compatible semaphore indexing
When a signal shape has a semaphore (moving part), and its animation definition within the
.s file has only two lines (e.g slerp_rot lines), MSTS interprets the SemaphorePos() lines within sigcfg.dat accordingly to following rule:
- SemaphorePos (2) is executed as SemaphorePos (1)
- SemaphorePos (1) is executed as SemaphorePos (0)
- SemaphorePos (0) is executed as SemaphorePos (0).
Open Rails follows this rule, in case one of the SemaphorePos lines has 2 as parameter. It does not follow this rule in case only 1 and 0 as parameters are present, because in such a case following the above rule they would be both executed as SemaphorePos (0) and therefore the semaphore would be static.
It is however strongly recommended to always have three animation lines within the .s file, where usually the third line repeats the parameters of the first line (except for the animation step).
16.12. Automatic door open/close on AI trains
The feature is explained here.
To override the selection made in the Experimental Options Window, a command line must be inserted in a small integration .trk file, that must be located in an Openrails subfolder within the route’s folder, and must have the same name as the base folder. Here below an example of such file:
include ( "../Platformtest.trk" )
                      ORTSOpenDoorsInAITrains ( 1 )
The first line must be empty.
ORTSOpenDoorsInAITrains ( 1 ) forces door open/close for this route even if the
option within the Experimental Options Window is not checked.
ORTSOpenDoorsInAITrains ( 0 ) disables door open/close for this route even if the
option within the Experimental Options Window is checked.
16.13. Removing forest trees from tracks and roads
OR and MSTS determine differently the position of trees in forests. This may result in trees appearing on tracks or roads. To avoid trees on tracks following OR-specific parameter can be added to the .trk file of the route:
ORTSUserPreferenceForestClearDistance ( 2 )
where the parameter represents a minimum distance in metres from the track
for placement of forests.
Alternatively, the original .trk file can be left unmodified, and a new .trk file
inserted into an OpenRails folder in the root folder of the route. This is
explained here.
To avoid also forest trees on roads insert the following line which sets the Boolean value to true:
ORTSUserPreferenceRemoveForestTreesFromRoads ( 1 )
and must be added below line:
ORTSUserPreferenceForestClearDistance ( 2 )
either in the route’s root .trk file or in the “Include” .trk file.
It is not possible to remove trees only from roads and not from tracks.
16.14. Multiple level crossing sounds
This feature allows to have level crossing sounds different from the default one for a specific level crossing on a route or for a specific level crossing shape. To get a level crossing sound different from the default one for a specific level crossing sound on a route a line like following one has to be inserted in the .w file LevelCrObj block:
ORTSSoundFileName ( "differentcrossingsound.sms" )
where “differentcrossingsound.sms” must be replaced with the desired .sms file name.
Caution
If the route is edited with the MSTS route editor modifying the .w files containing such line, the above line will be deleted.
To avoid this problem, two other possibilities are available to insert the additional line. One is described here. The other one is to use the OR specific TSRE route editor, that natively manages this feature. Also in the latter case if the route is later edited with the MSTS route editor, the above line will be deleted.
To get a level crossing sound different from the default one for a specific level crossing shape a line like following one must be inserted in the .sd file of the crossing shape:
ESD_ORTSSoundFileName ( "differentcrossingsound.sms" )
If both lines are present, the first overrides the second. For the first case it is suggested to place the sound file in the sound folder of the route, although it will also be searched in the general Train Simulator Sound folder. For the second case there is no suggestion. The file will again be searched in both folders.
16.15. Defining Curve Superelevation
This feature allows curves within the route to be assigned a value for superelevation. It
is inserted either in the route’s root .trk file or in the “Include” .trk file. Before
starting, the predominant gauge of track on the route should be given using the legacy
TrackGauge token. The default units used are meters, though other units are supported
as in other parts of the program. If TrackGauge is set to 0 (like most MSTS routes)
or not present in the .trk file, then the default gauge given in the
Superelevation Options will be used for superelevation calculations.
Defining a superelevation standard in the .trk file will control both the simulated level of
superelevation on each track section on the entire route and the amount of visual
superelevation generated by the dynamic track system. However, in some cases it may be desired
to manually influence the use of visual superelevation due to (un)desired graphical effects.
The token ORTSForceSuperElevation can be given a true/false value to force enable/disable
visual superelevation effects regardless of user settings and other ORTS behaviors. Adding
this token will have no impact on the physical simulation of superelevation, this only forces
the graphical elements to be enabled or disabled.
To define a superelevation standard, add an ORTSSuperElevation block to the route’s .trk
file and add some (or all) of the following parameters inside the ORTSSuperElevation block:
MaxFreightUnderbalance– The maximum amount (using units of length) of cant deficiency/underbalance that should be allowed for trains travelling at the freight speed limit. Larger allowed underbalance results in less extreme superelevation. (Default 100 mm for metric routes, 2 in for imperial routes.)MaxPassengerUnderbalance– The maximum amount (using units of length) of cant deficiency/underbalance that should be allowed for trains travelling at the passenger speed limit. (Default 150 mm / 3 in.) For comfort reasons, the underbalance values should be equal to or less than theORTSUnbalancedSuperElevationvalue used by the rolling stock on the route. If the superelevation required to achieve the max passenger underbalance is different from that required for freight, the curve will use whichever superelevation is larger (the actual amount of underbalance may be lower).MinimumCant– If a curve needs superelevation, the amount of superelevation will be no lower than this value (given in units of length). (Default 10 mm / 0.5 in.)MaximumCant– Sets the maximum amount of superelevation (units of length) that any curve is allowed to have, regardless of other factors. Usually curves should be designed to avoid reaching this limit, as exceeding the limit could result in excessive curve force or even trains toppling over at low speeds. (Default 180 mm / 6 in.)Precision– Determines the accuracy (in length) to which the superelevation is maintained. If the superelevation required by a curve is not a nice number, it will be rounded up to the nearest multiple ofPrecision. (Default 5 mm / 0.25 in.)MaxRunOffSlope– Sets a limit on the amount of change in superelevation per unit length along a curve (quantity is unitless). This allows for smooth transition between flat and superelevated track at low speeds. (Default 0.003.)MaxRunOffSpeed– Sets a limit on the amount of change in superelevation per second (units of speed) when travelling at the max speed for the curve. This allows for smooth transition between flat and superelevated track at high speeds. (Default 55 mm/sec / 1.5 in/sec.)MinimumSpeed– The minimum speed limit required for superelevation to be added to a curve. Useful for preventing superelevation from being generated in yards. (Default 25 kmh / 15 mph.)MaximumSpeed– The maximum speed limit allowed for superelevation to be added to a curve. This is only useful if a route needs multiple sets of superelevation settings. See section below for a description on use of multiple superelevation standards. (Default unlimited.)
Any parameters not specified will use the default values, which are suitable for most medium-speed routes.
Upon route loading, the given parameters will be used to calculate the appropriate amount of superelevation
for each curve based on the curve radius and speed limits. An example ORTSSuperElevation block which
defines the superelevation standard used by Union Pacific is given below:
ORTSSuperElevation(
            MaxFreightUnderbalance ( 1in )
            MaxPassengerUnderbalance ( 3in )
            MinimumCant ( 0.25in )
            MaximumCant ( 5in )
            Precision ( 0.25in )
            MaxRunOffSlope ( 0.0019 )
            MaxRunOffSpeed ( 1.25in/s )
            MinimumSpeed ( 15mph )
)
Note that it is also possible to create a superelevation standard which entirely disables superelevation
on the route, should the real railroad not use superelevation. This can be achieved by setting
MaximumCant ( 0 ) and leaving all other values default. Note that this disables both physics and visual
superelevation:
ORTSSuperElevation(
            MaximumCant ( 0 )
)
More than one ORTSSuperElevation block can be added to the .trk file to facilitate routes that require
different superelevation standards for different track speeds (for example, a route with both standard speed
160 kmh tracks and dedicated 300 kmh high speed tracks). If a track has a speed limit below MinimumSpeed
or above MaximumSpeed, the track will skip the superelevation standard defined and check the next standard in
the .trk file to see if the speed limit is in between the min and max of that standard. Only if the track
speed is out of bounds for every superelevation standard will no superelevation be applied at all. For
example, to have 3 different types of superelevation on one route, one from 25-60 kmh, another from 60-160 kmh,
and a third standard for 160 kph and up, the required Minimum/MaximumSpeed settings would look like this:
ORTSSuperElevation(
    ...
            MinimumSpeed ( 25km/h )
            MaximumSpeed ( 60km/h )
)
ORTSSuperElevation(
    ...
            MinimumSpeed ( 60km/h )
            MaximumSpeed ( 160km/h )
)
ORTSSuperElevation(
    ...
            MinimumSpeed ( 160km/h )
)
Note that the order of the ORTSSuperElevation blocks is important; they are read from top down
so the slowest superelevation standard should be on top of all faster superelevation standards.
Open Rails also supports a simpler way to define superelevation based on curve radius only, resulting
in the same superelevation regardless of track speed. If a railroad uses this simplified method, they
would provide a table of track curve radii and the superelevation used at that radius (usually also
including a maximum speed for the curve). This table can then be provided to OR using the
ORTSTrackSuperElevation parameter in the .trk file:
ORTSTrackSuperElevation (
    x1 y1
    x2 y2
    ........
)
Where x and y are a series of paired parameters specifying the curve radius (default meters) (x value), and the amount of superelevation (default meters) (y value). The statement will take as many paired values as desired, as long as the radius values are in increasing order. Each paired set of values must have an x and y value present. If it is desired to ‘hold’ a certain value of superelevation for a number of different radii curves, then the same y value needs to be used for succeeding values of curve radius. Where the y value changes between curve radii, then Open Rails will interpolate the y value between the two points.
Superelevation calculated using ORTSSuperElevation will generally override any values
entered in ORTSTrackSuperElevation unless the ORTSSuperElevation block did not specify
a value for MaxFreightUnderbalance or MaxPassengerUnderbalance. If neither is given,
superelevation will be replaced with the value given by ORTSTrackSuperElevation, but will
be adjusted to match the given values of minimum and maximum cant, precision, and runoff. This
way, it is possible to represent a wide variety of superelevation configurations.
16.16. Overhead (catenary) wire
Open Rails uses texture overheadwire.ace to display the overhead wire. Such
texture must be present in the route’s TEXTURES folder. If the texture is not found
there, Open Rails looks for it in the GLOBAL\TEXTURES folder. If the texture isn’t
there either, Open Rails selects texture GLOBAL\TEXTURES\diselsmoke.ace. It is however
strongly suggested to use a specific texture to display the overhead wire. A possible
texture to be used can be downloaded here Documentation\SampleFiles\Manual\overheadwire.zip.
16.17. Fading signal lamps
In Open Rails, signal lamps fade on and off for a visually pleasing transition
effect. The fade time defaults to one-fifth of a second. It can be customized in
the SignalType block of the sigcfg.dat file using the ORTSOnOffTimeS
property:
SignalTypes( ...
    SignalType ( "AM14Light"
        ...
        ORTSOnOffTimeS ( 0.2 )
    )
)
The value is the fade time in seconds. Use 0 to disable the effect
completely.
16.18. Animated clocks

Animated clocks that show the simulation time can be added or retro-fitted to a route. The clocks can have a second-hand that ticks each second, or one that moves smoothly or none at all. Typically clocks could be station clocks, church tower clocks or clocks at other public buildings. They are placed as normal static shapes in a route, similar to other shapes such as houses or trees.
Note: Loco cabs already have provision for both analogue and digital clocks.
16.18.1. Overview
You will need:
Shape and Texture Files
A shape file which defines each shape of clock, its hands and their animation and the texture files used by the shape.
Reference File
For each shape of clock in the route, a reference to the shape file in the reference file.
World File
The location of each clock in the world must be given in the world file.
16.18.2. Details
Shape and Texture Files
Create a clock just like any other shape. The hands of the clock must be sub-objects within the shape. They must have specific names and an animation.
Open Rails looks for the following names of clock hands in the shape file and animates them according to the simulation time.
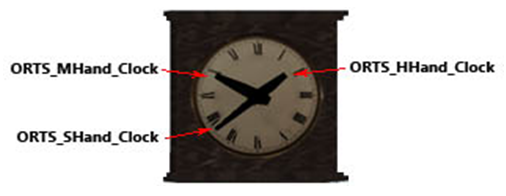
The names for the clock hands must start with:
“ORTS_HHand_Clock” for the hour hand
“ORTS_MHand_Clock” for the minute hand
“ORTS_SHand_Clock” for the second hand
“ORTS_CHand_Clock” for the centi-second hand
This last is used to provide a smooth movement in hundredths of a second whereas the second hand ticks forward once a second. It is suggested to use either the second hand or the centisecond hand or neither.
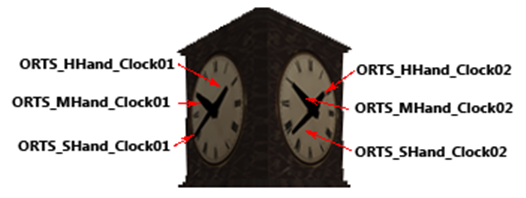
If a clock is to have several hands of the same type, simply append a number to the names of the hands, like this:
The animation requires 4 key frames at the 12, 3, 6 and 9 positions and calculates the intermediate positions using linear interpolation.
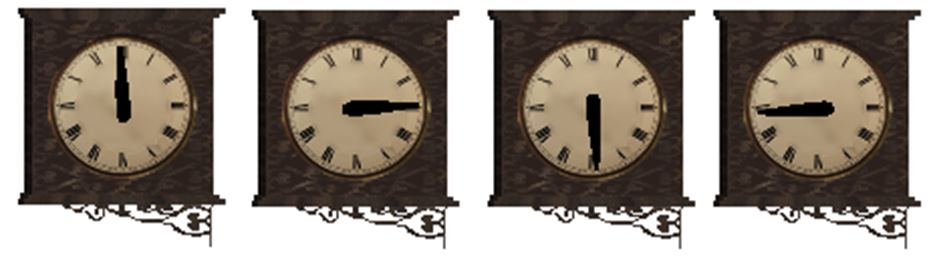
For example:
anim_node ORTS_HHand_Clock01 (
        controllers ( 1
                tcb_rot ( 5
                        slerp_rot ( 0  0     0 0 -1 )
                        slerp_rot ( 1 -0.707 0 0 -0.707 )
                        slerp_rot ( 2 -1     0 0  0 )
                        slerp_rot ( 3 -0.707 0 0  0.707 )
                        slerp_rot ( 4  0     0 0  1 )
                      )
              )
      )
Finally, move the clock shape and its textures into the corresponding folders SHAPES and TEXTURES of your route, such as ROUTES\<route_name>\SHAPES\clocks.s
Reference File
Add a reference to the shape file into the reference file ROUTES\<route_name>\<route_name>.ref Make sure that this reference begins with the “Static” keyword.:
Static (
        Filename    ( "ChurchClock.s" )
        Class       ( "Clocks" )
        Align       ( None )
        Description ( "ChurchClock" )
)
World File
Use a route editor to locate the clocks in the world file.
Note: Do not insert the shapes as animated ones. Otherwise, if MSTS is used to view the route then the hands of the clock will rotate wildly. In Open Rails they will match the simulation time anyway.